
A few years back Continuous Integration and Continuous Delivery (CI/CD) were an optional part of the software development and release management lifecycle. The toolsets were not very mature and developers preferred the more traditional way of doing things with toolsets like Make, Ant etc. The build process was automated but invocation was manual. Today CI/CD is an integral part of software development and release management lifecycle. I won’t get into the details and importance of CI/CD, a lot is said and written on this topic already and there are lots of excellent tools devoted to making your CD pipeline easy to manage like Concounse CI, Travis CI, GoCD, Spinnaker, Bamboo. However, recently I was working with a customer who still depended on Jenkins to handle both CI and CD and wanted to use it to manage a Solace Message Router. So I thought I would share my experiences in case you are in a similar situation.
What I have in this blog post is just a basic demonstration to give you an idea, but hopefully it can help show you how to get going if you find yourself in a similar environment where typical CD pipelines are not yet adopted.
I will assume that you are already familiar with Solace’s key features, value propositions and basics of CLI and Solace Element Management Protocol (SEMP). As we delve deeper into the process of configuration, I will cover the details of the features we will leverage for integrating Solace into your pipeline.
Let us begin with by stating what our end goal will be i.e. to create a high level flow of activities that will be performed to build a running demo:
- Create the script for object provisioning and check it into GitHub
- Jenkins monitors changes on GitHub and triggers a build action
- The build action script will provision the objects and configuration on the Solace VMR.
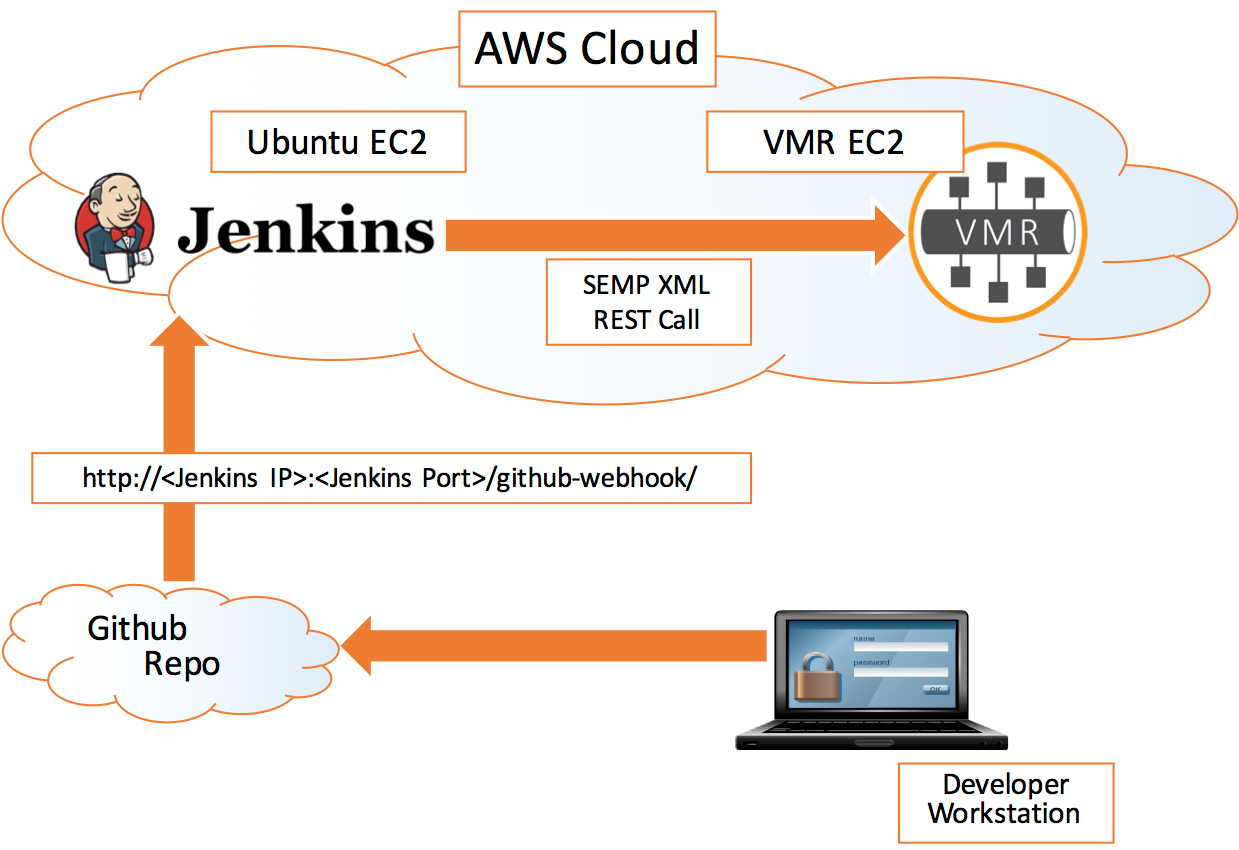
This simple example is slightly contrived for the purposes of demonstration but it shows you all the components you would need to have working to tie the system together using Jenkins.
Prerequisites
- You will need an account on GitHub. If you don’t have one, create one for yourself at https://github.com/join. Follow the instructions at https://git-scm.com/book/en/v2/Getting-Started-Installing-Git to install the Git toolset.
- You will need a Jenkins server running as well, either on your local machine or on a machine in corporate network or may be in a Cloud. I will be using Jenkins running on an EC2 Ubuntu Linux instance in AWS Cloud for this blog post.
- You will need a Solace environment, either an appliance that you can connect to or a VMR (Running locally on your machine or in the cloud on AWS). If you would like to use the Solace VMR on your local machine, you can download a trial version at https://solace.com/downloads. Please note, you will also need virtualization software such as Oracle Virtual Box or VMWare Workstation. This blog assumes the VMR is already either running on your local machine or in the cloud. You can find the details for setting up a VMR here.
- A text editor of your choice.
- If you would prefer a GUI based Solace Administration Tool (SolAdmin), this is optional, you may also download a copy of it at https://solace.com/downloads.
Github Setup
We will be using Github as a version control tool for Solace configuration scripts. Login to Github and create a new repository. Name it “Solace-CICD” and provide a description “Solace CICD pipeline”.
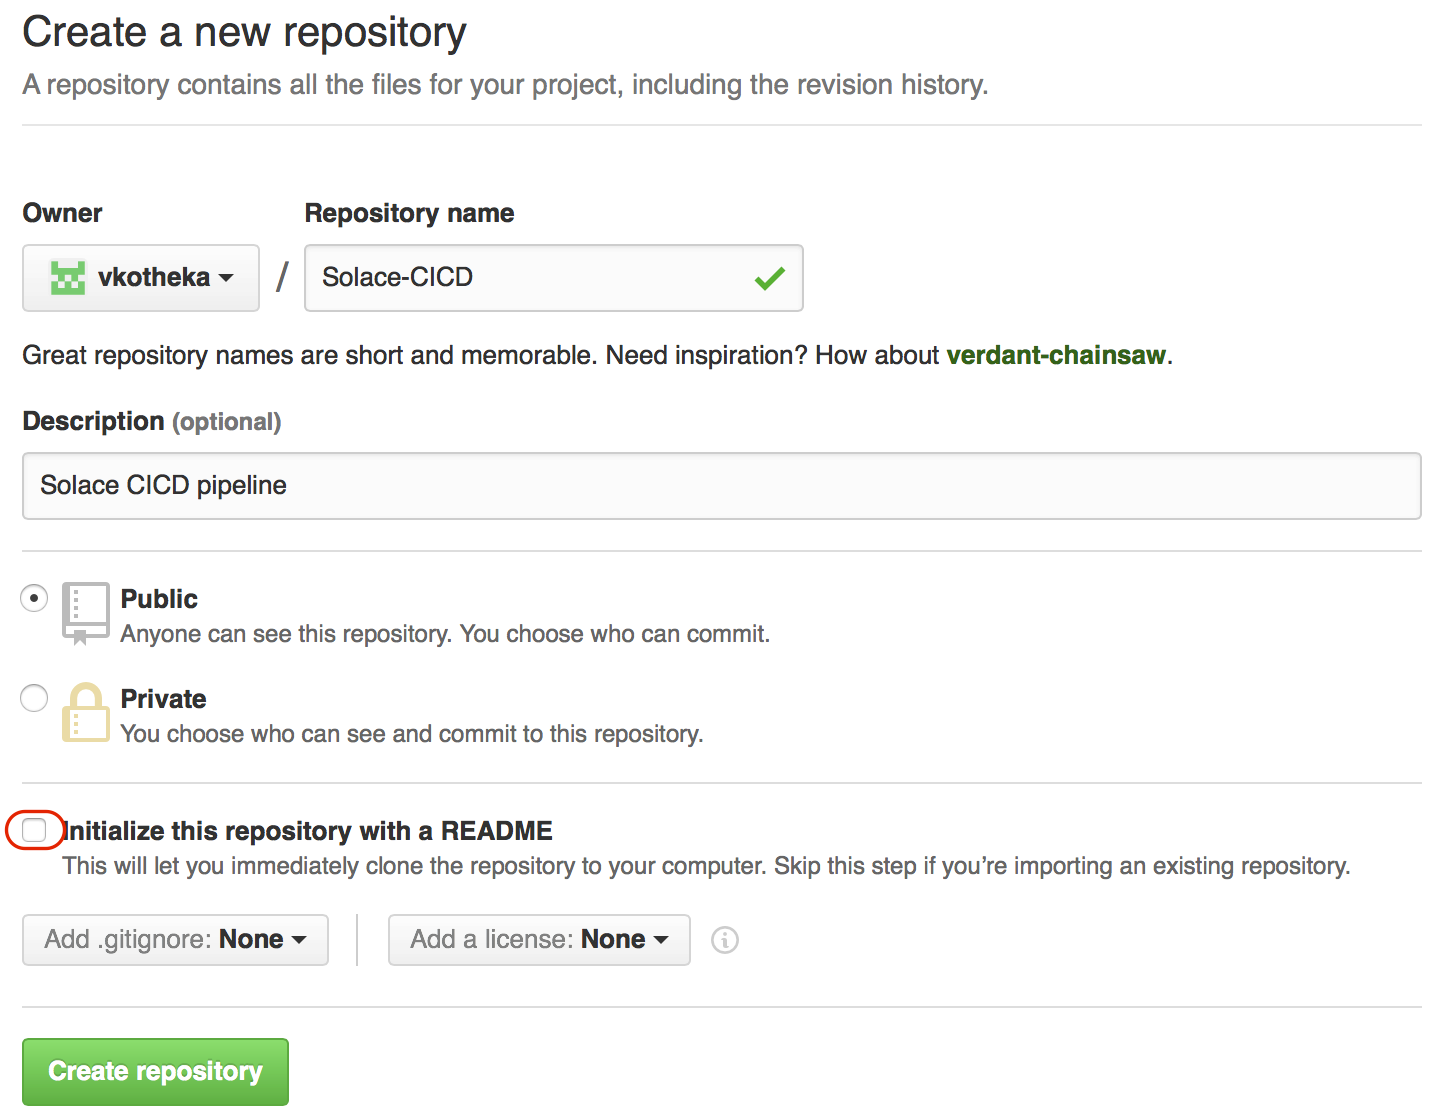
Keep the repository Public for the sake of brevity and keep “Initialize this repository with a README” checked.
Click “Create Repository” button and our repository will be ready for use.
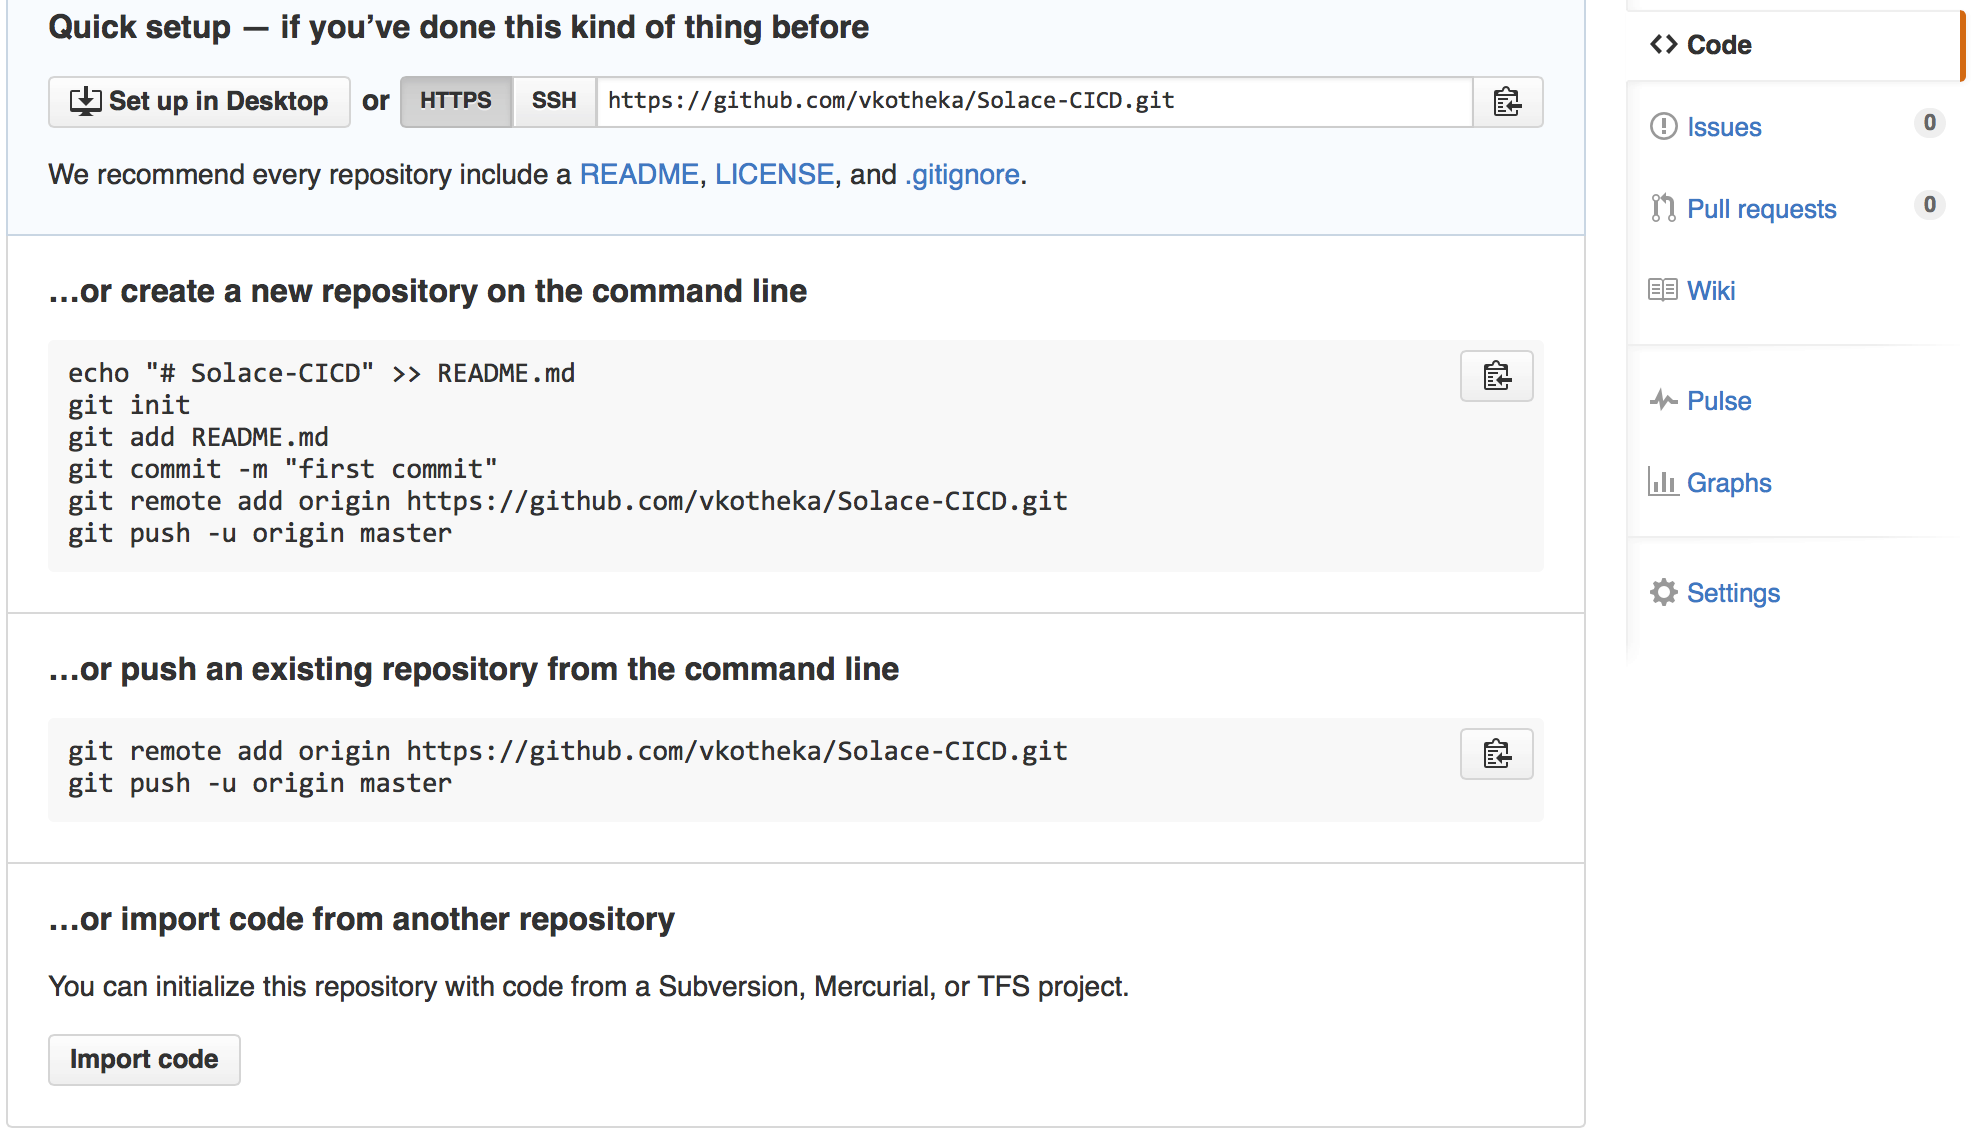
Now let’s clone (download) the contents from the Github repository to local machine.
On the shell prompt, navigate to a directory under which you would like the local copy of repository to be created.
git clone https://github.com/<your_userid>/Solace-CICD.git
Output:
Cloning into 'Solace-CICD'...
remote: Counting objects: 3,  done.
remote: Total 3 (delta 0),  reused 0 (delta 0),  pack-reused 0
Unpacking objects: 100% (3/3),  done.
Checking connectivity... done.

cd Solace-CICD
The directory should only contain the GitHub generated README.md file.
Now that you are setup with GitHub and a local repository copy, let’s go ahead with Jenkins set-up.
Jenkins Setup
Jenkins installation on Ubuntu is very simple. We will have “apt-get” doing all the work for us. Connect to an Ubuntu instance running in AWS and open a shell prompt:
Log into Ubuntu instance using your credentials
ssh <username>@<public_ip_address_of_EC2_Ubuntu_Instance>
OR using AWS pem file
ssh -i <path to your amazon issued .pem file> <username>@<public_ip_address_of_EC2_Ubuntu_Instance>
Add a new “apt” repository before starting the installation:
sudo wget -q -O - http://pkg.jenkins-ci.org/debian/jenkins-ci.org.key | sudo apt-key add -
sudo sh -c 'echo deb http://pkg.jenkins-ci.org/debian binary/ > /etc/apt/sources.list.d/jenkins.list'
sudo apt-get update
Install curl as this will be used in the build action to send SEMP XML over HTTP to Solace VMR.
sudo apt-get install curl
Install Jenkins.
sudo apt-get -y install jenkins
Once the installation is complete, Jenkins will be up and running on its default port 8080 (unless you have changed it due to a port conflict on your setup).
Now let’s open the Jenkins web console in your preferred browser using the following URL:
http://jenkins_hostname_or_ip_address <:8080_or_custom_port>
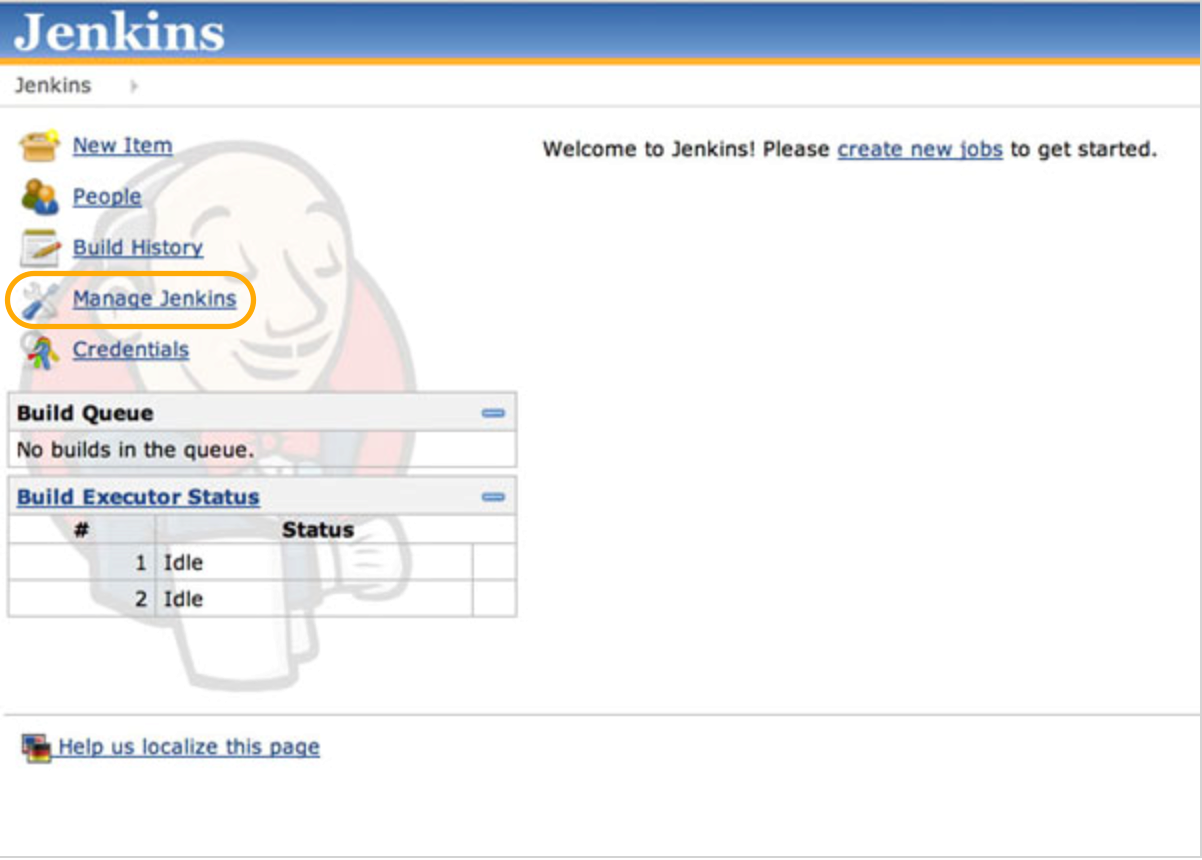
Click the Manage Jenkins link, and then the Manage Plugins link. Switch to the Available tab, and search for the “GitHub plugin”. Check the Install checkbox, and then click the Download now and install after restart button. This will start installation of the plugin into Jenkins environment. The plugin may have several dependencies and the installation process will take care of those dependencies. Once the download and installation of the GitHub plugin is complete and Jenkins is restarted, we will continue to configure Jenkins to integrate with GitHub.
To be sure Jenkins is restarted, enter the following in your ssh shell:
sudo service Jenkins restart
Let’s create a project in Jenkins. Navigate to Jenkins console home page in your browser and click on New Item.
Name the project Solace-CICD and select the project type Freestyle Project.
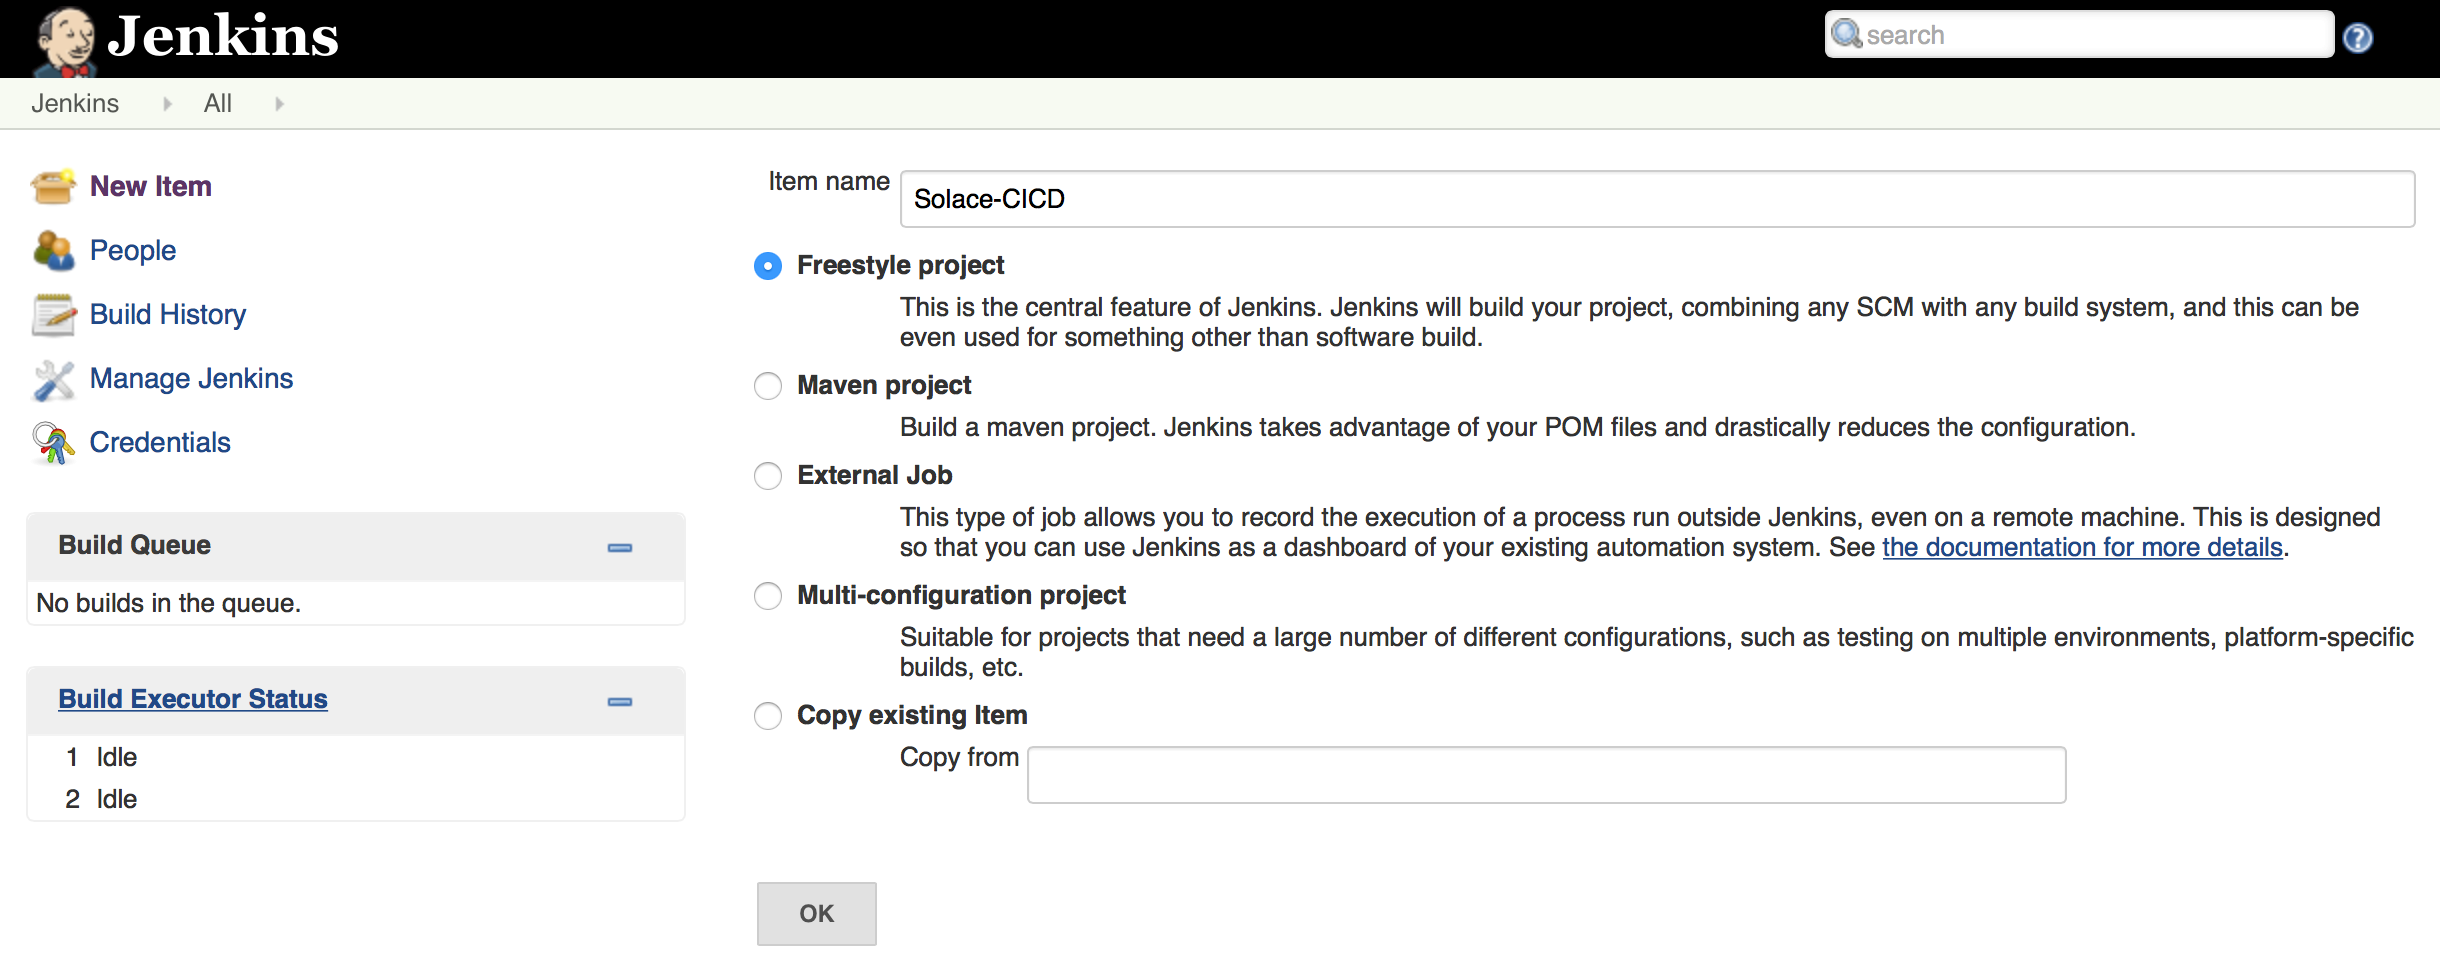
Click OK to create the project and configure it further to integrate with GitHub.
Add your project’s GitHub URL into the GitHub Project – Project URL field:
https://github.com/<your-userid>/Solace-CICD.git
Next, select the Git option under Source Code Management. In the newly appeared fields, add the URL of your GitHub project repository into the Repository URL field:
https://github.com/<your-userid>/Solace-CICD.git
Scroll down and check the box to enable Build when a change is pushed to GitHub. With this option checked, our Jenkins project will be triggered to build every time we push to our GitHub repository. Of course, we need Jenkins to know what to do when it runs a build. So, click the Add build step drop-down, and select Execute shell. This will make a Command dialogue available, and what we put in this dialogue will be executed via a shell when a build initiates. Add the following into the Command dialogue:
/bin/chmod +x ./provision.sh
./provision.sh
Note: We will create provision.sh and check it in into GitHub below. For time being, let’s complete the Jenkins configuration.
Click Save to complete the configuration on Jenkins. We are done with Jenkins configuration
Github – Jenkins Webhook Configuration
We will now configure GitHub repository to communicate with Jenkins. This will enable GitHub to call out to Jenkins after a check-in is done.
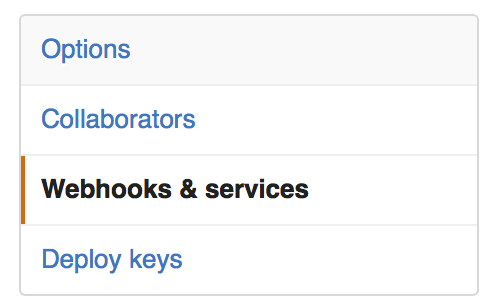
Navigate to GitHub Solace-CICD repository homepage and click on the Settings tab

Click on the “Webhooks & services” link
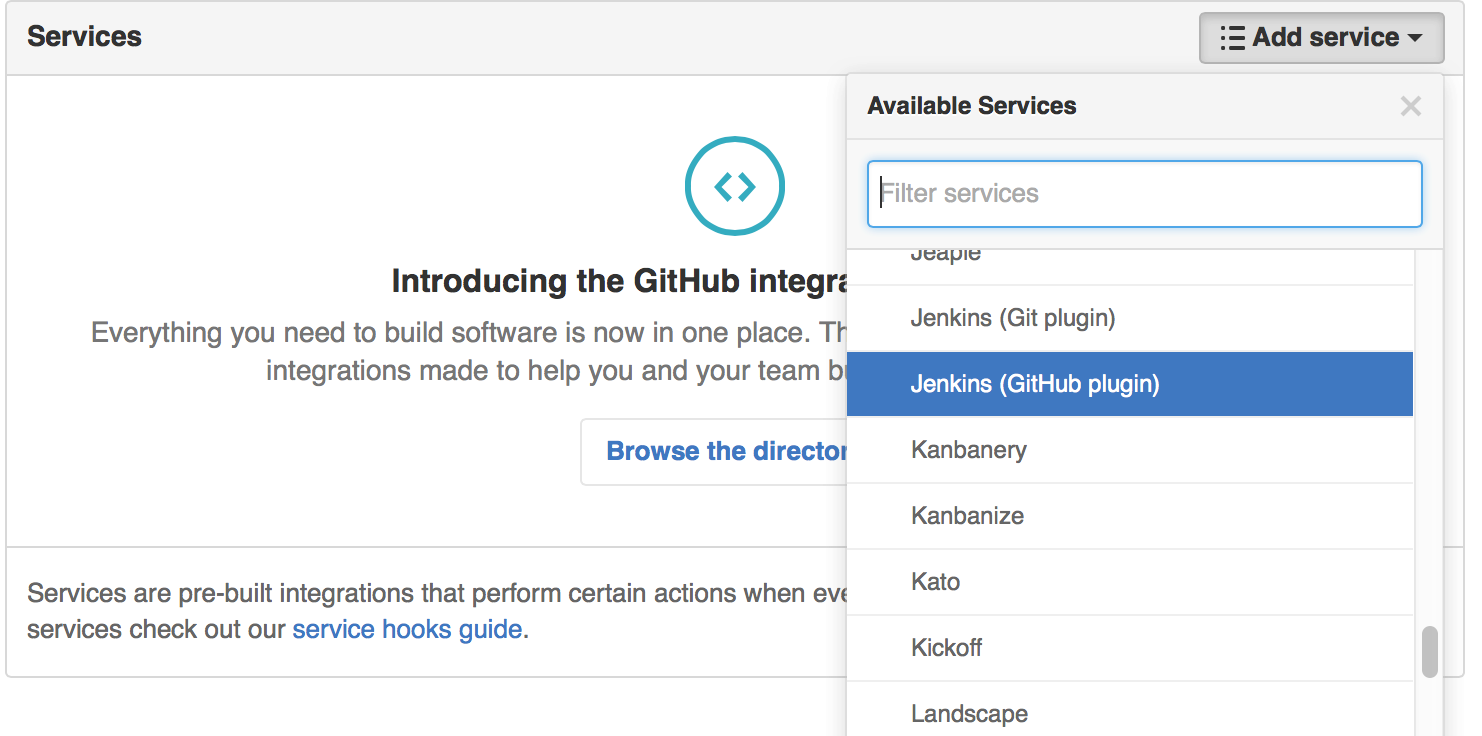
Click on Add Service and select Jenkins (GitHub plugin)
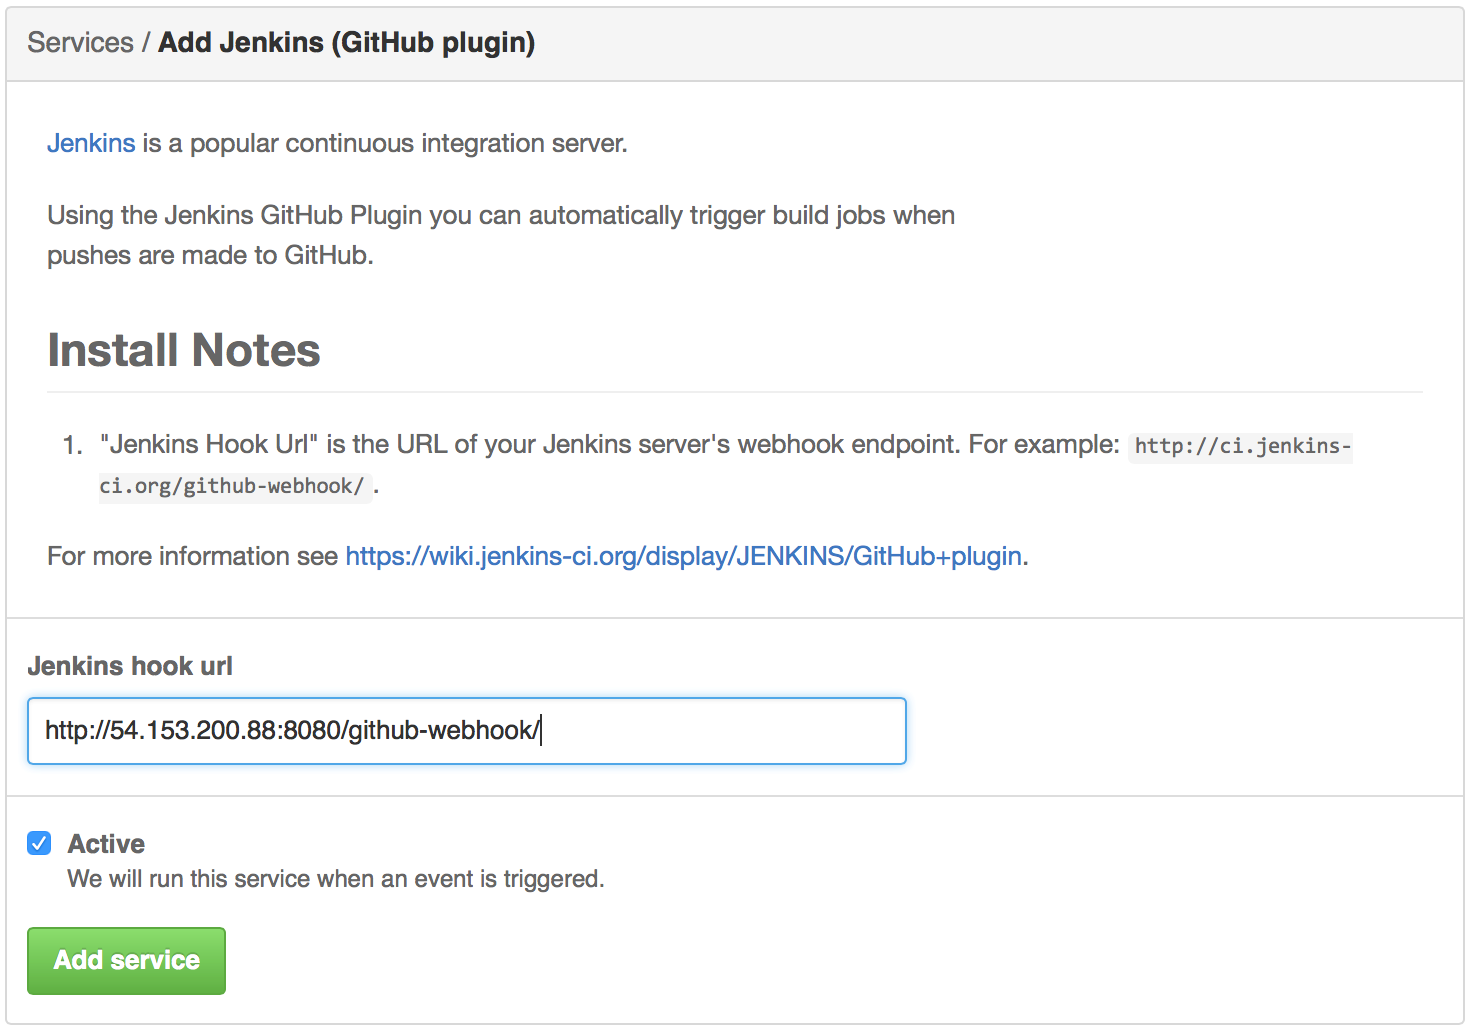
Add the following as the Jenkins hook URL and click on Add Service button.
http://<jenkins_hostname_or_ip_address >:<8080_or_custom_port>/github-webhook/
Execution
We are now set up with our CD pipeline. A quick recap of the activities we have completed so far:
- We created a public GitHub repository;
https://github.com/<your-userid>/Solace-CICD.git
- We installed Jenkins on an AWS Ubuntu instance;
- Created a Jenkins project called Solace-CICD.
- Configured Jenkins Solace-CICD to pull source from our GitHub repository.
- Configured a build action in Jenkins to execute a shell script (provision.sh) after each check-in to our GitHub repository.
- We configured the GitHub repository with Service Webhook into Jenkins so that Jenkins executes build upon each check-in

Let’s begin with a test to see our pipeline delivering the results. To validate our CD pipeline, we will check-in provision.sh to GitHub, which in turn will notify Jenkins and the build action will be triggered i.e. provision.sh will execute and will create objects on the Solace VMR running in AWS.
Create a file provision.sh with following contents and save it to your local GitHub repository directory i.e. in Solace-CICD. Do not forget to provide an IP address / hostname of the VMR, port number and Solace admin user credentials.
#!/bin/bash

SOLACE_IP=<IP Address of the VMR>:<admin port>
CRED=<Solace VMR admin username>:< Solace VMR admin password >

CREATE_VPN="
<rpc semp-version="soltr/7_1_1">
<create>
<message-vpn>
<vpn-name>Solace-CICD</vpn-name>
</message-vpn>
</create>
</rpc>
"
START_VPN="
<rpc semp-version="soltr/7_1_1"
<message-vpn>
<vpn-name>Solace-CICD</vpn-name>
<no>
<shutdown></shutdown>
</no>
</message-vpn>
</rpc>
"

echo "${CREATE_VPN}" | curl -d @- -u "${CRED}" http://${SOLACE_IP}/SEMP
echo "${START_VPN}" | curl -d @- -u "${CRED}" http://${SOLACE_IP}/SEMP
Let’s make sure you are in the local GitHub repository directory i.e. in Solace-CICD. We will now check-in provision.sh into GitHub:
Issue the following commands on your shell prompt to commit and check-in:
git add .
git commit -m “VPN Creation via CD Pipeline”
git push origin master
This commits the changes into GitHub and the Webhook triggers the Jenkins build action to execute provision.sh which in turn creates Solace objects on the VMR. Navigate to the Jenkins console home page and you should now see an entry for successful build:

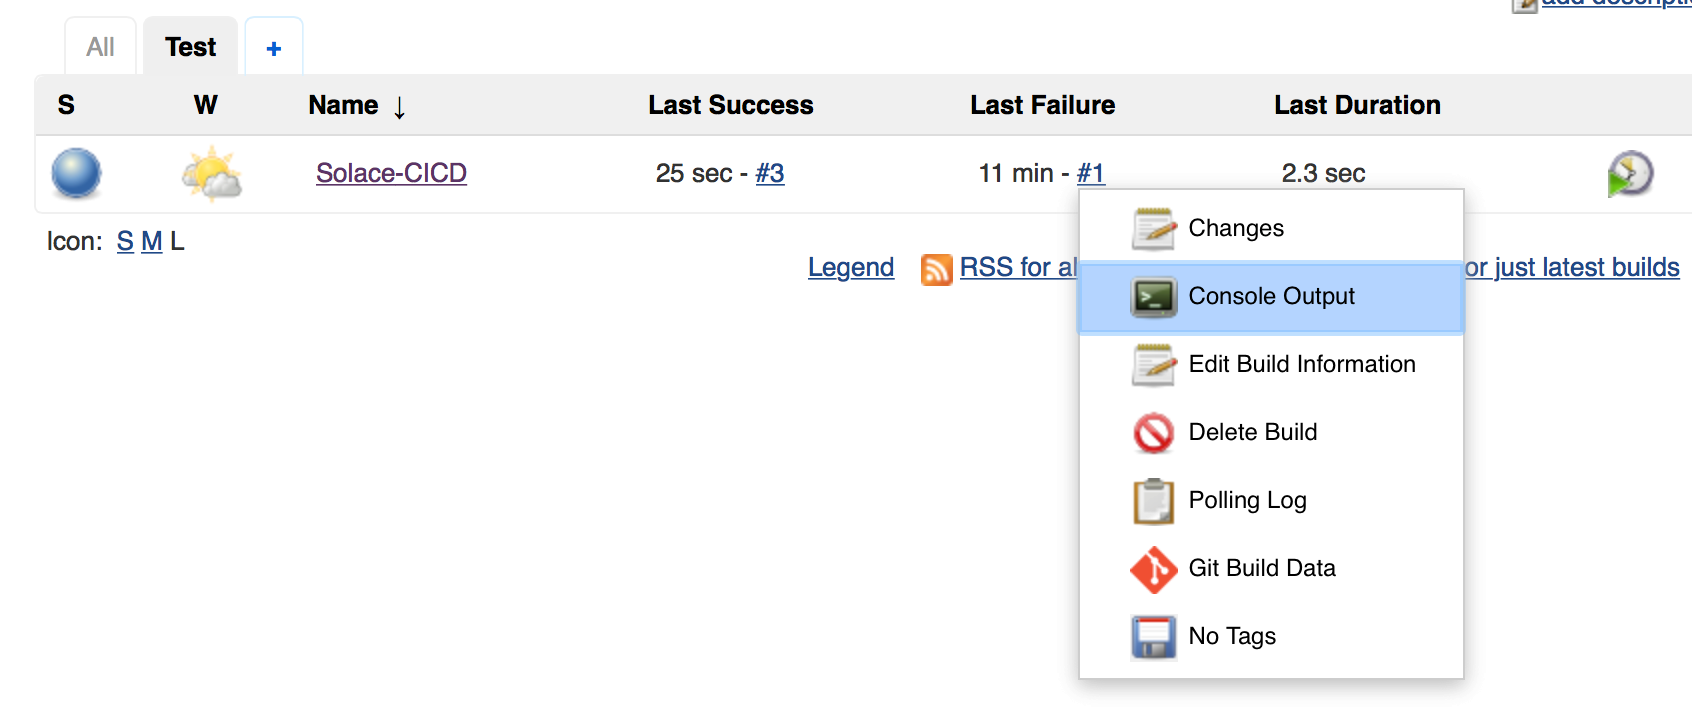
If the build was unsuccessful, you can check for the failure reasons in console log:
Verify the VPN was created successfully and is enabled on Solace VMR running in AWS. You can do it by connecting over SSH and issuing CLI or you can check it via SolAdmin. We will connect using SSH. Issue following command on the Solace CLI shell prompt
show message-vpn Solace-CICD
You should see the output showing the VPN name and its status (among other information that is not captured below for the sake of brevity).
Message VPN: Solace-CICD
Configuration Status: Enabled
Local Status: Up
You would have noticed that both the SEMP XML script and using Curl with SSH to send the XML to the Solace Message Router used in this example is very primitive. It just sends a SEMP XML request to create a VPN and enable it on the Solace VMR and receives the response OK or failure. However, in production deployments, the situation will be different. The SEMP XML script to automate the object creation on the Solace Message Router will be much more comprehensive and sophisticated in terms of what it does.
For example, the script may create and configure Message VPN, Access Control Lists, Client Profiles, Client Usernames, VPN Bridges, Alert notification threshold etc. depending on the messaging requirements. The scripts could be stored as templates with placeholders for variables such as Solace object names and configuration parameters, which in turn may be captured through a configuration management interface and injected into actual SEMP XML required to create Solace objects. A combination of templates and actual values for placeholders will create an executable SEMP XML script (Templates + Variable Values => Actual Deployment Script). Production class deployments would often rely on a choice of programming language / scripting language to build deployment framework (in-lieu of primitives we used for this blog post).
To put things into perspective:
For this blog post, we used following script to create a VPN:
echo "${CREATE_VPN}" | curl -d @- -u "${CRED}" http://${SOLACE_IP}/SEMP
The same results could be achieved by using a programming language (e.g. Ruby, Java, Python, Node.js etc.) to create an HTTP client to send the SEMP XML “${CREATE_VPN}” to the Solace Message Router endpoint http://${SOLACE_IP:port}/SEMP. From the Solace Message Router management interface perspective, all it requires is an HTTP post request with correct SEMP XML on the management endpoint to create and configure the Solace objects. SEMP XML is feature rich and supports most of the configurations that can be performed using command line interface or Solace Admin GUI.
Summary
Just to recap and summarize the steps: The goal was to set up a simple CI/CD pipeline that integrates Version Control System (GitHub), a build server (Jenkins) and Solace.
- We created a source control repository on GitHub and configured GitHub with Jenkins Webhook
- We created a Jenkins project and configured it to point to our GitHub repository
- We created a simple Solace SEMP XML to provision VPN on Solace VMR and provisioned it via CD pipeline.
Useful Links


Subscribe to Our Blog
Get the latest trends, solutions, and insights into the event-driven future every week.
By submitting this form, you agree to Solace’s privacy policy: solace.com/privacy-policy/