
The goal of this blog post is to give you a high-level overview of how to deploy Solace-powered event-driven applications using Minishift, a tool that lets you run an OpenShift 3.x cluster locally. By using Minishift, we’ll be able to develop OpenShift applications without spending the time required to set up a full-fledged development OpenShift cluster.
While the example architecture we’ll walk through is not production grade, it demonstrates how to configure both internal and external access to event broker services in OpenShift. Whether you’re trying to deploy and connect event-driven applications in an isolated on-premises environment, or you’re trying to deploy and connect event-driven applications across public and private clouds, the fundamentals covered in this blog post should prove useful to you.
If you follow along, you’ll learn how to:
- Run an OpenShift cluster locally
- Deploy a singleton Solace PubSub+ Event Broker into an OpenShift cluster
- Establish connectivity between pods in an OpenShift cluster
- Establish connectivity between a pod in an OpenShift cluster (in this case, a Solace PubSub+ Event Broker) and an external application
If you’re reasonably familiar with OpenShift, you could skip this tutorial and check out:
The templates used in this blog post should not be used in a production-grade environment.
Overview
In this blog post, the first thing we’re going to do is get an OpenShift cluster running locally. Then, we’ll deploy both a singleton Solace PubSub+ Event Broker and a Node.js Express server that serves a basic web application to the client’s server. And lastly, we’ll show how both the Express server and the external web application can connect to the Solace PubSub+ Event Broker.
To get an OpenShift cluster running locally, we’ll be running Minishift with VirtualBox.
Here’s a visual of what the end product will look like:

You can find all the source code referenced in this blog post on this GitHub page.
Now, let’s start!
Run an OpenShift Cluster Locally
In this section, we’ll walk through how to install Minishift and VirtualBox, and then how to start an OpenShift cluster using them together.
OpenShift is a great technology, but unlike Docker it’s not something you can run natively on either a Mac or Windows computer. This is because OpenShift is a Kubernetes application platform that is built on top of Red Hat Enterprise Linux. If you want to test out OpenShift without paying for a dedicated test environment, you can use Minishift, “a tool that helps you run OpenShift locally by running a single-node OpenShift cluster inside a virtual machine (VM).” Note that Minishift runs OpenShift 3.x clusters. If you want to run OpenShift 4.x, there are other projects that you can use. You can run Minishift’s virtual machine using the hypervisor of your choice, but for the purposes of this blog post we’ll use VirtualBox, “a free and open-source hosted hypervisor for x86 virtualization, developed by Oracle.”
- Install VirtualBox
Follow the instructions on the Downloads – Oracle VM VirtualBox page to install VirtualBox. - Install Minishift
Follow the instructions on the Installing Minishift page to install Minishift.
If you’re using a Mac computer, I’d recommend installing Minishift using Homebrew Cask.
If you already have Minishift, you should create a new VM by using
minishift deleteandminishift start --cpus 5 --memory 10GB - Start an OpenShift Cluster
Once you have VirtualBox and Minishift installed, you can use this command to start a local OpenShift cluster:
minishift start --vm-driver virtualbox --memory 9GB --cpus 5
Note that we set a couple flags in the command:--vm-driver virtualboxtells Minishift how it can run the virtual machine--memory 9GBtells Minishift how much memory to dedicate to the virtual machine--cpus 5tells Minishift how many CPU cores to dedicate to the virtual machine

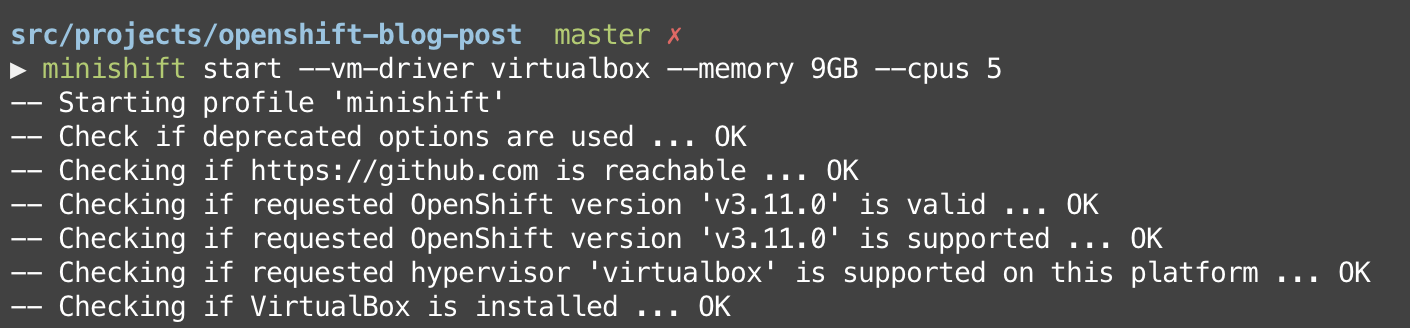
Then it does some stuff…
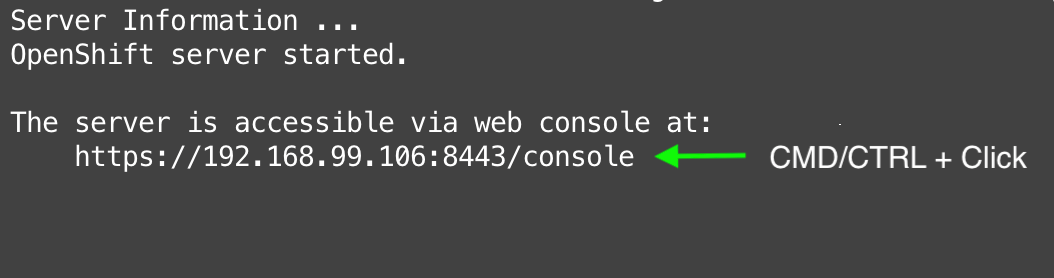
And if Minishift starts successfully (it should), Control–click (Windows) or Command-click (Mac) the URL that the command spits out:
When you navigate to the link, you’ll see a screen that looks like this:
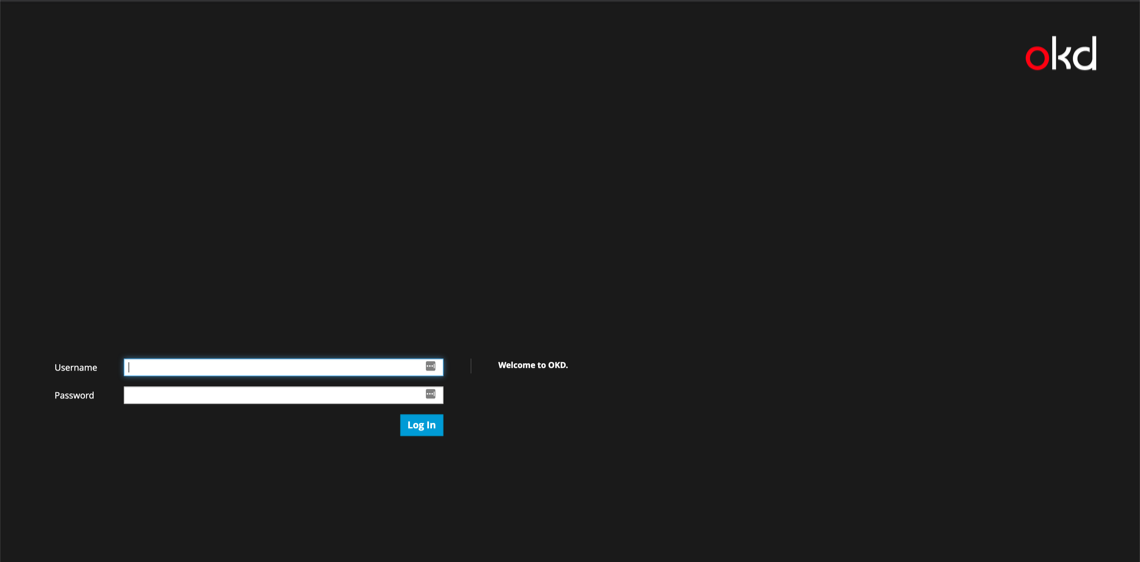
Once you get here, log in using “solace” for both the username and password. We’re not going to be covering how permissions work in OpenShift, so if you’d like to learn more about that, you can read more here.
You’ll see a screen that looks like this:
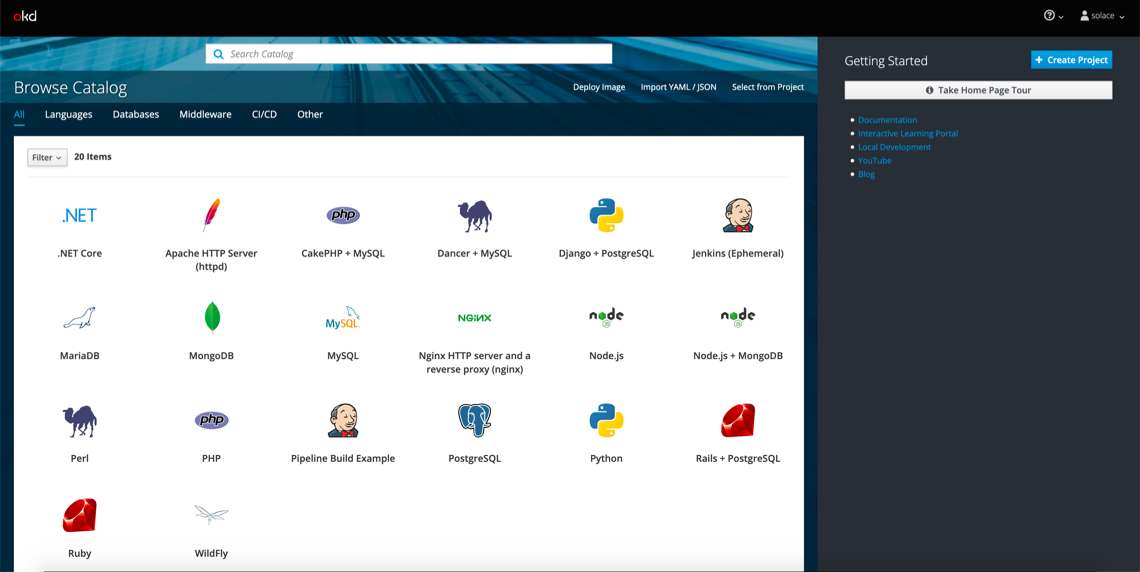
At this point, you’re ready to deploy some pods!
Deploy a PubSub+ Event Broker Using OpenShift
In this section, we’ll walk through how to deploy a Solace PubSub+ Event Broker as a pod into the OpenShift cluster we just started. The template we’ll be using is an ever-so-slightly modified version of what’s found on our sample templates repo. The modified version we’ll be using assigns a static NodePort to the NodePort service so that the port numbers in this blog post will match what you see locally. The blog post explains what that means in a bit.
If you haven’t already done so, download the source code.
Once you’ve downloaded the source code, navigate to templates/solace-singleton-ps+-broker.yml and take a minute to read over everything there. You’ll see that in the objects section of the template, three objects are being deployed: a pod, a cluster IP service, and a node port service.
Here are the descriptions of these three objects in the OpenShift documentation:
- Pod: OpenShift Enterprise leverages the Kubernetes concept of a pod, which is one or more containers deployed together on one host, and the smallest compute unit that can be defined, deployed, and managed.
- Cluster IP Service: A Kubernetes service serves as an internal load balancer. The default service clusterIP addresses are from the OpenShift Container Platform internal network and they are used to permit pods to access each other.
- NodePort Service: Use NodePorts to expose the service nodePort on all nodes in the cluster. A node port exposes the service on a static port on the node IP address. NodePorts are in the 30000-32767 range by default, which means a NodePort is unlikely to match a service’s intended port (for example, 8080 may be exposed as 31020).
If the architecture diagram didn’t make sense at first, look at it again now that you have read each object’s description.

Hopefully by now you understand what this template is going to deploy, so let’s actually deploy it! OpenShift makes this step very easy.
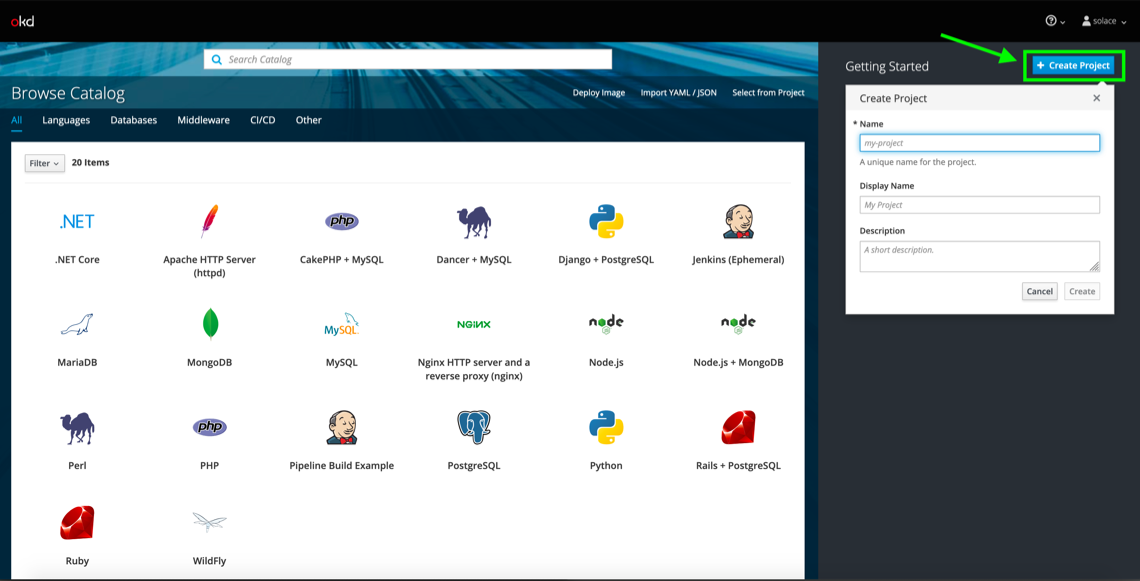
First, create a project by clicking Create Project.
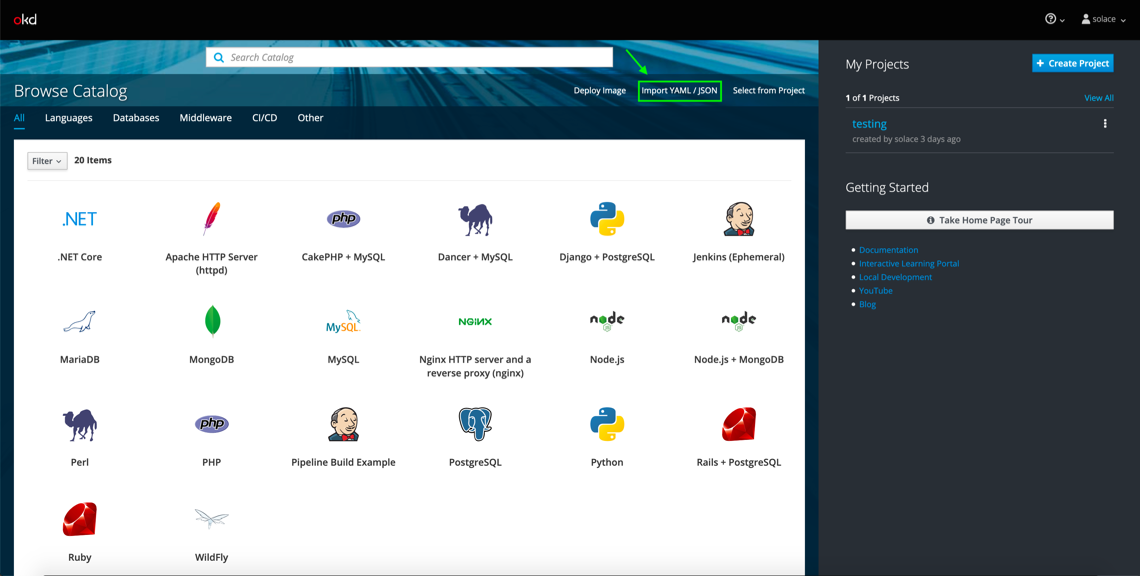
After you create your project, click Import YAML / JSON.
Then select the solace-singleton-ps+-broker.yml file found in the source code.
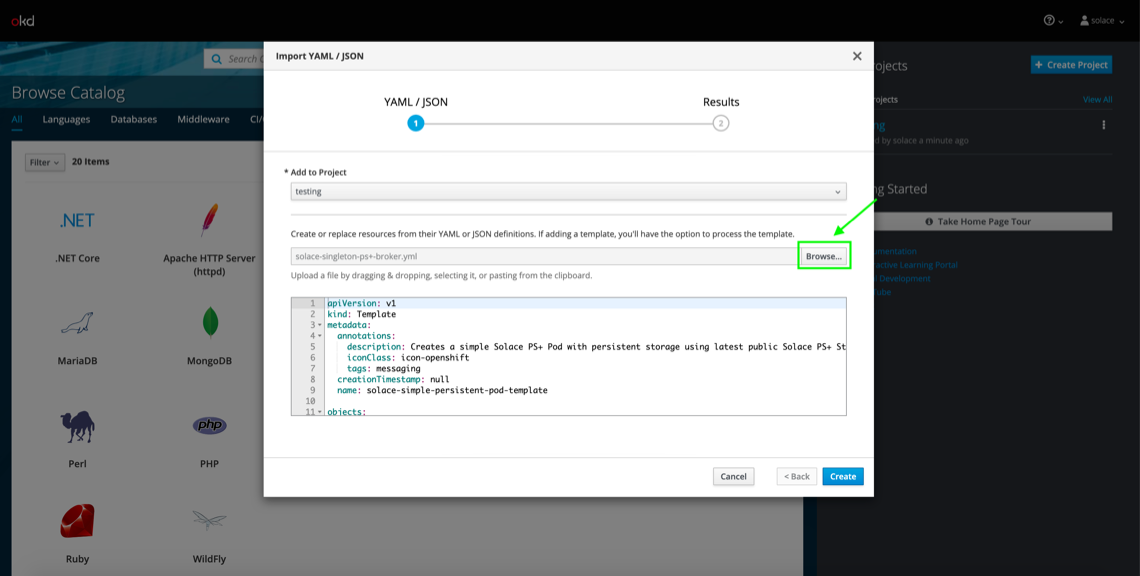
Click Create in the bottom right and then Continue in the nested popup. Don’t worry about saving the template, only Process the template has to be ticked for the purposes of this tutorial.
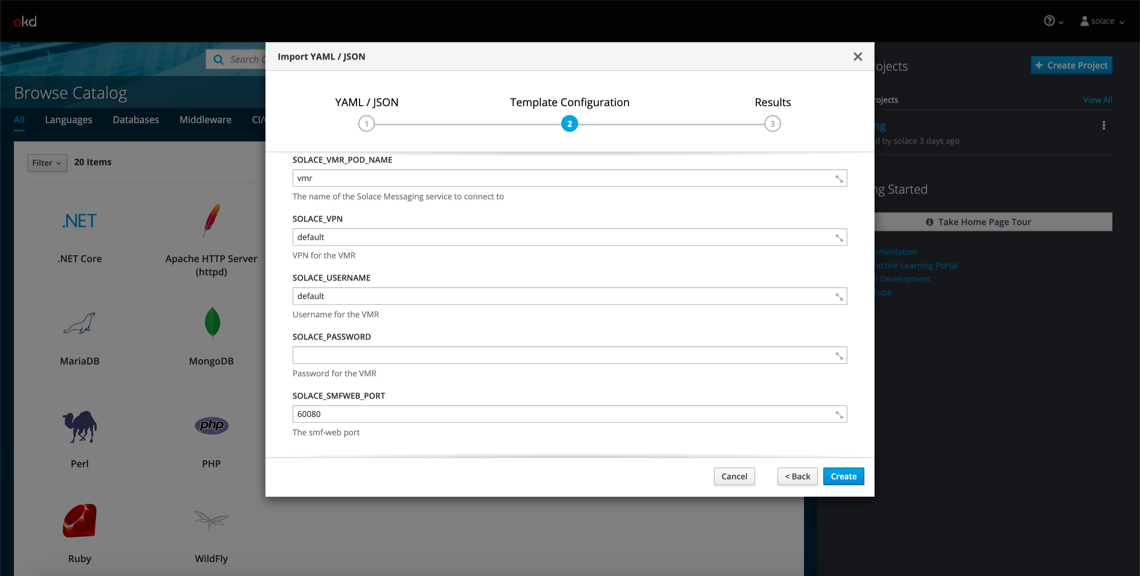
After you click Continue, you’ll see a screen like this:
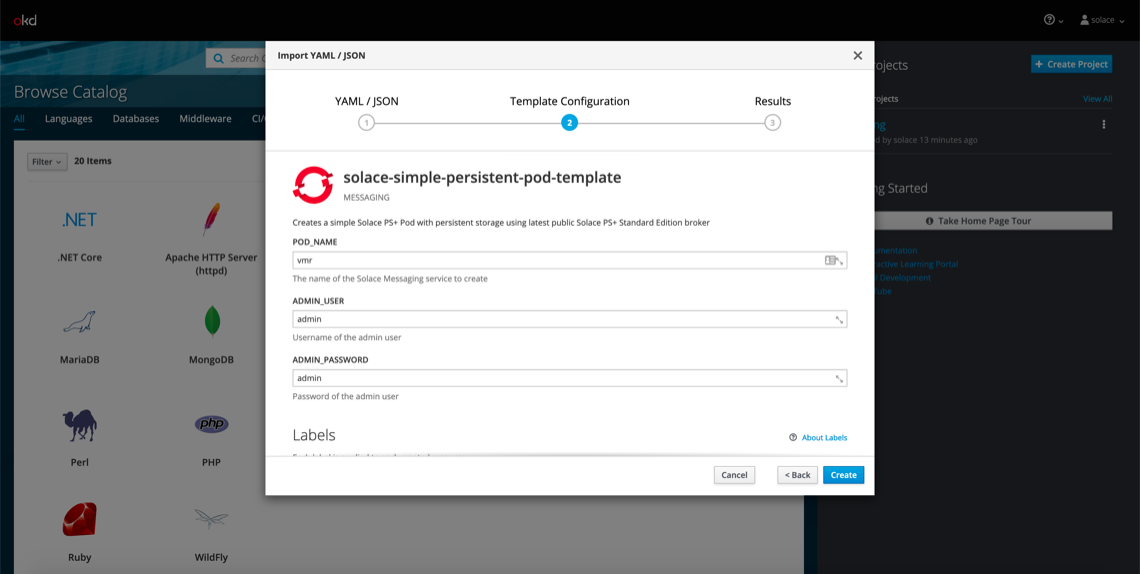
This is where you can fill in the parameters that get interpolated into the template file. For example, the POD_NAME parameter gets interpolated anywhere the ${POD_NAME} variable is found. This can be useful for adding environment variables, connecting pods together, etc. Overall, it’s a handy tool for dynamically forming deployment templates.
The default parameter values are just fine for deploying the Solace PubSub+ Event Broker, so click Create and wait a couple seconds for the pod to deploy.
If you click into the project and look at the Overview tab, you should see a screen like this:
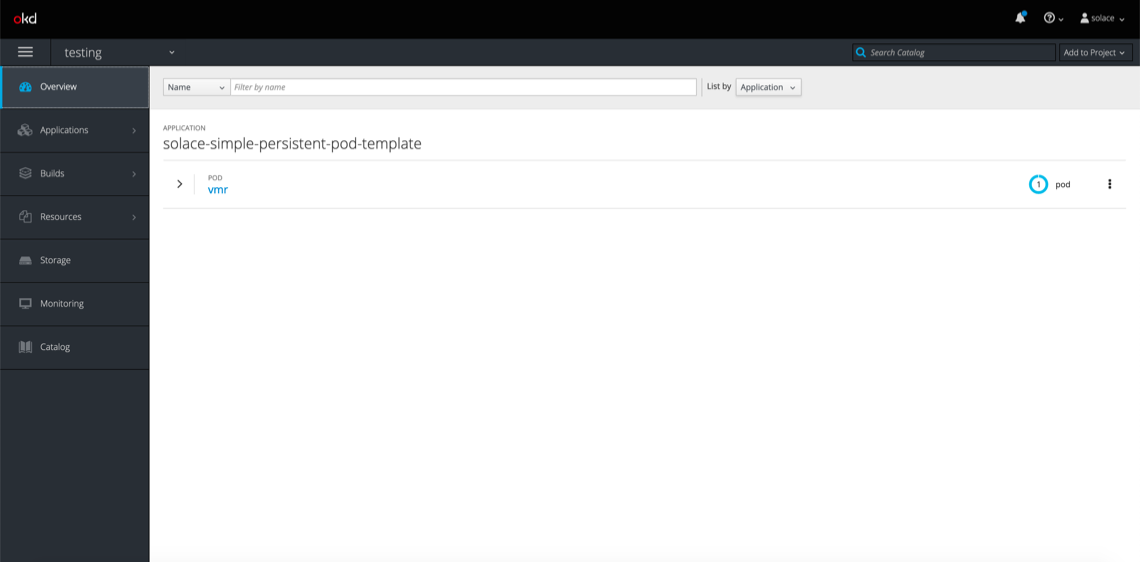
And if you click Applications > Services, you should see this:
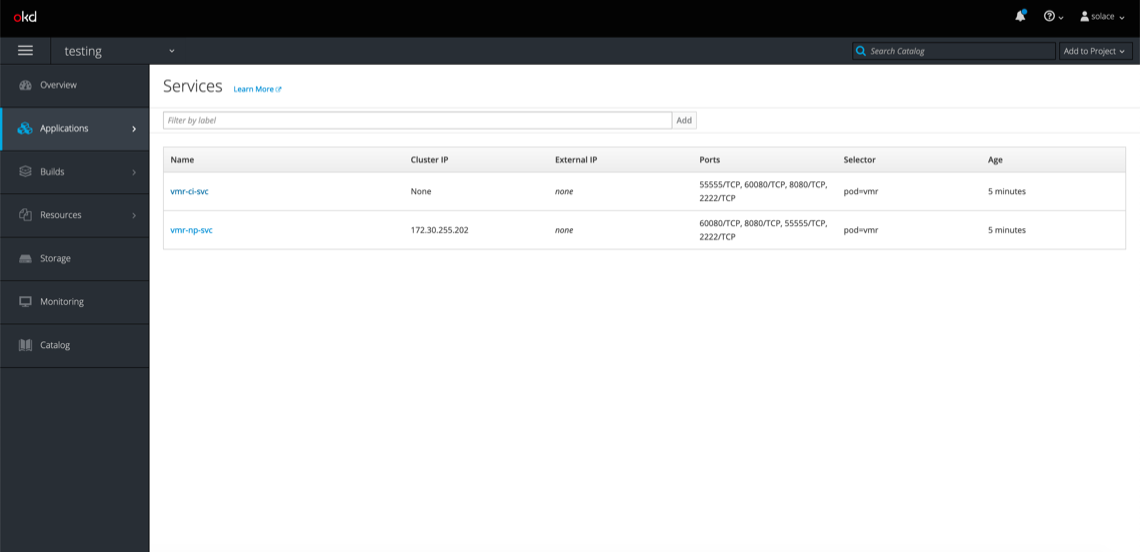
If you see these objects in your console, congrats! You’ve successfully deployed a Solace PubSub+ Event Broker using OpenShift.
Now, let’s deploy the Node.js express server pod and services that will connect to our broker.
Deploy and Connect a Node.js Application Pod
In this section, we’ll walk through how to deploy a Node.js Express server as a pod into the OpenShift cluster, and then we’ll show how it can connect to the services we created for our Solace PubSub+ Event Broker.
Follow the same steps from the previous section except this time import the solace-simple-application.yml file found in the templates directory of the source code. This template will deploy both the Node.js application pod and a NodePort service that will allow us to reach the application externally. In the case of this example, we’ll be connecting to the Solace PubSub+ Event Broker from our web browser.
Pause after you click Process the template and look at the parameters that this template expects.
SOLACE_VMR_POD_NAME and SOLACE_SMFWEB_PORT are the variables that we’ll be using to connect the application pod to our Solace PubSub+ Event Broker pod. If you look inside the template under the pod object, you’ll find the following container environment variable:
containers:
   - env:
      -  name: POD_NAMESPACE
      valueFrom:
         fieldRef:
            apiVersion: v1
            fieldPath: metadata.namespace
            -  name:"SOLACE_CLUSTERIP_SVC_HOSTNAME"
            value:${SOLACE_VMR_POD_NAME}-ci-svc.$(POD_NAMESPACE).svc
Here, we’re dynamically forming the host name that we’ll use to connect to the event broker. When the default parameters are substituted into the template, it forms vmr-ci-svc.testing.svc and will be accessible using the SOLACE_CLUSTERIP_SVC_HOSTNAME environment variable in our application.
In the SolaceClient.js file of our application code, you’ll see how this environment variable is used.
solaceclient.connectionParams = {
   url: `ws://${process.env.SOLACE_CLUSTERIP_SVC_HOSTNAME}:${process.env.SOLACE_SMFWEB_PORT}`,
   vpnName: process.env.SOLACE_VPN,
   userName: process.env.SOLACE_USERNAME,
   password: process.env.SOLACE_PASSWORD
};
Here, we form the URL that the client will use to connect to the Solace PubSub+ Event Broker using both environment variables. This host URL resolves to our Solace PubSub+ Event Broker pod within our cluster.
When the application pod finishes deploying, you’ll see a message indicating whether it was able to connect to the Solace PubSub+ Event Broker. This is what it’ll look like if it successfully connects:
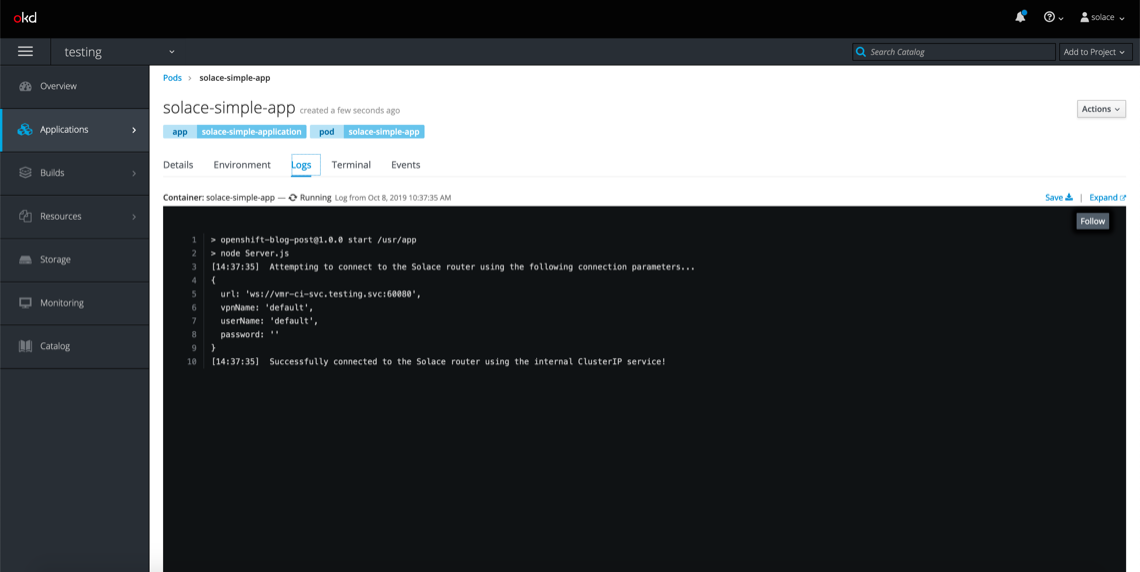
As the message indicates, the pod connects to the Solace router using the internally exposed ClusterIP service. Using this pattern, you can create an entirely self-contained, event-driven OpenShift cluster. This might be useful for on-premises deployments of OpenShift.
Along with the application, the template created another NodePort service that we can access from our web browsers. You’ll see it here named solace-simple-app-np-svc:

If you click on it for a detailed view of the NodePort service, you’ll see that the service is exposed on NodePort 30100, which we’ve defined statically in the template.
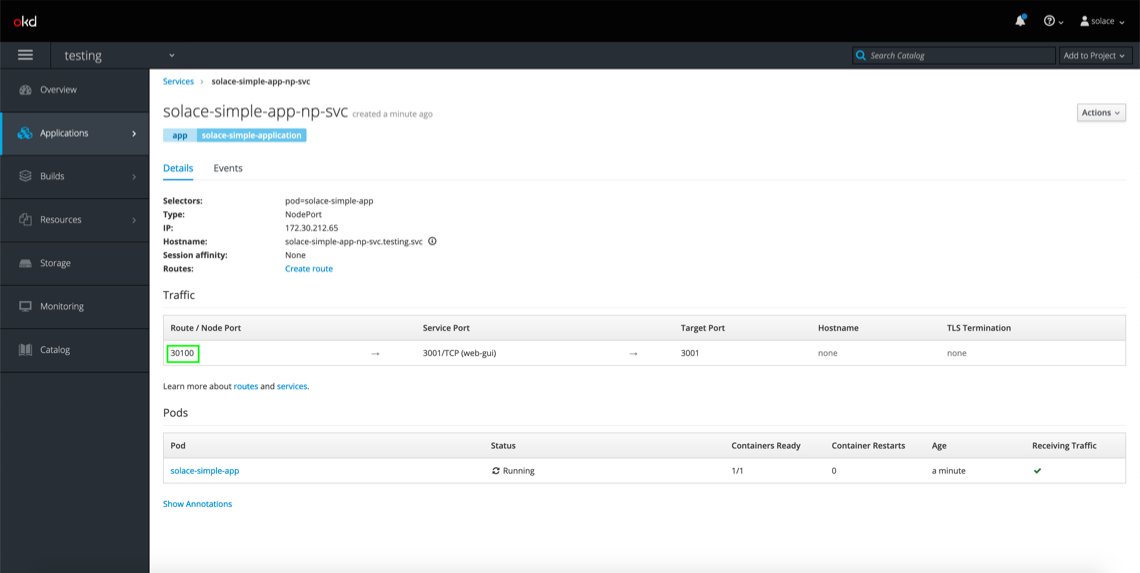
To access this service from our web browser, you’ll need to navigate to
<Minishift IP>:<App Service NodePort>
A quick way to find your Minishift IP is to copy the IP address you’ve used to connect to the console.
![]()
In my case, I’d navigate to 192.168.99.110:30100
This is what our example Web page looks like:
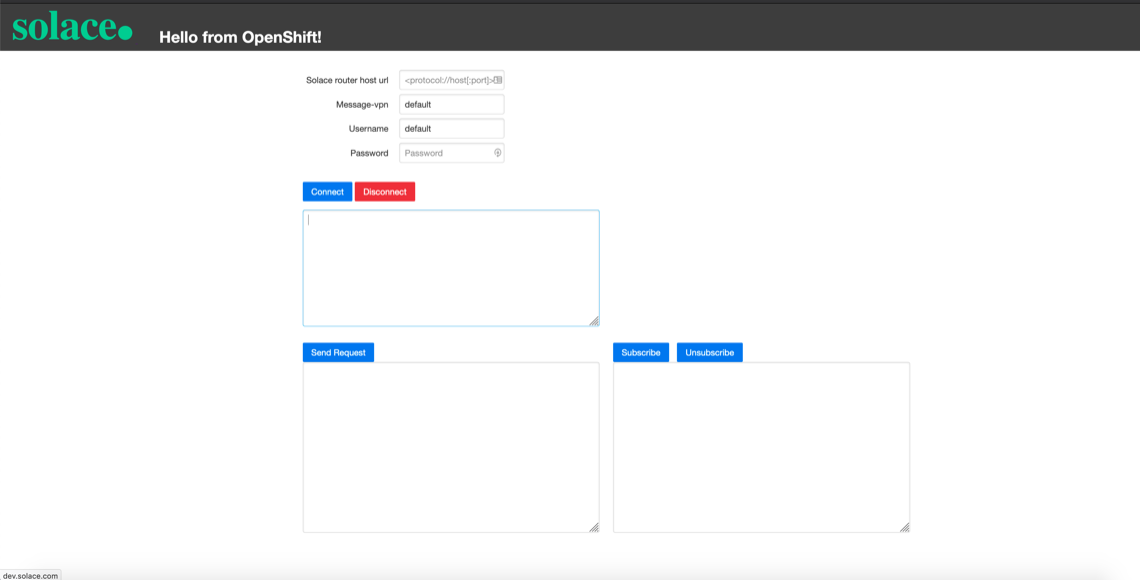
This is an example app that demonstrates how a Web page might use Solace PubSub+ Event Broker to perform request and reply operations. The only information you’ll need to change on this page to get started is the Solace router host URL.
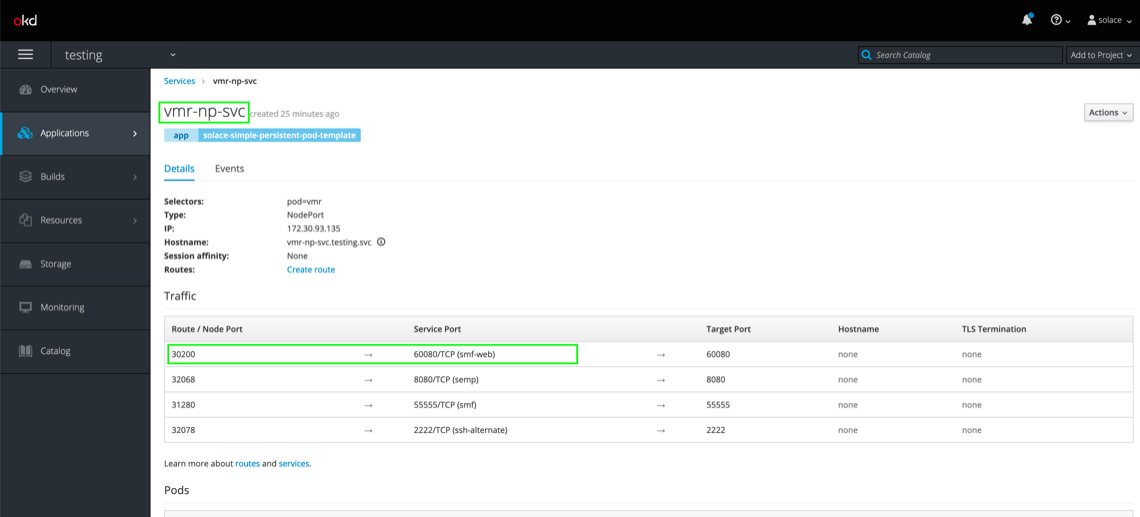
To access the Solace PubSub+ Event Broker externally, we’ll form and use a URL in a way similar to how we did to access our Web page’s landing page, but in this case, we’ll use the NodePort associated with the Solace router. Since this application is a Web page, we’ll be using the NodePort for Web messaging, which allows communication using the WebSocket protocol. For the purposes of this example, the template statically maps NodePort 30200 to the corresponding container port that handles WebSocket channels (port 60080).
Here’s how you’d find this information:
So, the full Solace router host URL will be ![]()
Note the ws:// prefix, which indicates the protocol that the client will be using to communicate.
After you plug in the Solace router host URL, click connect, subscribe, and send request:
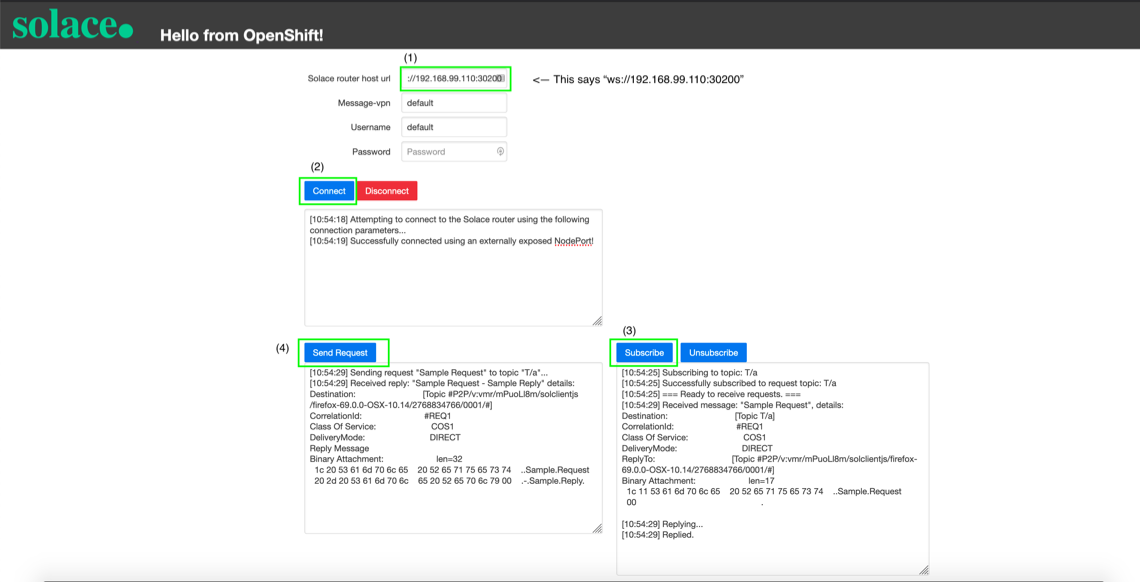
If your screen looks like the screenshot, your Web browser was able to communicate with the Solace router that you’re running in an OpenShift cluster using Minishift, which demonstrates how you’re able to establish external connectivity to your router.
Conclusion
If you followed this tutorial from start to finish, you should have learned how to:
- Run an OpenShift cluster locally
- Deploy a singleton Solace PubSub+ Event Broker into an OpenShift cluster
- Establish connectivity between pods in an OpenShift cluster
- Establish connectivity between a pod in an OpenShift cluster and an external application
I hope you found this tutorial useful! If you have any questions, please post them to Solace Developer Community.


Subscribe to Our Blog
Get the latest trends, solutions, and insights into the event-driven future every week.
By submitting this form, you agree to Solace’s privacy policy: solace.com/privacy-policy/