Special thanks to Paulo Rodrigues, infrastructure and cloud specialist, and Diogo Rodrigues, business
developer, from Link Consulting for their valuable contributions in bringing this piece to life.
Solace provides a robust integration and messaging solution called Solace Platform, and deploying it on Oracle Cloud Infrastructure Container Engine for Kubernetes (OKE) ensures a scalable and reliable system. With this piece, I’ll guide you through the process of setting up an Oracle Kubernetes cluster using various methods and subsequently deploying Solace on OKE.
1. Setting Up Oracle Kubernetes Cluster
There mainly three ways to provision OKE clusters:
- Cluster API Provider for OCI (CAPOCI): The Cluster API Provider for OCI simplifies the creation, configuration, and management of Kubernetes clusters through declarative, Kubernetes-style APIs. This method ensures seamless integration with Oracle Cloud Infrastructure, providing a solid foundation for deploying Solace.
- Terraform Configuration Files: Utilizing Terraform configuration files provides a structured and version-controlled approach to defining the infrastructure. Follow the official documentation for detailed instructions on setting up an OCI OKE cluster .
- Graphical User Interface: For a more visual and interactive approach, Oracle offers a Graphical User Interface (GUI) for setting up Kubernetes clusters. The GUI simplifies the process for those who prefer a visual representation of the cluster setup steps.
Feel free to select the method that aligns best with your preferences and requirements.
For this demonstration, I will use the GUI, as it will be the easiest and most common way to create the OKE cluster
2. Step-by-Step Guide for Cluster Setup from console
Follow the detailed step-by-step guide provided in the official documentation:
Setting Up an OCI OKE Cluster.
Once the cluster is ready, go ahead with below.
3. Verifying Cluster Status
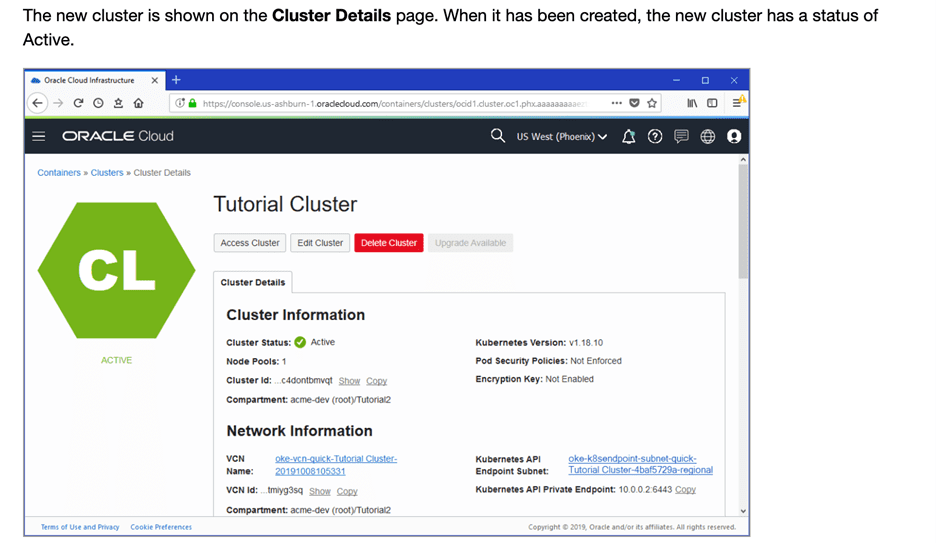
After successfully setting up the Oracle Kubernetes cluster, it is essential to verify its status. The cluster status should transition to “ACTIVE,” indicating readiness for use. This ensures all components are running as expected, laying the foundation for Solace deployment.
The next step is to establish connectivity to the cluster.
4. Setting up kubeconfig File for the Cluster
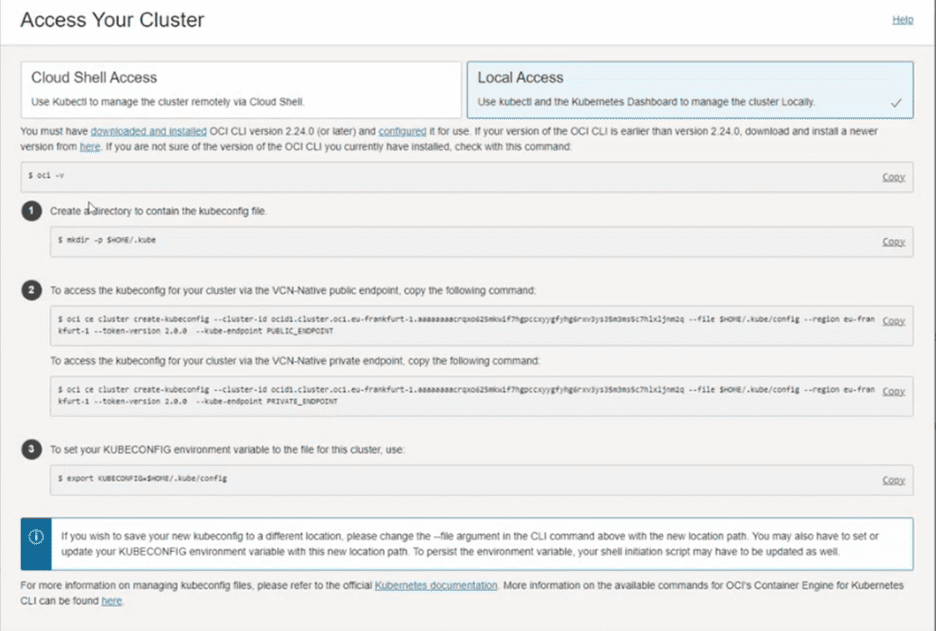
With the cluster ready, the next step is to configure the kubeconfig file for seamless interaction with Kubernetes using kubectl. Follow these steps:
- Install and configure the Oracle Cloud Infrastructure CLI.
- Navigate to Cluster Details and click “Access Cluster” to display the Access Your Cluster dialog box.
- Click “Local Access” and follow the steps seen here:
5. Verify kubectl Access to the Cluster
Ensure that kubectl is installed. If not, refer to the kubectl documentation.
Run the following command:
bash
$ kubectl get nodes
You should see details of the nodes running in the cluster, confirming your access.
Congratulations, you have a cluster, and have verified access to it!
6. Deployment Options for Solace Pub Sub+ on OKE
There are two deployment options:
- Via Solace Operator: Utilizes the Solace Operator, providing a declarative, Kubernetes-style API for Solace cluster creation, configuration, and management. This approach is recommended for those who prefer a programmatic and Kubernetes-native deployment.
- Via Helm Charts (Selected for Today’s Deployment): Leverages Helm charts to simplify the deployment process. Helm is a package manager for Kubernetes, and this method is suitable for users who prefer a straightforward and customizable deployment using Helm.
7. Deploy Solace using Helm Charts
Now that your Oracle Kubernetes cluster is set up, you can deploy Solace Pub Sub+ using Helm charts. This Helm chart facilitates the deployment of a single-node or high-availability (HA) configuration of the Solace Event Broker on your Kubernetes cluster. Detailed documentation is available here.
Prerequisites
Before deploying Solace, ensure you meet the following prerequisites:
- Kubernetes 1.10 or later with sufficient CPU, memory, and storage resources.
- Helm package manager v2 or v3 client installed and configured. Helm v3 is recommended.
- Solace Event Broker Software Docker image loaded in your Docker registry.
- If using persistent storage, ensure a storage class is specified.
Create a Deployment
The Solace repo in Helm Hub contains three charts:
- pubsubplus-dev: Deploy a minimum footprint single-node non-HA Solace Event Broker Software onto a Kubernetes Cluster for development purposes
- pubsubplus: Deploy a single-node non-HA Solace Event Broker Software onto a Kubernetes Cluster
- pubsubplus-ha: Deploy an HA redundancy group of Solace Event Broker Software onto a Kubernetes Cluster
helm repo add solacecharts https://solaceproducts.github.io/pubsubplus-kubernetes-quickstart/helm-charts
I’ll proceed with high availability (HA) for the demo, but you should choose the option that best suits your requirements.
helm install my-release solacecharts/pubsubplus-ha
Checking Solace Deployment Status
To check the status of the Solace deployment, run the following command:
kubectl get all -n solace
The load balancer (LB) will go in a pending state due to backend ports limit in OCI, that’s due to setting in OCI which limits backend ports that can be spined over, however this is soft limit and can be changed by placing request with OCI account team.
Inspect the exact error with command:
kubectl describe service/solace-pubsubplus-ha -n solace
Resolution for Backend Ports Limit
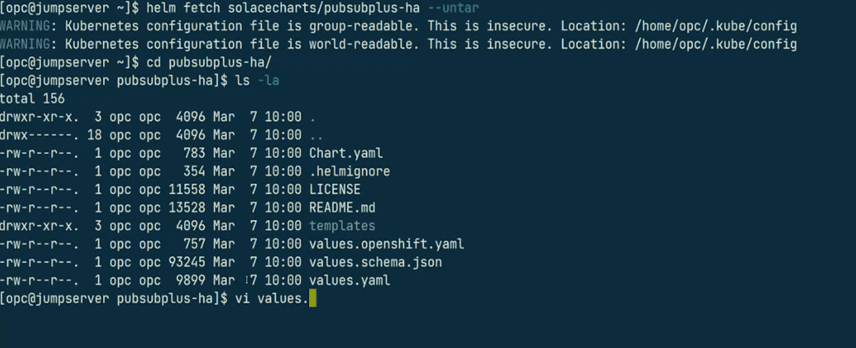
- Open yaml under the Helm chart directory (load helm locally with command in screen shot).
- Comment out unnecessary ports based on your organization’s needs. For example:
- Refresh Helm and apply the changes. Note: In case internal LB is requited instead of external one, you may add below annotations to main manifest file- values.yaml.
Congratulations! You’ve successfully deployed Solace Event Broker on your Oracle Kubernetes cluster.
8. Extract password:
Run below command:
kubectl get secret <release-name>-solace-secrets -o jsonpath="{.data.username_admin_password}" | base64 --decode
9. Open the Solace management GUI with LB IP and start building event-driven applications!
Explore other posts from category: For Developers

 Alam Khan


