MQTT is a lightweight publish-subscribe messaging protocol that’s fast becoming the de facto protocol of choice for Internet of Things (IoT) applications. MQTT’s popularity is largely due to its small bandwidth usage and low power consumption. In this article, we will leverage the Solace PubSub+ Event Broker’s native MQTT capabilities to build a simple event-driven Android app that uses the publish-subscribe messaging pattern. We will be using Kotlin as our programming language of choice when writing the Android app.
Creating a Solace PubSub+ Cloud Messaging Service
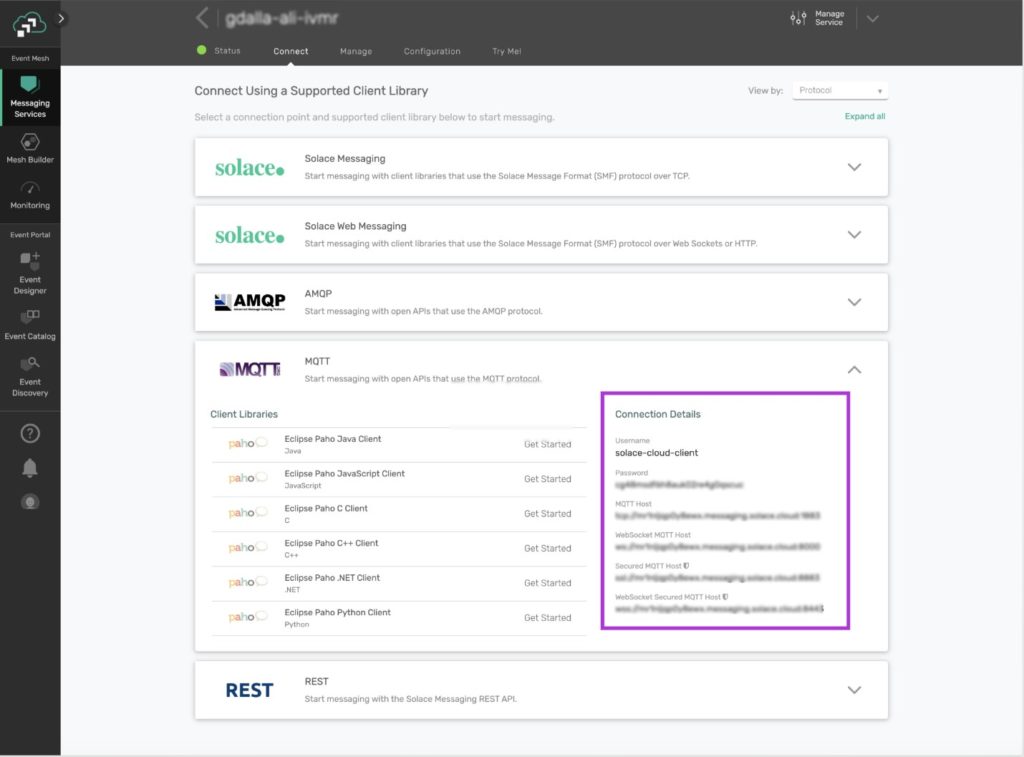
To build an event-driven application, you need to connect it to an event broker so that it could send and receive events asynchronously. Use Solace PubSub+ Cloud to create a free Messaging Service. Once the messaging service is up and running, navigate to its Connect tab and note its MQTT Connection Details. These details will later be used to connect our app to the Solace PubSub+ Event Broker.
Building an Event-Driven Android App in Kotlin
We will use the Android Studio IDE to build a new Kotlin project. The project will use the Eclipse Paho MQTT client library as our MQTT client library. This MQTT client library will be wrapped with a helper class that only exposes the methods we’ll need to publish and subscribe to Solace events. After writing the helper class, we will then build a simple Android MainActivity that we can use to subscribe to a user-defined topic and publish messages to the same topic.
Setting up the Kotlin project using Android Studio
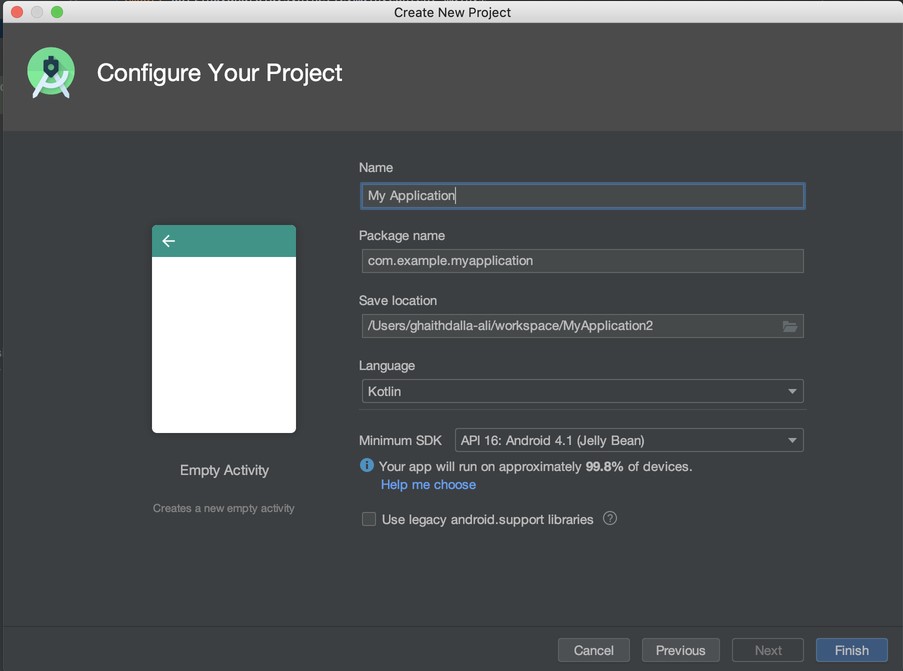
After downloading and installing Android Studio, create a new Kotlin project with an Empty Activity by navigating to File > New Project > Empty Activity and selecting Kotlin as the Language.
Configuring the Project and its Dependencies
Once the project is set up, configure the project’s Gradle dependencies by navigating to build.gradle (Project: My Application) and adding the following repository which contains the Eclipse MQTT Paho library:
    repositories {
        // <other repositories that might already exist, we will leave as is>
        // paho repository
        maven {
            url "https://repo.eclipse.org/content/repositories/paho-snapshots/"
        }
}
Navigate to app/build.gradle and add the following dependencies to fetch the Eclipse MQTT Paho client library:
dependencies {
    // <other dependencies that might already exist, we will leave as is>
    // paho dependencies
    implementation 'org.eclipse.paho:org.eclipse.paho.client.mqttv3:1.1.0'
    implementation 'org.eclipse.paho:org.eclipse.paho.android.service:1.1.1'
}
At this point Android Studio should prompt you to sync these Gradle dependencies to your project. Click on Sync Now to do so.
Next, configure the project’s AndroidManifest.xml file to give the app the required access permissions as well as register the MQTT client library as an Android service:
<manifest ...>

    // <other user permissions that might already exist, we will leave as is>

    <uses-permission android:name="android.permission.WAKE_LOCK" />
    <uses-permission android:name="android.permission.INTERNET" />
    <uses-permission android:name="android.permission.ACCESS_NETWORK_STATE" />

    <application ...

        // <other configuration that might already exist, we will leave as is>

        <service android:name="org.eclipse.paho.android.service.MqttService" />

    </application>

</manifest>
Configuring Broker Connection Details
Once the Android Studio project is set up, create a new Kotlin file – MessagingOptions.kt – that will contain the broker connection details that the app will use to connect to the Solace PubSub+ Event Broker (as noted from the first step):
package com.example.myapplication

// Solace PubSub+ Broker Options

// Fill in your Solace Cloud PubSub+ Broker's 'MQTT Host' and 'Password' options.
// This information can be found under:
// https://console.solace.cloud/services/ -> <your-service> -> 'Connect' -> 'MQTT'
const val SOLACE_CLIENT_USER_NAME = "solace-cloud-client"
const val SOLACE_CLIENT_PASSWORD = "<your-service-password>"
const val SOLACE_MQTT_HOST = "tcp://<your-service-mqtt-host>.messaging.solace.cloud:1883"

// Other options
const val SOLACE_CONNECTION_TIMEOUT = 3
const val SOLACE_CONNECTION_KEEP_ALIVE_INTERVAL = 60
const val SOLACE_CONNECTION_CLEAN_SESSION = true
const val SOLACE_CONNECTION_RECONNECT = true
Adding the MQTT helper class
Next, create a new MQTT package and add a helper class to it: MqttClientHelper. This helper class will wrap the MQTT Client library methods that the app will use. The helper class will make use of the MQTT connection options that were previously specified:
package com.example.myapplication.mqtt

import android.content.Context
import android.util.Log
import com.example.myapplication.*
import org.eclipse.paho.android.service.MqttAndroidClient
import org.eclipse.paho.client.mqttv3.*
import org.eclipse.paho.client.mqttv3.MqttClient


class MqttClientHelper(context: Context?) {

    companion object {
        const val TAG = "MqttClientHelper"
    }

    var mqttAndroidClient: MqttAndroidClient
    val serverUri = SOLACE_MQTT_HOST
    private val clientId: String = MqttClient.generateClientId()

    fun setCallback(callback: MqttCallbackExtended?) {
        mqttAndroidClient.setCallback(callback)
    }

    init {
        mqttAndroidClient = MqttAndroidClient(context, serverUri, clientId)
        mqttAndroidClient.setCallback(object : MqttCallbackExtended {
            override fun connectComplete(b: Boolean, s: String) {
                Log.w(TAG, s)
            }

            override fun connectionLost(throwable: Throwable) {}
            @Throws(Exception::class)
            override fun messageArrived(
                topic: String,
                mqttMessage: MqttMessage
            ) {
                Log.w(TAG, mqttMessage.toString())
            }

            override fun deliveryComplete(iMqttDeliveryToken: IMqttDeliveryToken) {}
        })
        connect()
    }

    private fun connect() {
        val mqttConnectOptions = MqttConnectOptions()
        mqttConnectOptions.isAutomaticReconnect = SOLACE_CONNECTION_RECONNECT
        mqttConnectOptions.isCleanSession = SOLACE_CONNECTION_CLEAN_SESSION
        mqttConnectOptions.userName = SOLACE_CLIENT_USER_NAME
        mqttConnectOptions.password = SOLACE_CLIENT_PASSWORD.toCharArray()
        mqttConnectOptions.connectionTimeout = SOLACE_CONNECTION_TIMEOUT
        mqttConnectOptions.keepAliveInterval = SOLACE_CONNECTION_KEEP_ALIVE_INTERVAL
        try {
            mqttAndroidClient.connect(mqttConnectOptions, null, object : IMqttActionListener {
                override fun onSuccess(asyncActionToken: IMqttToken) {
                    val disconnectedBufferOptions =
                        DisconnectedBufferOptions()
                    disconnectedBufferOptions.isBufferEnabled = true
                    disconnectedBufferOptions.bufferSize = 100
                    disconnectedBufferOptions.isPersistBuffer = false
                    disconnectedBufferOptions.isDeleteOldestMessages = false
                    mqttAndroidClient.setBufferOpts(disconnectedBufferOptions)
                }

                override fun onFailure(
                    asyncActionToken: IMqttToken,
                    exception: Throwable
                ) {
                    Log.w(TAG, "Failed to connect to: $serverUri ; $exception")
                }
            })
        } catch (ex: MqttException) {
            ex.printStackTrace()
        }
    }

    fun subscribe(subscriptionTopic: String, qos: Int = 0) {
        try {
            mqttAndroidClient.subscribe(subscriptionTopic, qos, null, object : IMqttActionListener {
                override fun onSuccess(asyncActionToken: IMqttToken) {
                    Log.w(TAG, "Subscribed to topic '$subscriptionTopic'")
                }

                override fun onFailure(
                    asyncActionToken: IMqttToken,
                    exception: Throwable
                ) {
                    Log.w(TAG, "Subscription to topic '$subscriptionTopic' failed!")
                }
            })
        } catch (ex: MqttException) {
            System.err.println("Exception whilst subscribing to topic '$subscriptionTopic'")
            ex.printStackTrace()
        }
    }

    fun publish(topic: String, msg: String, qos: Int = 0) {
        try {
            val message = MqttMessage()
            message.payload = msg.toByteArray()
            mqttAndroidClient.publish(topic, message.payload, qos, false)
            Log.d(TAG, "Message published to topic `$topic`: $msg")
        } catch (e: MqttException) {
            Log.d(TAG, "Error Publishing to $topic: " + e.message)
            e.printStackTrace()
        }

    }

    fun isConnected() : Boolean {
        return mqttAndroidClient.isConnected
    }

    fun destroy() {
        mqttAndroidClient.unregisterResources()
        mqttAndroidClient.disconnect()
    }
}
Building the App’s Main Activity
At this point, you should have the setup needed to build your own event-driven Android application in whatever way you would like. What follows is an example implementation of a simple Android app that uses a publish-subscribe messaging pattern.
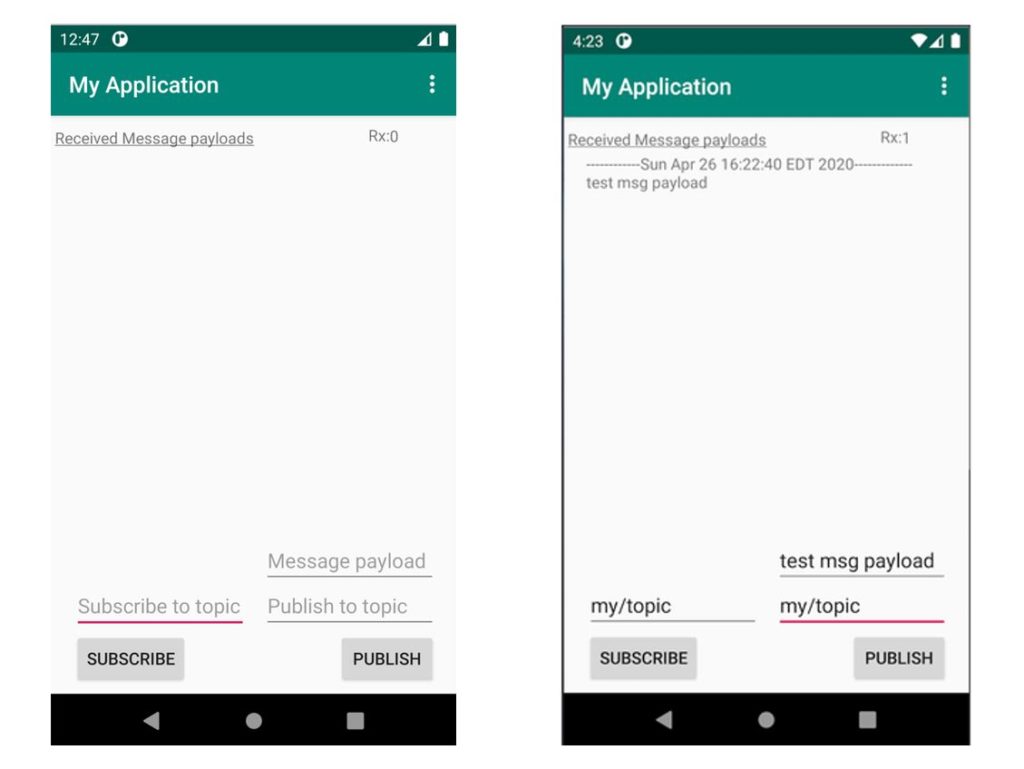
The app has three input fields: the topic to subscribe to, the topic to publish to, and the message payload to publish. If subscribed to a topic (e.g. my/topic), you may publish a message to the same topic with a Message Payload of your choosing. By doing so, the app would be publishing the message with the specified message payload to the Solace PubSub+ Event Broker. The broker would then send that message to its subscribers (in this case, the app itself), and the app’s messageArrived() callback would then be triggered to update its Received Message Payloads view.
To build the app above, you will need to copy the following files to your project and rebuild it:
- app/src/main/java/com/example/myapplication/MainActivity.kt
- app/src/main/res/layout/content_main.xml
- app/src/main/res/values/strings.xml
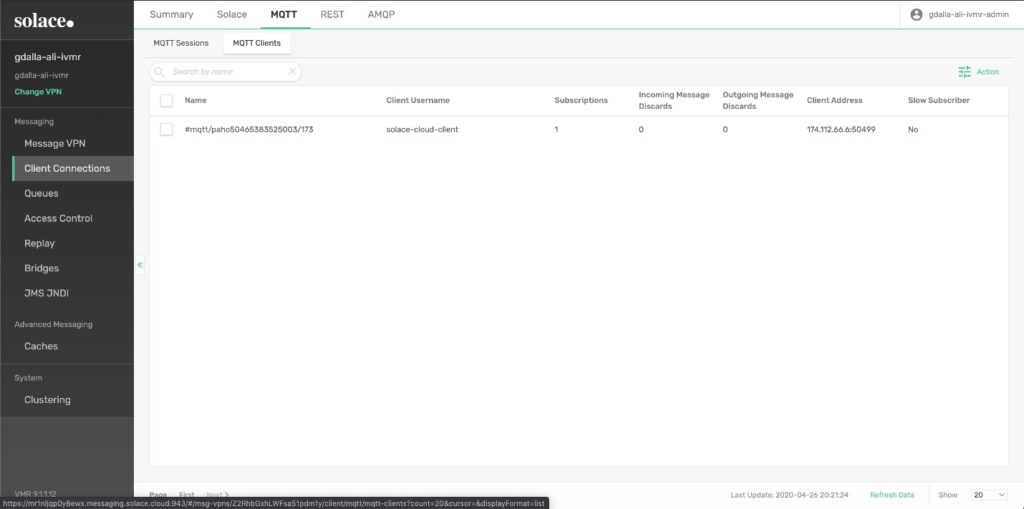
When the app is launched, its MainActivity invokes the MqttClientHelper which in turn attempts to connect to the Solace PubSub+ Event Broker as per its init implementation. The connection details that the init logic uses are described in MessagingOptions.kt. You can verify that the app connected to your Solace PubSub+ Event Broker successfully by navigating to Messaging Services > your-service-name > Manage Service > Client Connections > MQTT &> MQTT Clients in the Solace Cloud Console. You should then see one Paho MQTT client listed under the MQTT Clients tab.
Subscribing to Topics from Other Brokers
The app above while very simplistic in its implementation, could also be used to retrieve events from other applications that are already publishing data to other event brokers.
As part of the covid19-stream-processors project, Solace has made-available topics related to the COVID-19 Coronavirus – aggregated from different sources – as data that’s easily consumable by other event-driven applications. This data is being published – by an event-driven application – to a Solace PubSub+ Event Broker that uses dynamic topics. These dynamic topics allow subscribers to pick, choose, and filter on the specific data that they want to consume.
We will use our Android app, as-is, to subscribe to one of the topics from the event broker that’s serving the covid19-stream-processors data.
Modifying Broker Connection Details
To connect the the covid19-stream-processors event broker, modify the MessagingOptions.kt file as per the connection information from the covid19-stream-processors GitHub page:
const val SOLACE_CLIENT_USER_NAME = "covid-public-client"
const val SOLACE_CLIENT_PASSWORD = "covid19"
const val SOLACE_MQTT_HOST = "tcp://mr2r9za6fwi0wf.messaging.solace.cloud:1883"
Subscribing to a Topic from an External Broker
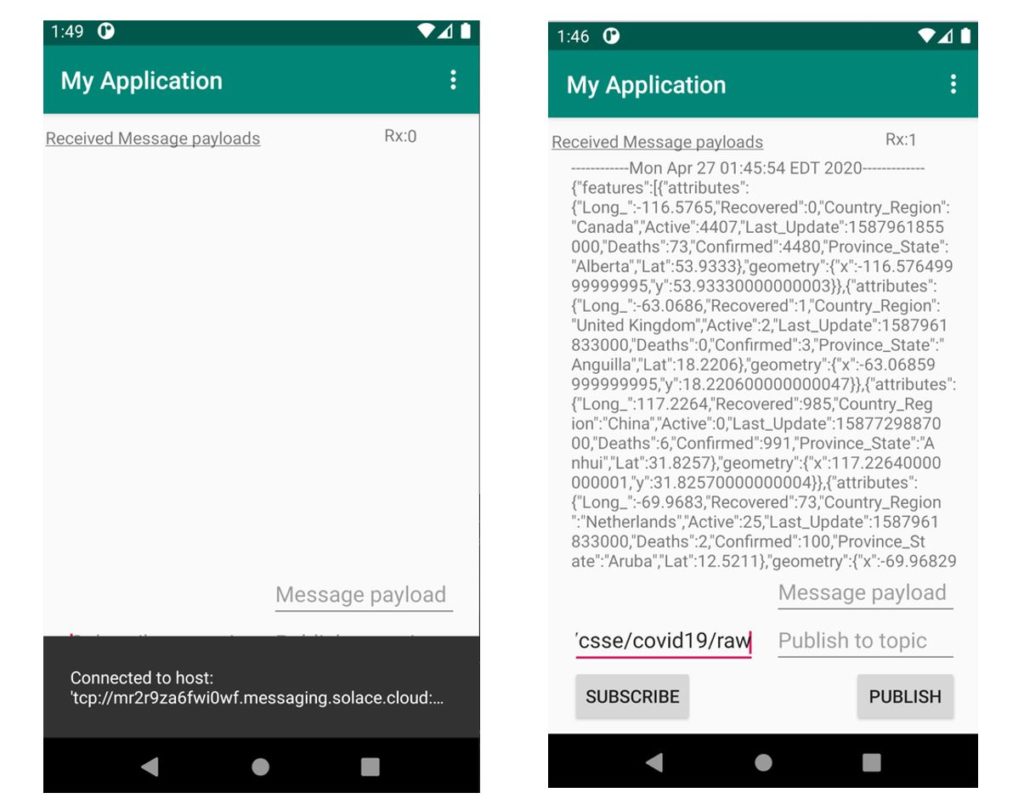
After updating MessagingOptions.kt, launch the app and it should notify you that it has connected to the covid19-stream-processors Event Broker (host) at the bottom. Once the app connects successfully, you can then subscribe to one of the topics outlined in the project (e.g. jhu/csse/covid19/raw) by typing it into the input field and selecting SUBSCRIBE. After ~45 seconds, you should begin to see JSON message payloads being received by the Android app.
Conclusion
In this article, we showcased how to create an event-driven Android app with a Solace PubSub+ Cloud Messaging Service as its event broker. The app was implemented in Kotlin using a publish-subscribe messaging pattern to connect to the Solace PubSub+ Event Broker. The established connection used the MQTT messaging protocol as its messaging transport to demonstrate the publish-subscribe model. The app was then used to connect to an external pre-configured event broker to consume public data related to COVID-19 that’s being published by an external application.
The full implementation of the Android app discussed in this article can be found in this GitHub repository.
Explore other posts from category: For Developers

 Ghaith Dalla-Ali