Khajan Singh is a middle school student and the youngest in the Solace Scholar program. He enjoys using hardware and data cloud to solve real-life problems.
I wanted to detect if somebody walks into my room, so I set up some sensors and connected them to my computer. I quickly realized, however, that I didn’t want to always have my computer physically connected to the sensors because I’d no longer be able to use the computer throughout the house. I also realized connecting the sensors to my computer would mean I couldn’t easily add sensors in other rooms if I wanted to. So, I decided to publish data readings from the sensors to my computer using a messaging protocol, and I settled on MQTT. To do that, I’m using Solace PubSub+.
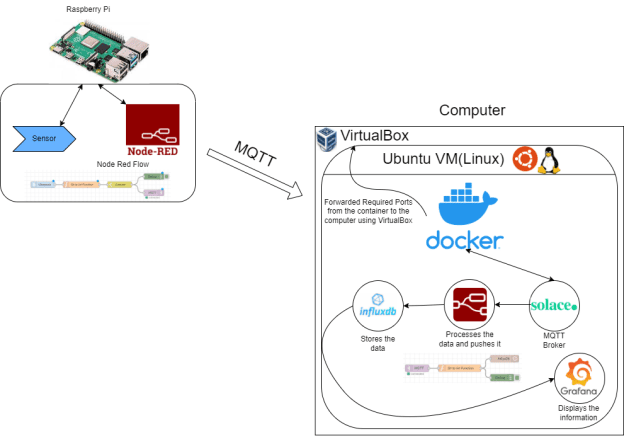
In this article, I’ll explain how I set up a Raspberry Pi to collect sensor data and send it to my computer using MQTT. The point of running it on the computer is to have expandability with more things sending information, for example adding more Raspberry Pi’s over a certain area with more sensors attached to them.
I did this by setting up a Solace event broker in a Docker container on my computer and making it responsible for receiving data from the Pi via MQTT. I used Node-Red on the computer to decide what to do with it – for example I made it store sensor reading in a database and graph it with Grafana.

Step 1: Setting Up the VM
For this project, I wanted to use Docker to manage all the containers, because if something goes wrong, I can easily reinstall them, and it would be easy to manage them.
The first challenge I faced was that my docker ports weren’t being exposed over my network, so the Pi was not able to communicate with the Solace broker running in the docker container. After doing some research, I found that trying to expose the ports on the host OS using something called “MacVLAN” might break something in the IP networking and learned that putting in place a virtual machine and exposing it from the VirtualBox manager might do the job. So, I installed VirtualBox, configured the Docker images on it, and it started working as expected.
For the guest operating system, I recommend a Linux based OS – I am using Ubuntu, myself. After you have the image for whatever OS you’re going to install, create the VM and go through the installation process.
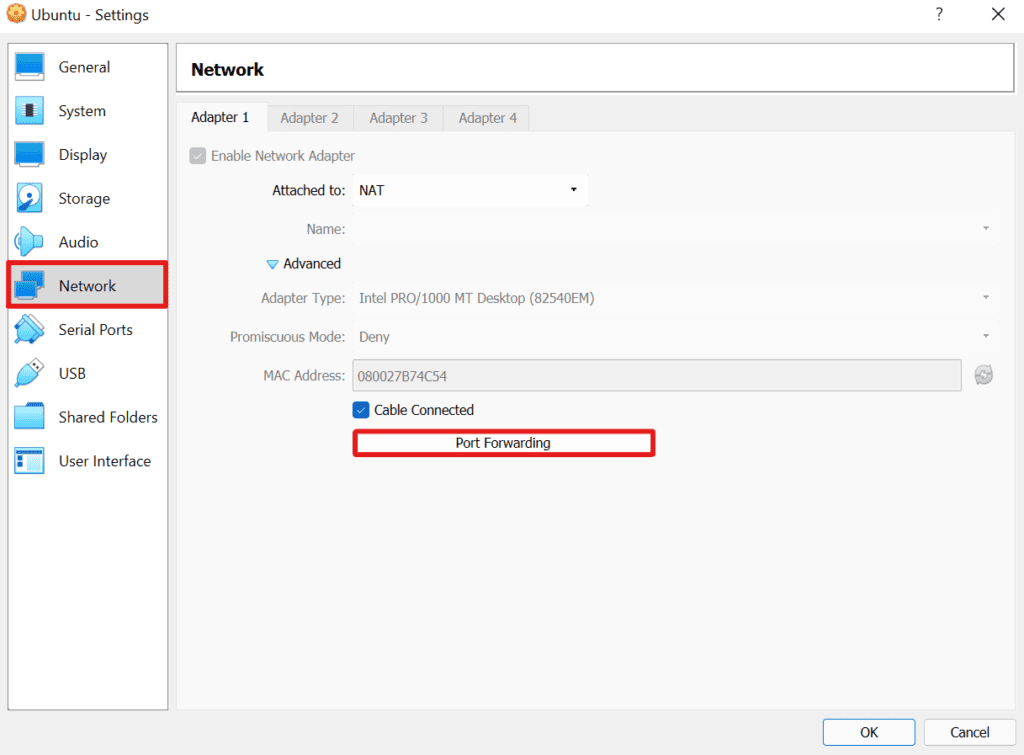
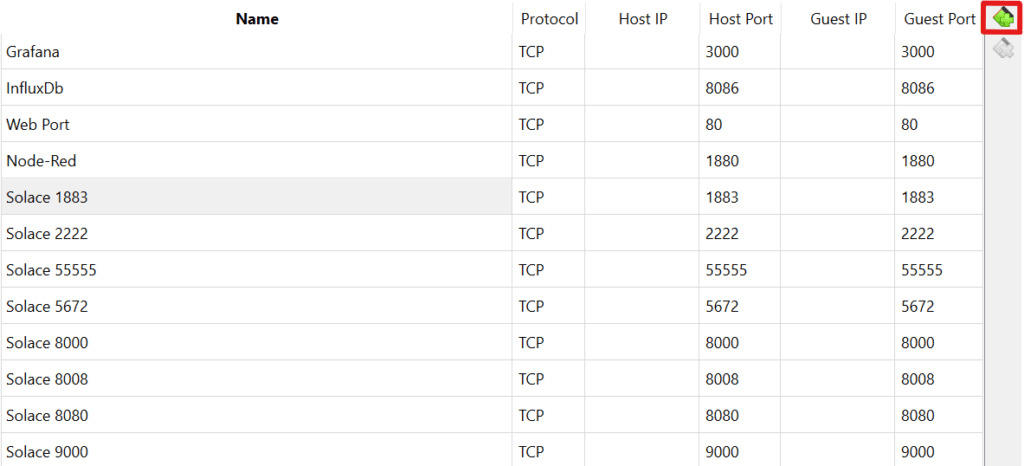
To expose the ports, open the VirtualBox application, click your VM and press settings in its menu bar. Head over to the Network tab, click Advanced, and click Port Forwarding.
The specific ports for the Solace broker are available here.
Step 2: Installing Docker
As you probably know, Docker is software to run containers, or packaged environments in which you can run applications in. That means you can install Node-Red and Solace in separate packages and initiate them to run when you want them to, and Docker makes it easy to reinstall and delete things if something goes wrong with a container.
Installing Docker is different for all systems, so you can visit this link to install it in your VM depending on its OS. Just find your VM name OS and click on its link to follow all the instructions. Once that’s done, you can configure Docker to run on boot and use it without the sudo command by following this documentation.
Step 3: Installing the Containers
As mentioned in the previous step, the next step is to install a few containers in which you can run the applications that are processing and using this data. So to install those containers, use these commands in the VM terminal:
- Node-Red:
docker run -it -p 1880:1880 -v node_red_data:/data --name nodered nodered/node-red - Solace:
docker run -d -p 8080:8080 -p 55555:55555 -p 8008:8008 -p 1883:1883 -p 8000:8000 -p 5672:5672 -p 9000:9000 -p 2222:2222 --shm-size=2g --env username_admin_globalaccesslevel=admin --env username_admin_password=admin --name=solace solace/solace-pubsub-standard
To stop the containers from running, use the command docker stop [container name] and to start them use docker start [container name]
Step 4: Raspberry Pi Setup
The Pi will read the data from the sensors and send it to the Solace broker. Before you start doing anything, make a note of your computer and Pi’s IP addresses, as you’ll need them to communicate to the Solace broker and Node-Red. Once you’ve done that, make sure that Node-Red is running on the Pi and Solace in your VM.
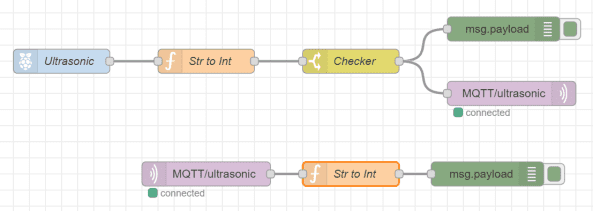
Connect to the Node-Red interface by entering <Pi IP address>:1880 in your web browser. Once it’s open, drag out a node that you want to send the data with, like an inject node for testing or a sensor one. Then drag an MQTT out node and connect your previous node to it. Double click on the MQTT out node and click the pen icon to configure it. For the server, add your computer’s IP, the MQTT port is already filled out as 1883. Click save and add a topic like “test/sensor”. Deploy it, check if it’s connected, and you’ve got your connection!
Now you have to wire up a sensor. I am using an ultrasonic sensor with the ability to not only detect when anybody passes by, but indicate at what distance. I won’t go into the wiring, so you could look at how to do it for your specific use case. A helpful starting point is the Using a Raspberry Pi distance sensor (ultrasonic sensor HC-SR04) website
Step 5: Future Applications
Now that you’ve got connection, you can make it use that information on your computer using Node-Red by using an MQTT in node, and you can install InfluxDB and Grafana in the VM to make Node-Red connect to InfluxDB and graph it onto Grafana. You can even go as far as forwarding the ports on your router to access the data over the internet. From there, if you decide to do this as more than a learning exercise, you’ll probably want to stream data to the cloud for more security, flexibility, and reliability.
Conclusion
I hope that you can now see how using Solace PubSub+ helps in this kind of situation. It allowed me to be able to send data easily and simplified the ability to do that in a Docker package, which also adds more expandability for connecting it to more applications for practical uses. I
About the Author
Explore other posts from categories: For Developers | Solace Scholars

 Solace Scholars


