Donald Le is a quality engineer in software with 9 years of experience.
Command query responsibility segregation (CQRS) is a computer programming principle that separates read and update actions in the databases. Using CQRS, you can optimize the application performance by choosing databases matching business use cases.
However, applying CQRS for your application is not simple as it sounds. In my software career, I experienced a lot of difficulties related to CQRS applications. Most problems come from the inefficiently synced mechanism between the writing and reading databases. Syncing too frequently will result in a heavy load on your reading database and can lead to application downtime. In contrast, syncing occasionally can confuse customers because of the mismatched data between the two databases.
Applying change data capture (CDC) for your databases is one way to overcome the above problems. I applied CDC in one of my recent projects, and the syncing mechanism has run smoothly. In this article, let’s learn how to apply CDC for your databases using Solace Platform to implement the CQRS-enabled application efficiently.
What is CQRS
CQRS is a software principle that favors the separation between handling write and read operations. Usually you typically handle both the reading and writing operations the same way. By applying CQRS, you can choose the optimized database for each operation. Moreover, you can scale the application more efficiently because the writing and reading operations are now separated.
The Benefits of Using CQRS
There are three primary benefits of using CQRS:
- Scalability: In CQRS, you use different databases for each operation. If your application needs to handle writing operations more than reading, you can scale out the resources for writing databases. In contrast, if your app does not need much reading capability, you can also scale in the reading databases. Applying CQRS allows you to scale your app easily. In addition, you can also optimize the cost of managing infrastructure since you don’t have to scale both writing and operating databases.
- Performance: Applying CQRS also boost the performance of your application. You can choose the ideal databases for each operation. For example, you can use the PostgreSQL database for writing operations and Redis for reading operations. PostgreSQL is a relational database that allows you to design and work on related objects to address your business requirements. On the other hand, Redis is a simple key-value database optimized for reading capability. Using both PostgreSQL and Redis enables you to have the benefits of both databases and improve the app’s performance tremendously.
- Event Sourcing: Event sourcing is a pattern that focuses on building software driven by a sequence of events. Event sourcing allows your application state to be repeatable if anything goes wrong. In addition, it also prevents data conflict from happening since data is now updated using events sequentially, not directly updated.
Combining CQRS with the event sourcing pattern lets you separate events between reading and writing databases. As a result, you get a more flexible capability in replaying and auditing applications using an event approach.
Difficulties in Syncing Between the Write and Read Databases
Despite offering many benefits, CDC is not low-hanging fruit for you to grab. The hardest part of applying CDC for a software application lies in its difficulties syncing between the write and the read databases.
The first problem is finding the optimal time for syncing between the write and read databases. Syncing too frequently, say 3-5 seconds, will put high pressure on the read database and decrease performance. On the other hand, occasionally syncing, 30-45 seconds, will bring noticeable unmatched data between the read and write databases and confuse users.
The second problem is handling and recovering from errors when syncing data. While syncing data between the writing and reading databases, network errors or application exceptions can cause the syncing process to be halted. As a result, you cannot ensure data integrity in your reading database.
To overcome these challenges, you must combine the change data capture (CDC) technique with your CQRS implementation.
With CDC, the system will be notified of every update in the writing database and trigger appropriate action. This allows your application state to be updated in real-time and does decrease your application performance since the reading database only needs to be updated with the data that has been changed.
In addition, if any errors happen during the syncing process, you can try to sync it again using the events marked as failed.
Moreover, if applying CDC using a publish/subscribe pattern with Solace Event Broker, other services within your app can also consume the events to trigger the corresponding action that matches your business needs.
Demo Application
Let’s build a demo app to understand better how to apply CDC and CQRS to build a performant and reliable application.
The application will use the PostgreSQL database as the writing database (create/update/delete blogs) and the Redis as the reading database (get the blog by ID, get all blogs).
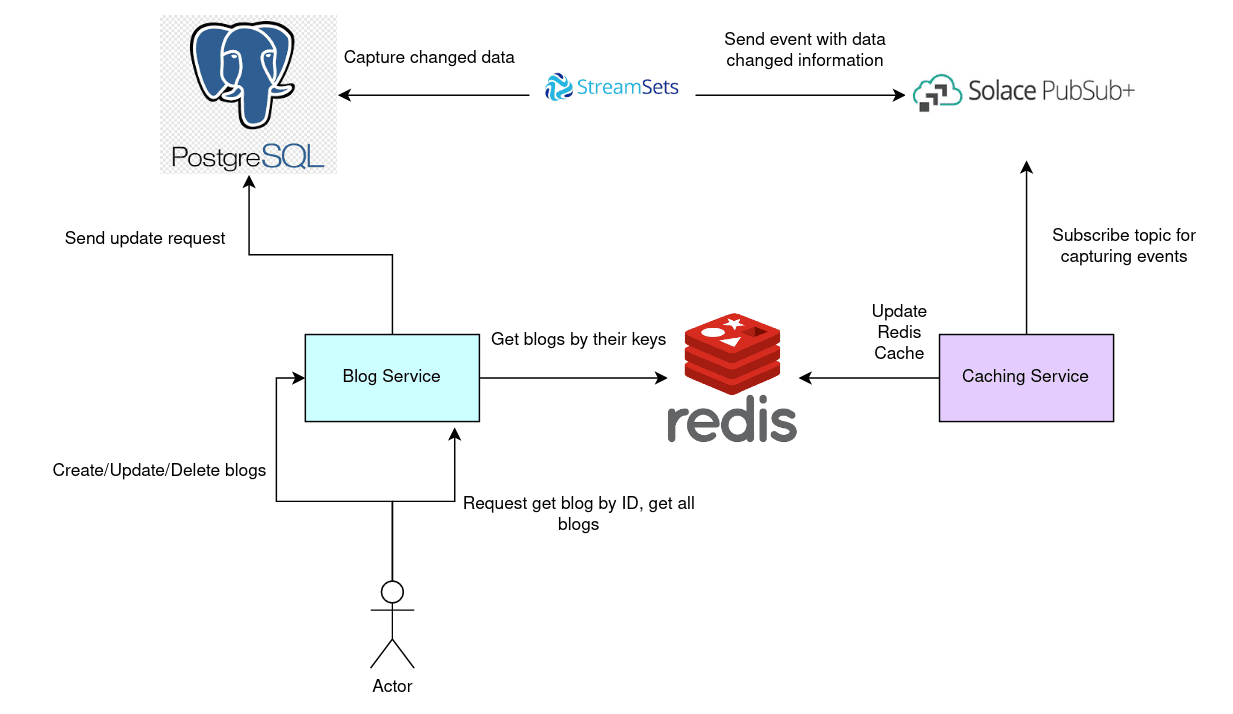
Figure 1: Illustration of the application flow
- When users make some requests to the APIs to create/update/delete blogs, the PostgreSQL database will be updated.
- Then, an event will be created by Solace Event Broker thanks to the CDC mechanism triggering by StreamSets.
- Finally, the caching service will use the generated event to update data in Redis accordingly.
- As a result, users can get the latest blog updated content when they request APIs to get the blog by ID or all blogs.
Prerequisites
To go along with the step-by-step demo application, you need to prepare the following prerequisites:
- A ready-to-use Linux machine, preferably an Ubuntu version 20.04
- The Git command line is installed to clone code from GitHub repositories
- Having an account on Solace Cloud
- Having an account on StreamSets
- Already installed the Go programming language (preferably version 1.19 or above) on the local machine
- Already installed Docker (version 24.0.2 or above) and Docker Compose (version 2.18.1 or above)
- Already installed the PostgreSQL database (preferably version 14.8 or above)
Step 1: Set up the Postgresql Database
In this section, you will create a new database and a new user with a password for accessing it. Then you will enable change data capture for the PostgreSQL database.
Create a New Database and a New User
Open up a new terminal and access the PostgreSQL database as administrator. Run the following command to create a new user named `donald` with the same password.
create user donald with password 'donald';
Create a new database named `donald` and assign `donald` user as the owner.
create database donald owner donald;
Then alter the role of user `donald` to `superuser` role.
alter user donald with superuser;
Now that you have successfully created the username and the database. Let’s try to access the `donald` database using the user `donald`:
psql -h localhost -U donald -d donald
Provide `donald` as the password value. Then run the following command to use `donald` database:
\c donald
Create a new table named “blogs” to store the blog data.
CREATE TABLE blogs (
	blog_id serial PRIMARY KEY,
	title VARCHAR ( 50 ) NOT NULL,
	content VARCHAR ( 3000 ) NOT NULL,
	author VARCHAR ( 100 ) NOT NULL,
	created_on TIMESTAMP NOT NULL,
        last_updated TIMESTAMP
);
Enable Change Data Capture
To enable change data capture for the PostgreSQL database, you need to:
- Set the “wal_level” value of the PostgreSQL database to “logical”
- Install wal2json plugin so that the PostgreSQL database can interact with StreamSets so that you can send events to Solace Event Broker
To set the “wal_level” value to “logical”, run the following command in the current PostgreSQL database session:
ALTER SYSTEM SET wal_level = logical;
To install the wal2json plugin, let’s say for an Ubuntu machine, run the following command in a new terminal:
sudo apt-get install postgresql-14-wal2json
Then log out of the PostgreSQL database session and restart the PostgreSQL service.
service postgresql restart
Open the Postgresql Database for Remote Access
For StreamSets to access your local PostgreSQL database, you need to expose your DB to remote access.
Open up a new terminal and run the following command to edit the “postgresql.conf” file.
sudo vim /etc/postgresql/14/main/postgresql.conf
Uncomment and set the “listen_addresses” value to “*” for the PostgreSQL database to listen for all addresses from outside.
listen_addresses = '*'
Then edit “pg_hba.conf” file to allow access from all IP addresses in the internet.
sudo vim /etc/postgresql/14/main/pg_hba.conf
Edit the line with “host all all … scram-sha-256” to the following value:
host all all 0.0.0.0/0 scram-sha-256
Log out of the session of the PostgreSQL database and run the following command to expose port “5432” to the outside.
sudo ufw allow 5432/tcp
Now that you have successfully set up the PostgreSQL database let’s move on to set up the Solace Cloud.
Step 2: Set up Solace Cloud
Follow the Create Your First Event Broker Service page to create your Event Broker Service. Then you must disable “DIRECT TRANSPORT” in your Event Broker Service for StreamSets to interact with it.
From Solace Console Page, click on the “Cluster Manager” button on the left panel.
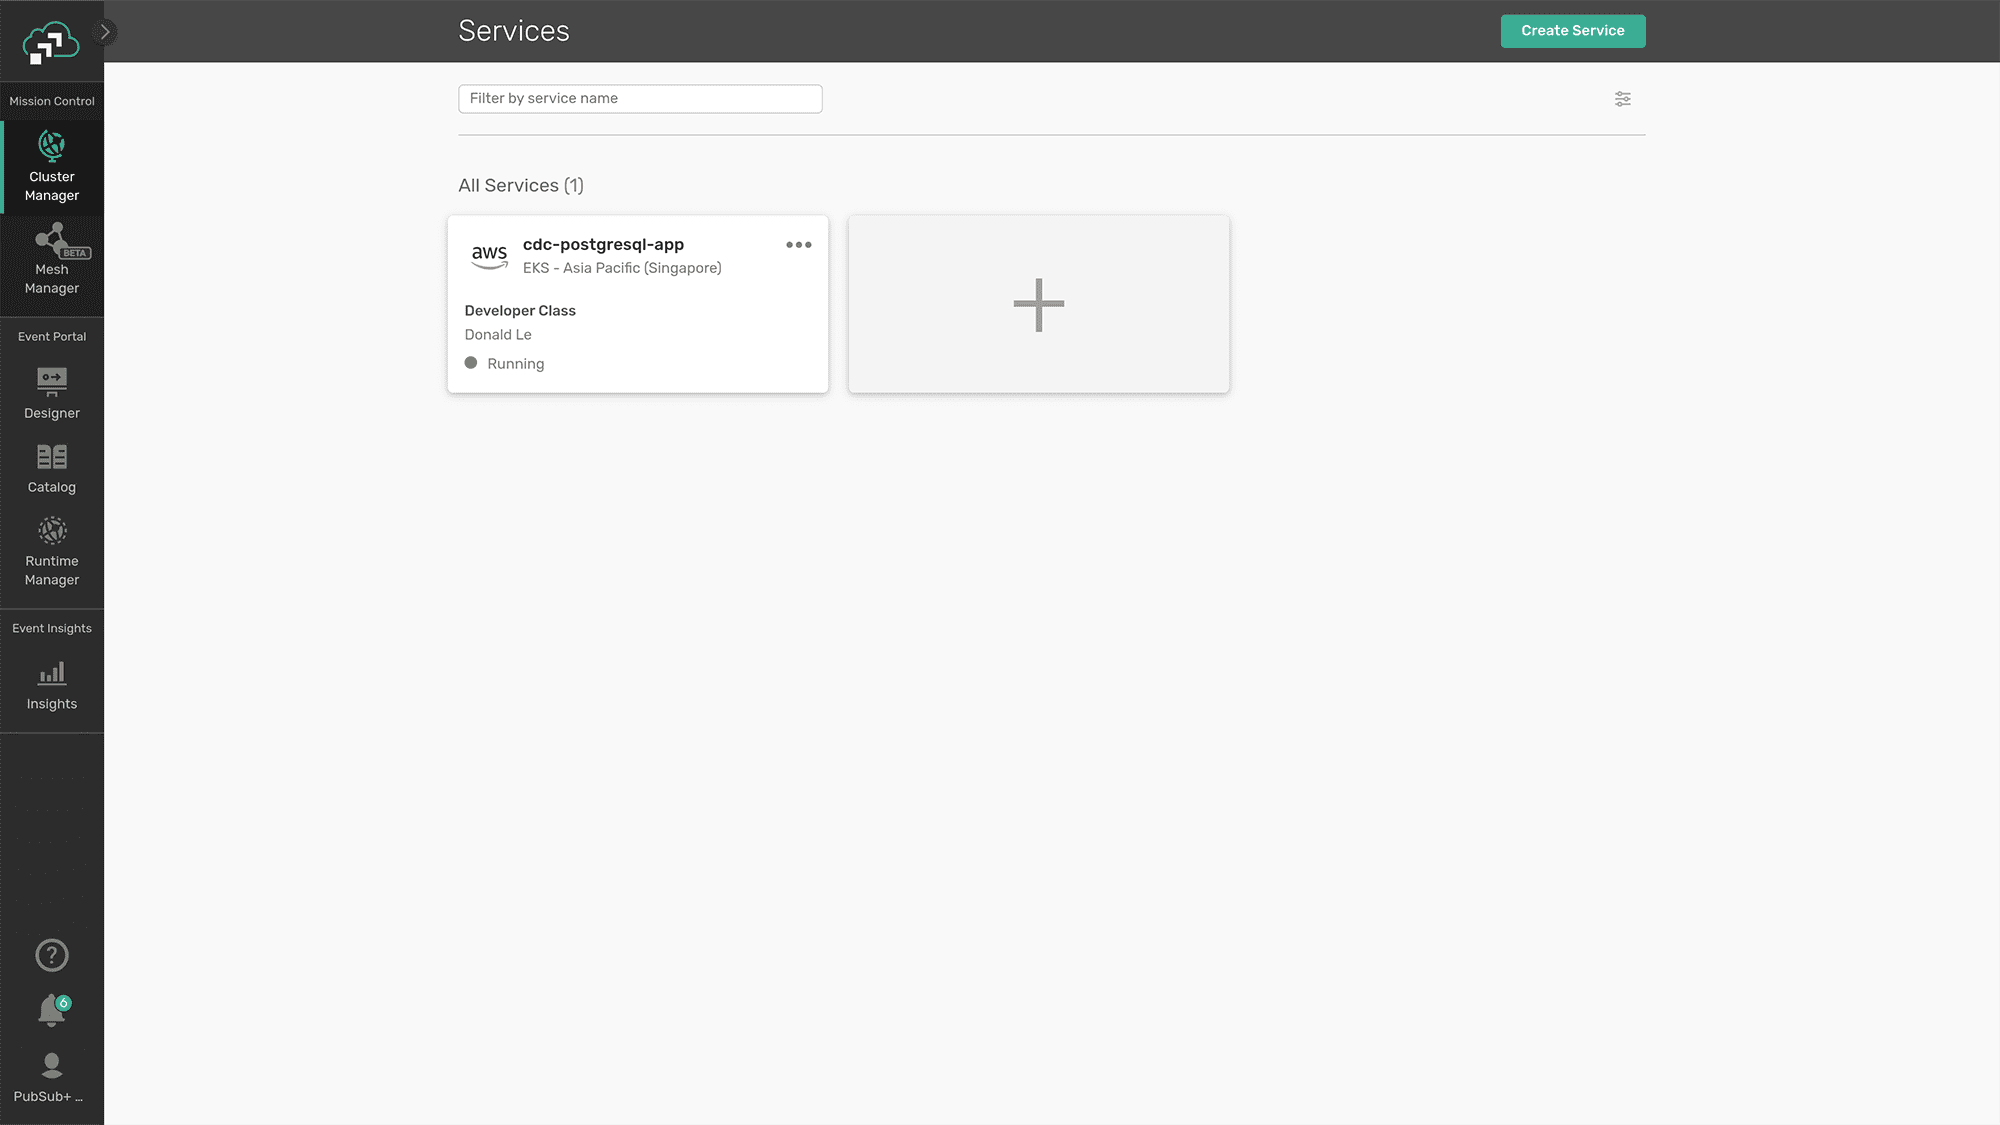
Figure 2: Open “Cluster Manager” page
Click on “…” option and choose “Manage Service”. A new window should be opened and automatically navigated to the “Manage Service” page.
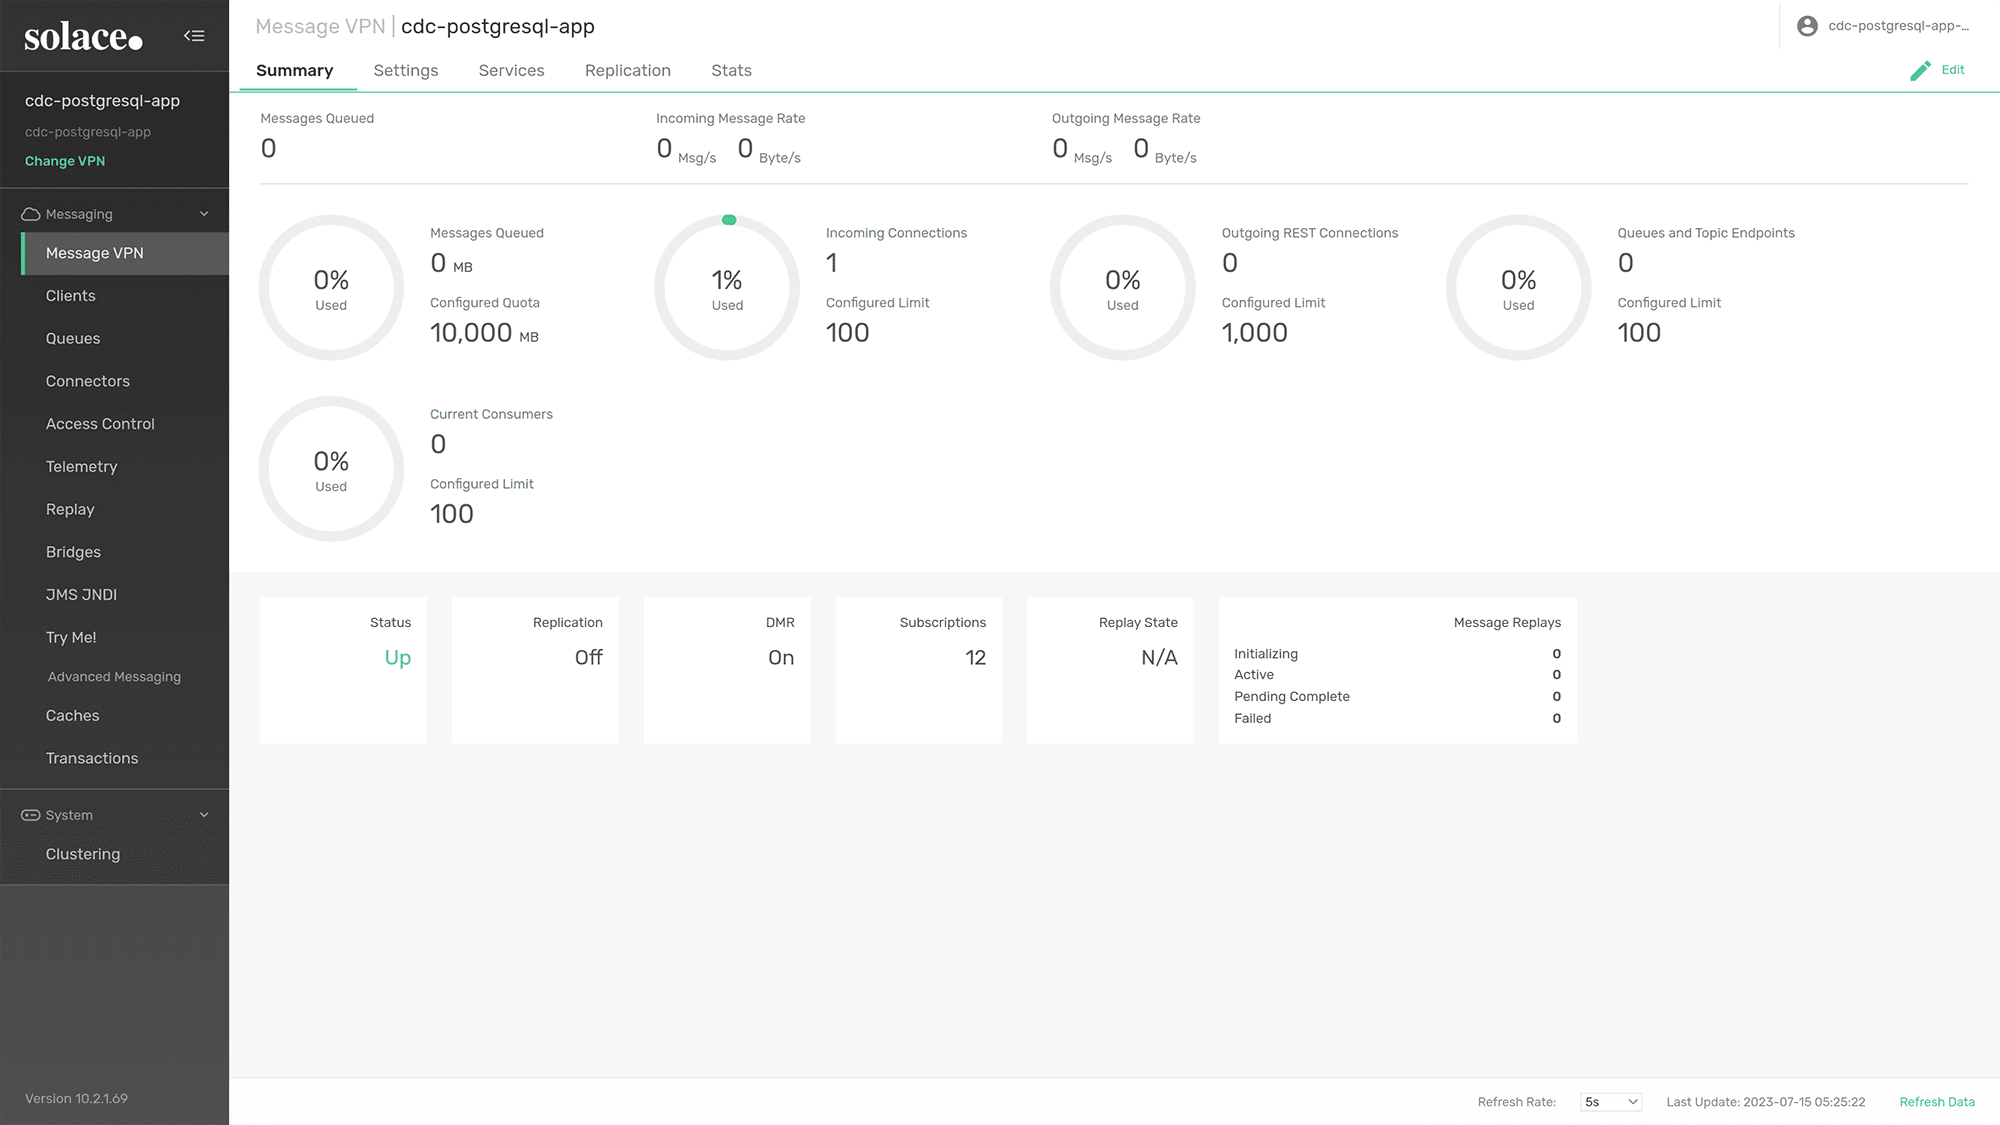
Figure 3: A new window is opened and navigated to the “Cluster Manager” page
Click on “JMS JNDI” button on the left panel.

Figure 4: Click on “JMS JNDI” button
Then click on “Connection Factories” tab.
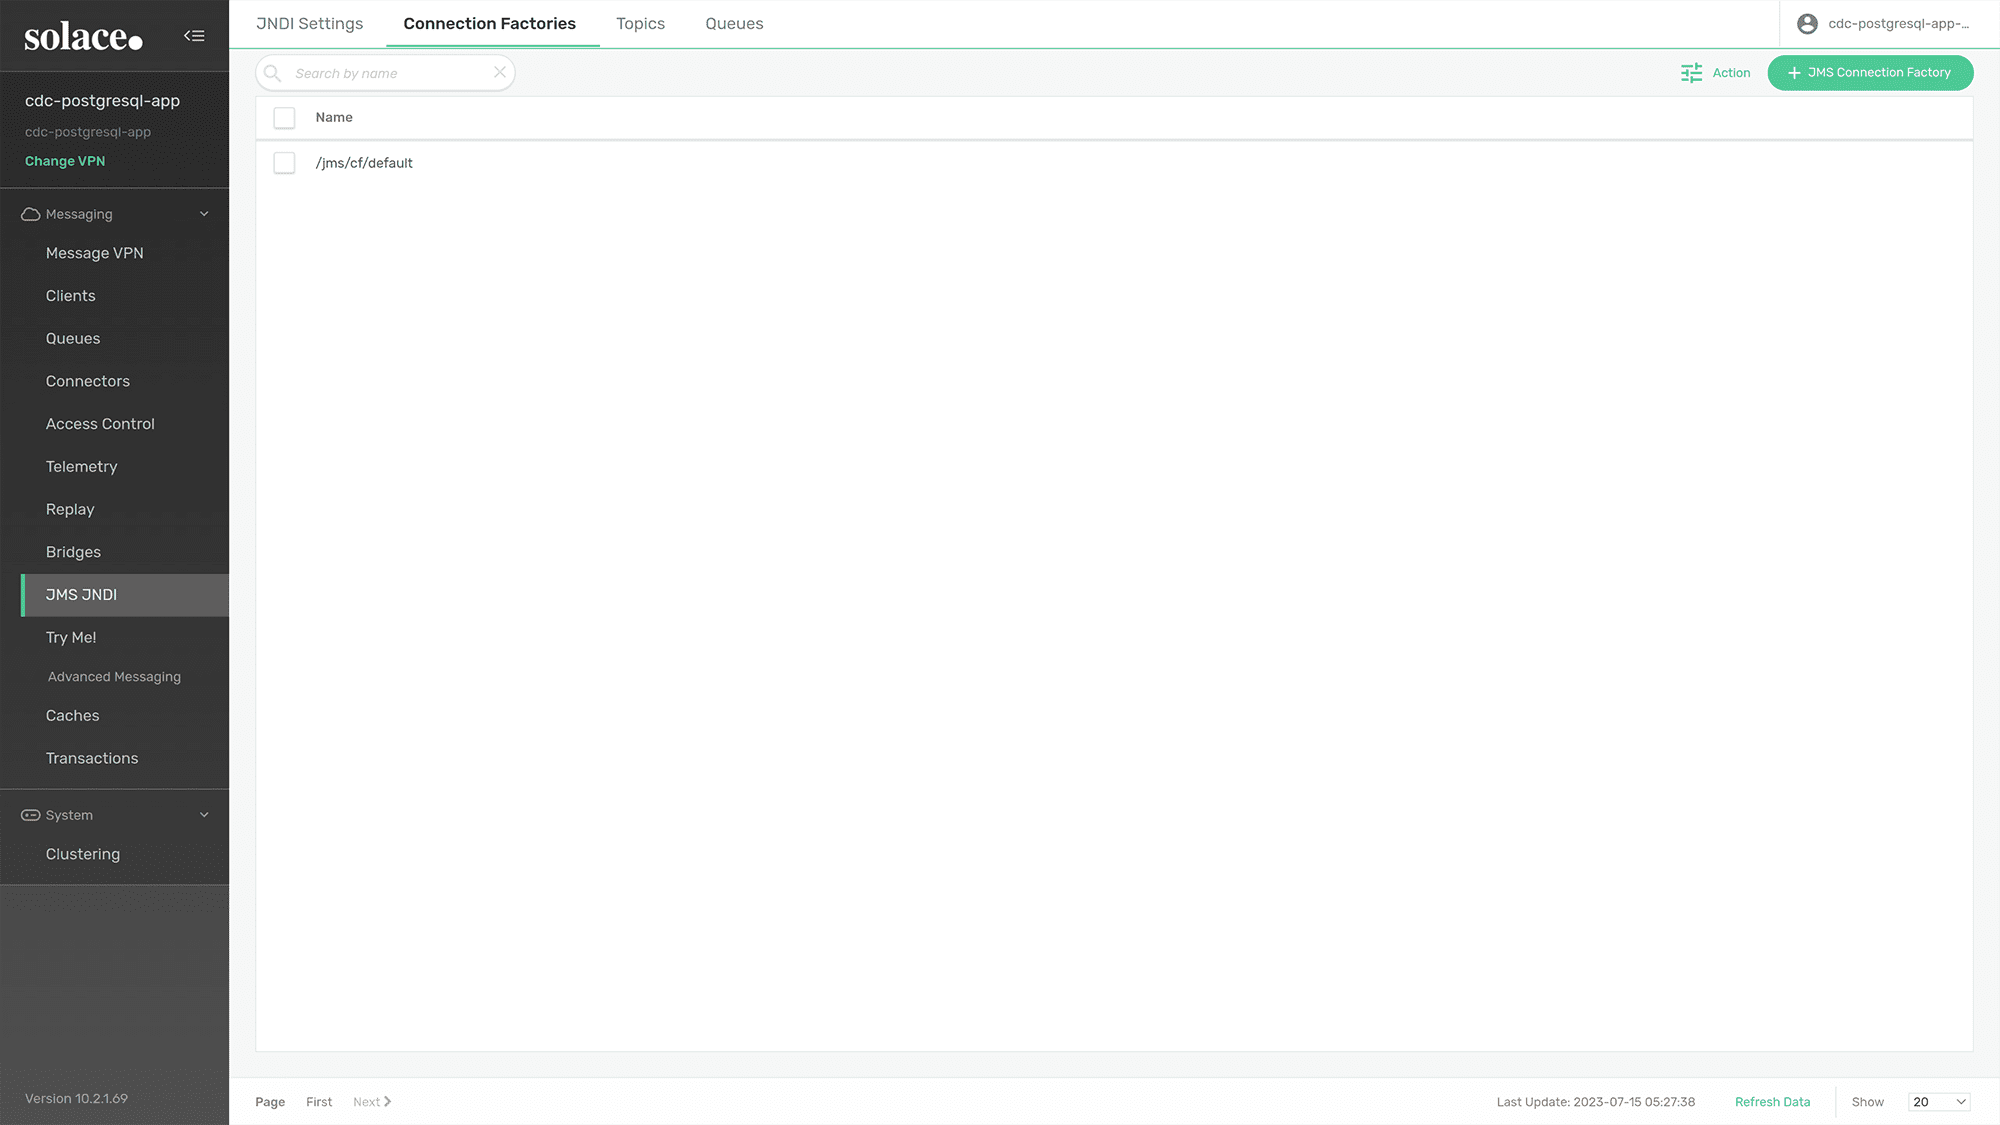
Figure 5: Click on the “Connection Factories” column
Then choose “/jms/cf/default” connection factory, click “Edit” and disable “DIRECT TRANSPORT” .
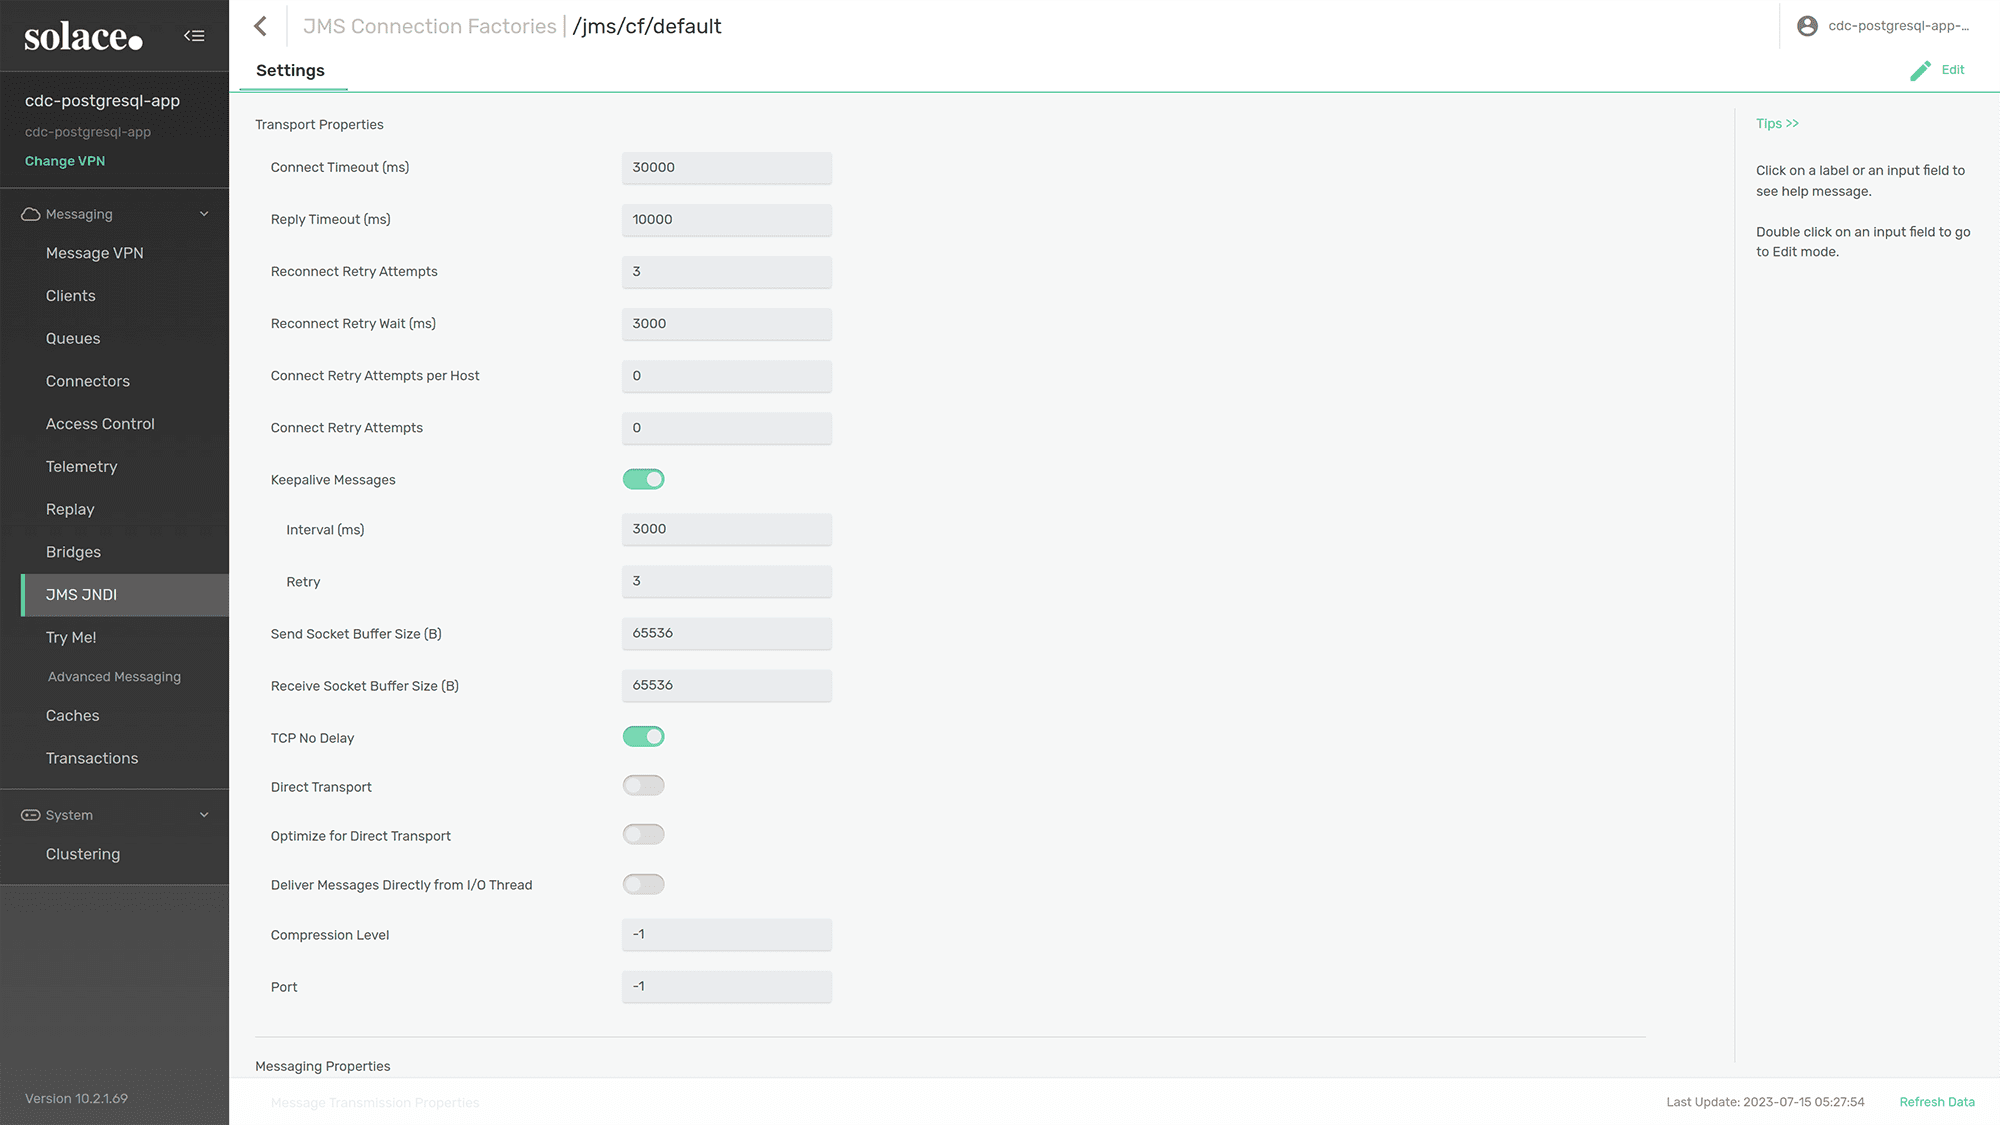
Figure 6: Disable “Direct Transport”
You have now completed the setup for Event Broker Service. Let’s move on to the next section to integrate the PostgreSQL database and Solace using StreamSets.
Step 3: Using Streamsets To Enable CDC Between Postgresql and Solace Platform
Login StreamSets with your account, then click the “Deployments” button under the “Set Up” section.
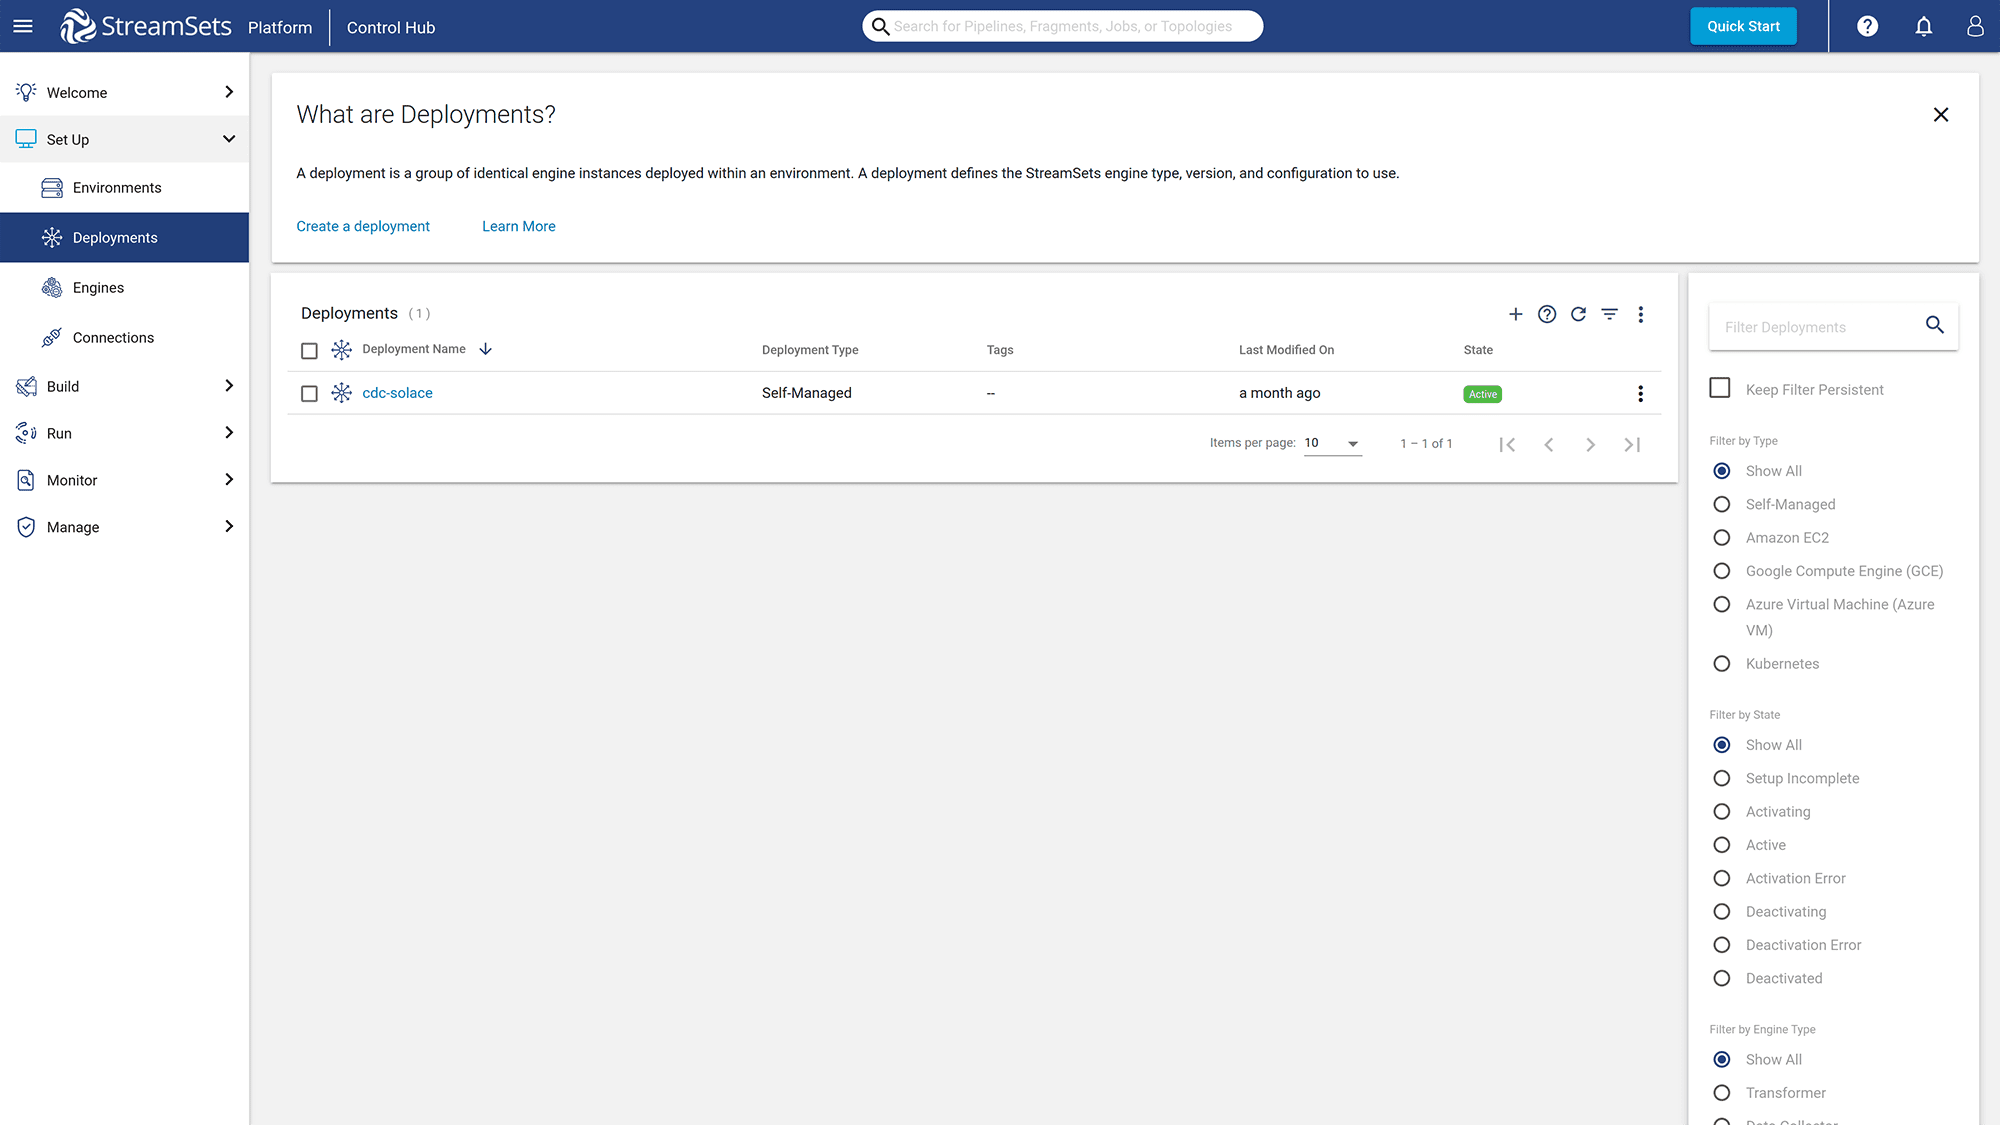
Figure 7: Choose “Deployments” option
Click on “+” button to create a new deployment for integrating the PostgreSQL database, Event Broker Service with StreamSets.
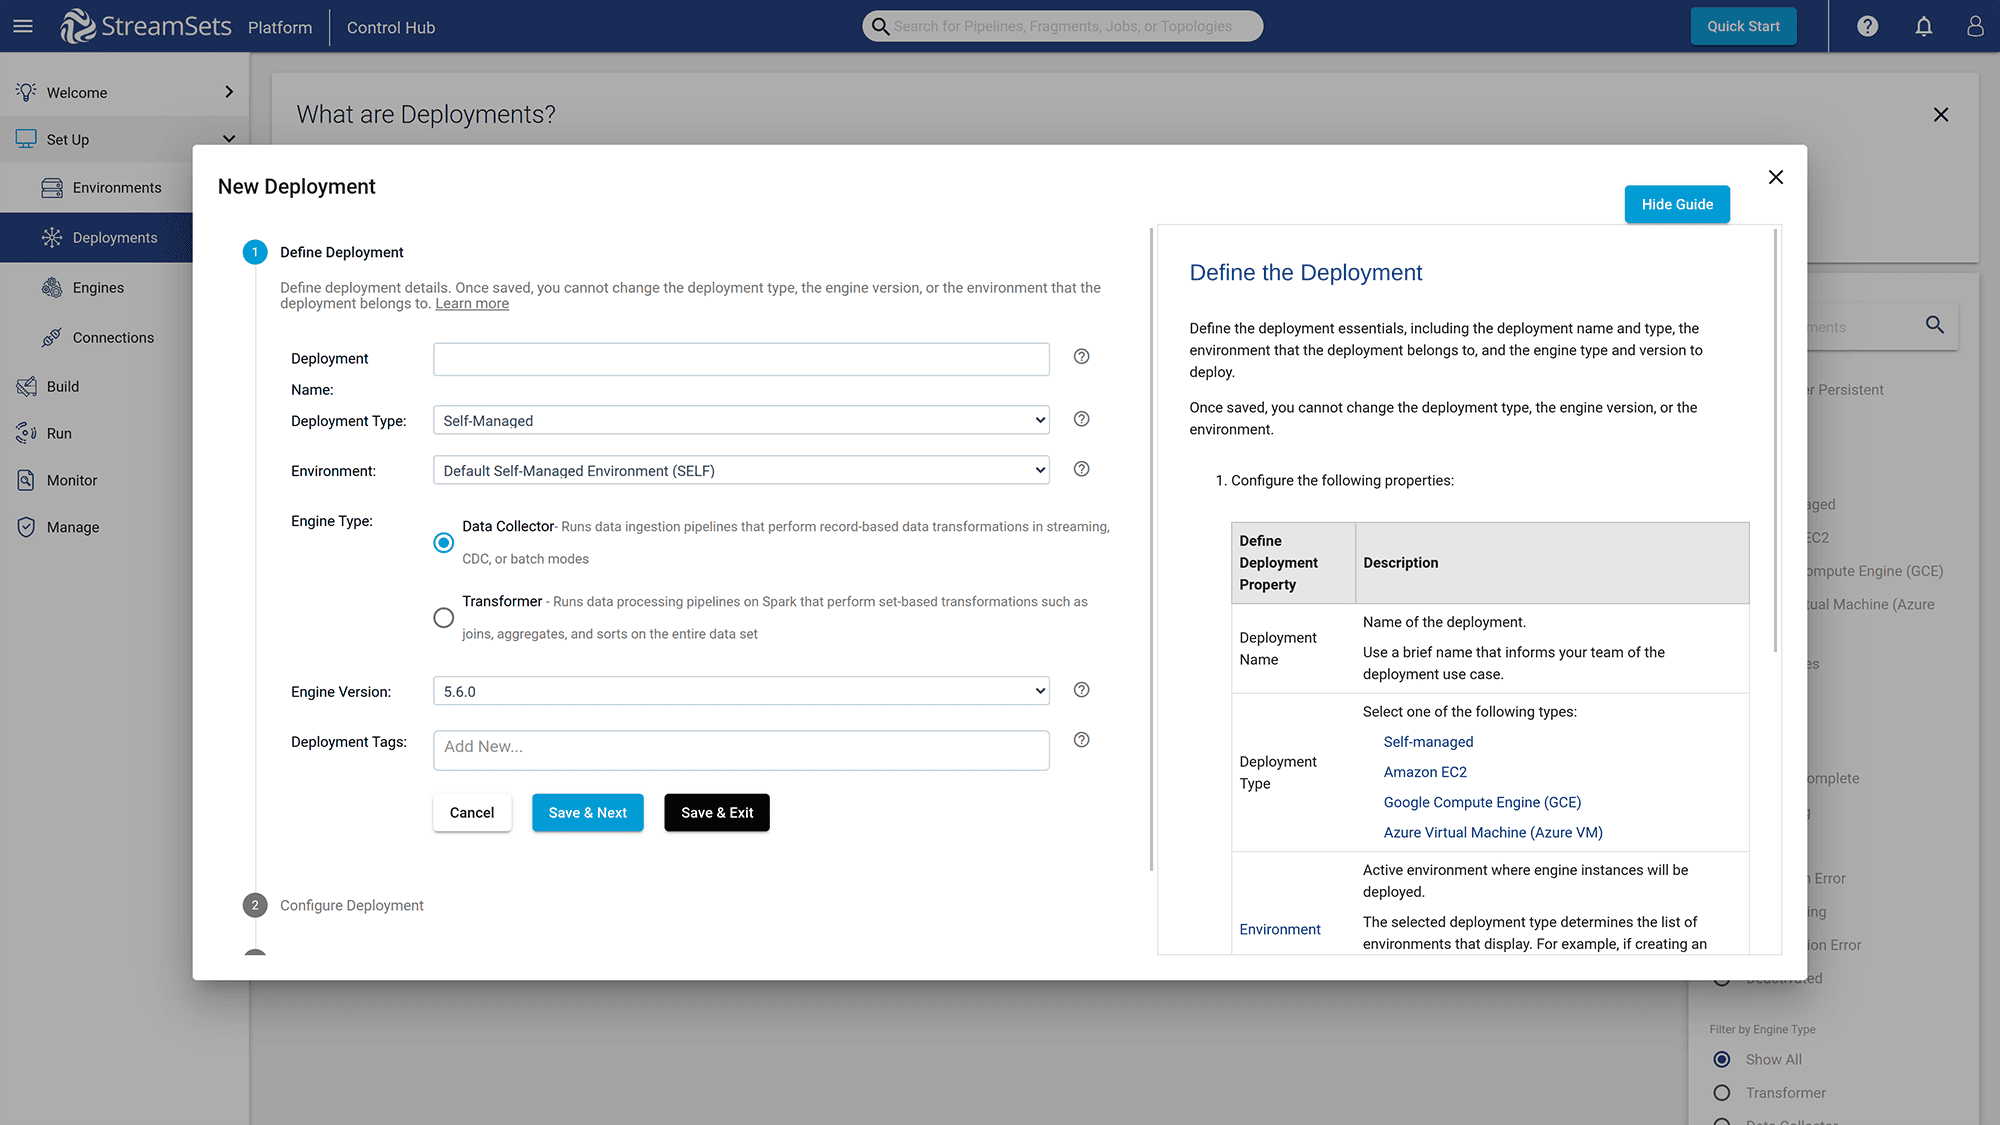
Figure 8: Create a new deployment
Provide the “Deployment Name” for your new deployment. Click the “Save & Next” button to move to the second step.
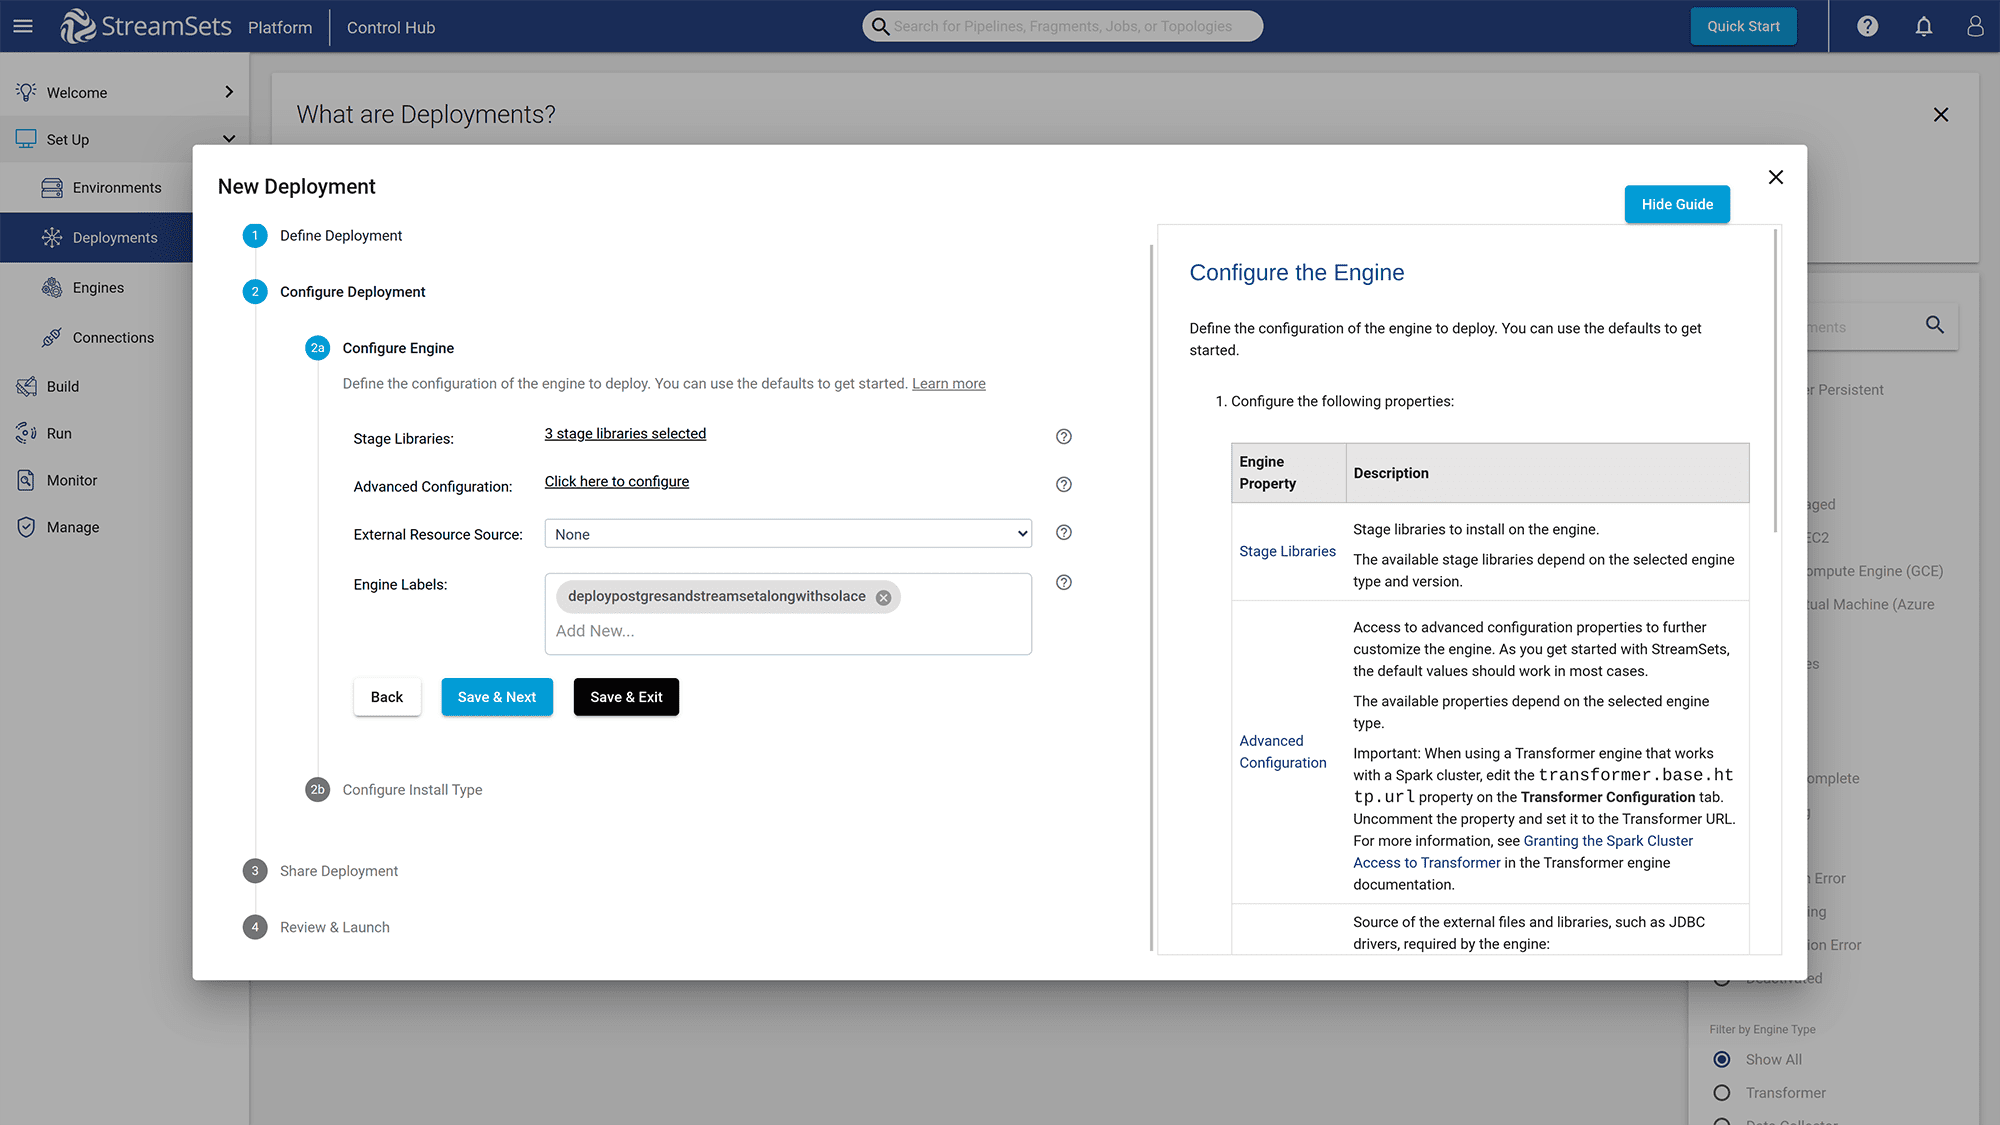
Figure 9: Click on the “x stage libraries selected” link to add new libraries
Click on the “x stage libraries selected” link to add libraries for “JMS” since StreamSets uses the JSM library to interact with the Event Broker Service.
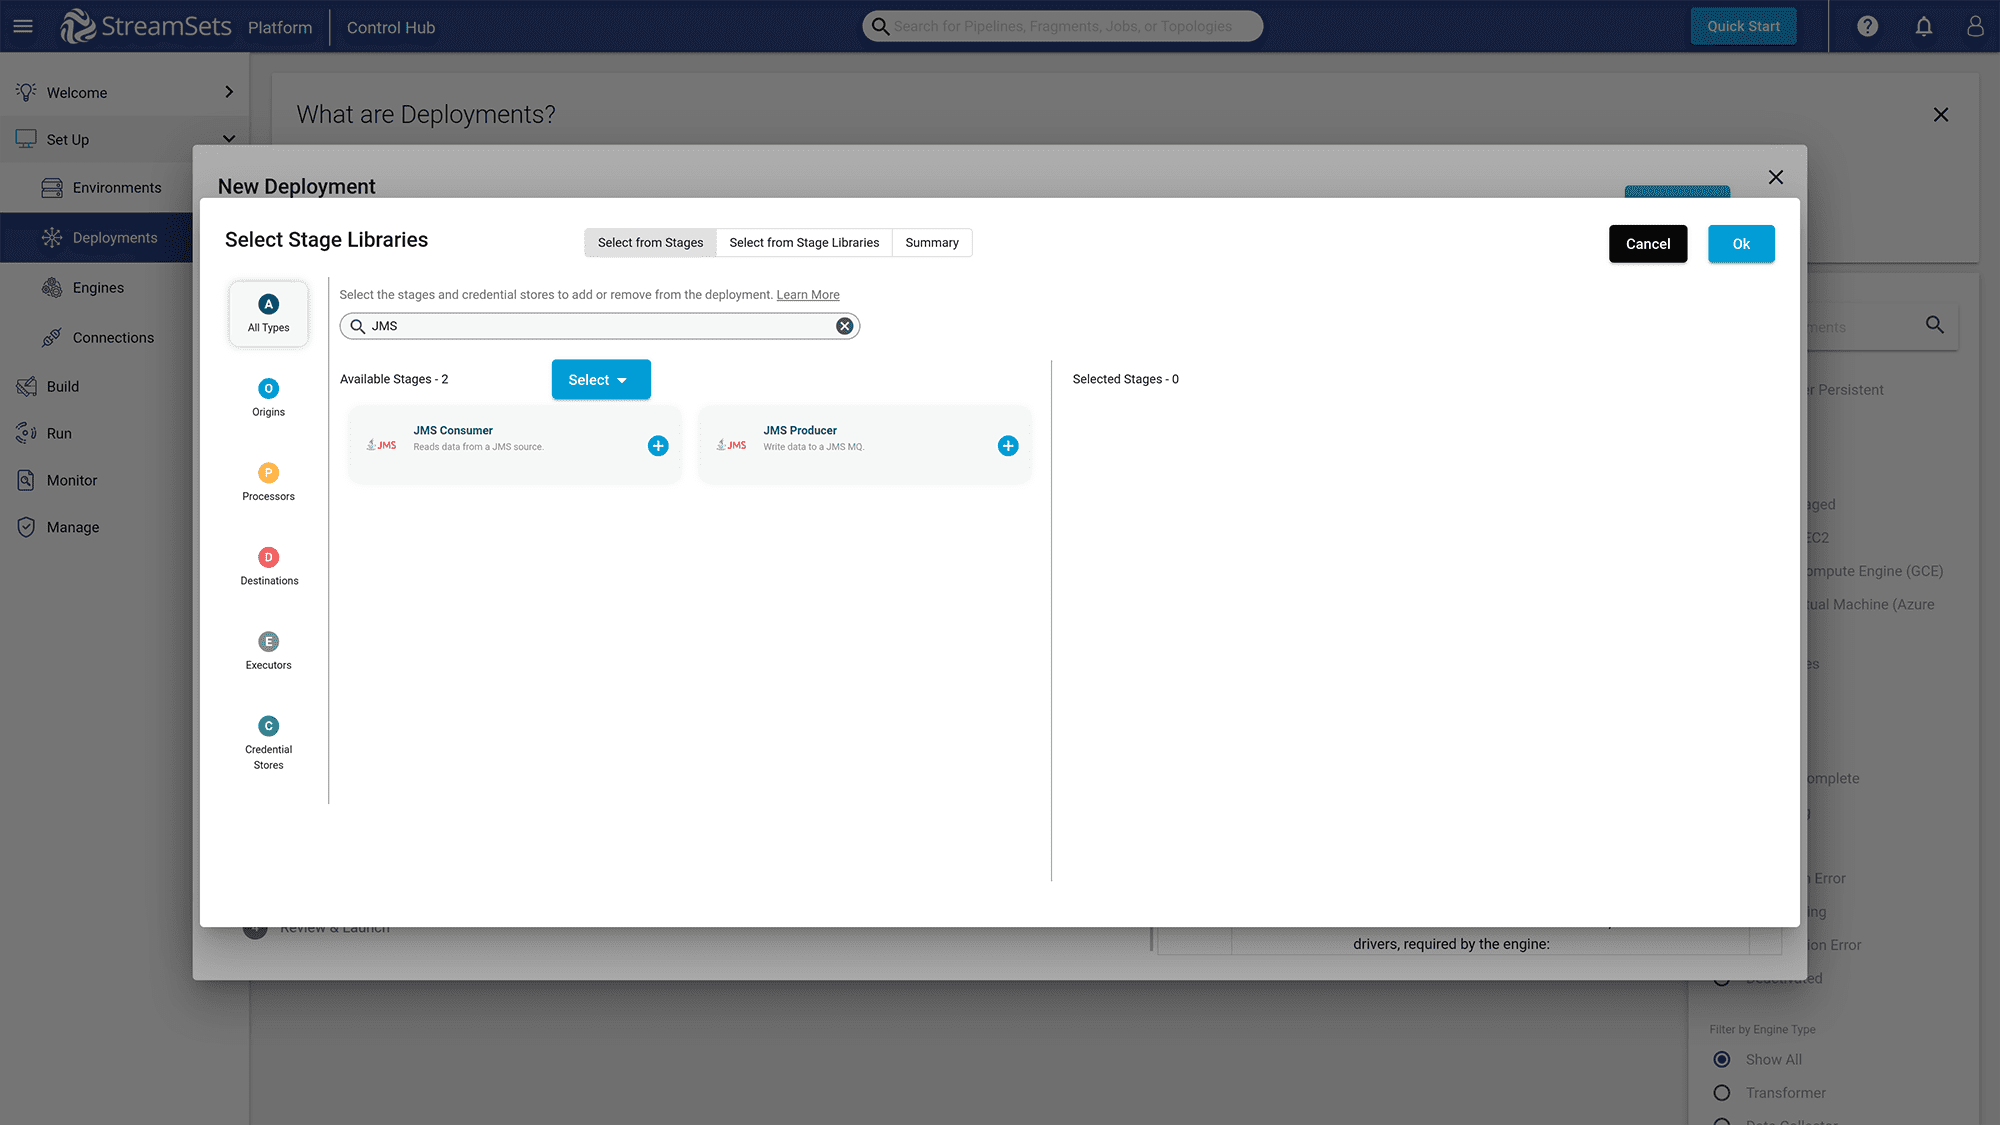
Figure 10: Search for JMS Libraries and add JMS Producer
You must also add the “PostgreSQL CDC Client” library for StreamSets to interact with PostgreSQL to capture data changes.
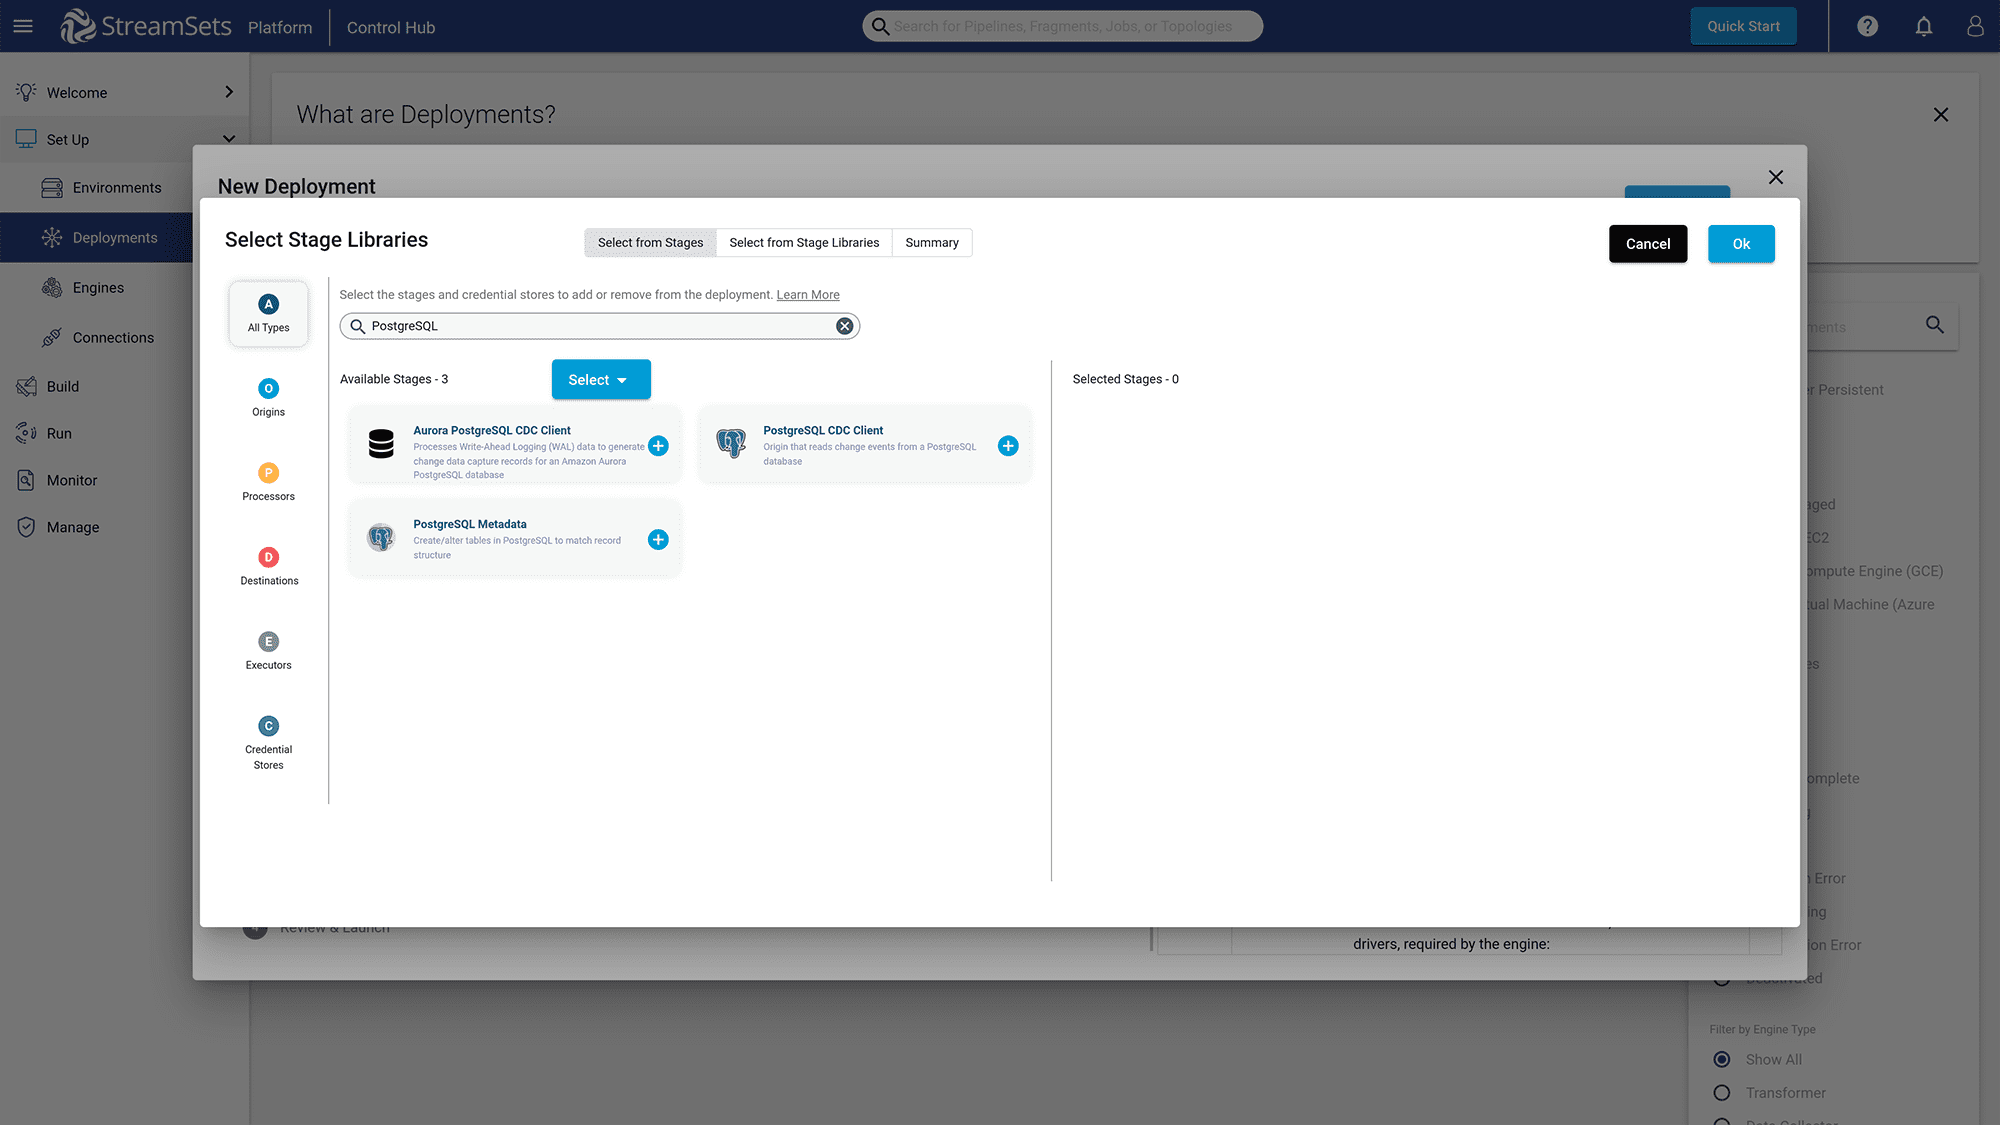
Figure 11: Search for PostgreSQL CDC Client and add this library to the deployment
Finally, click on the “Save & Next” button in the next steps to create the deployment for StreamSets.
After the deployment has been created, go to the new Deployment page.
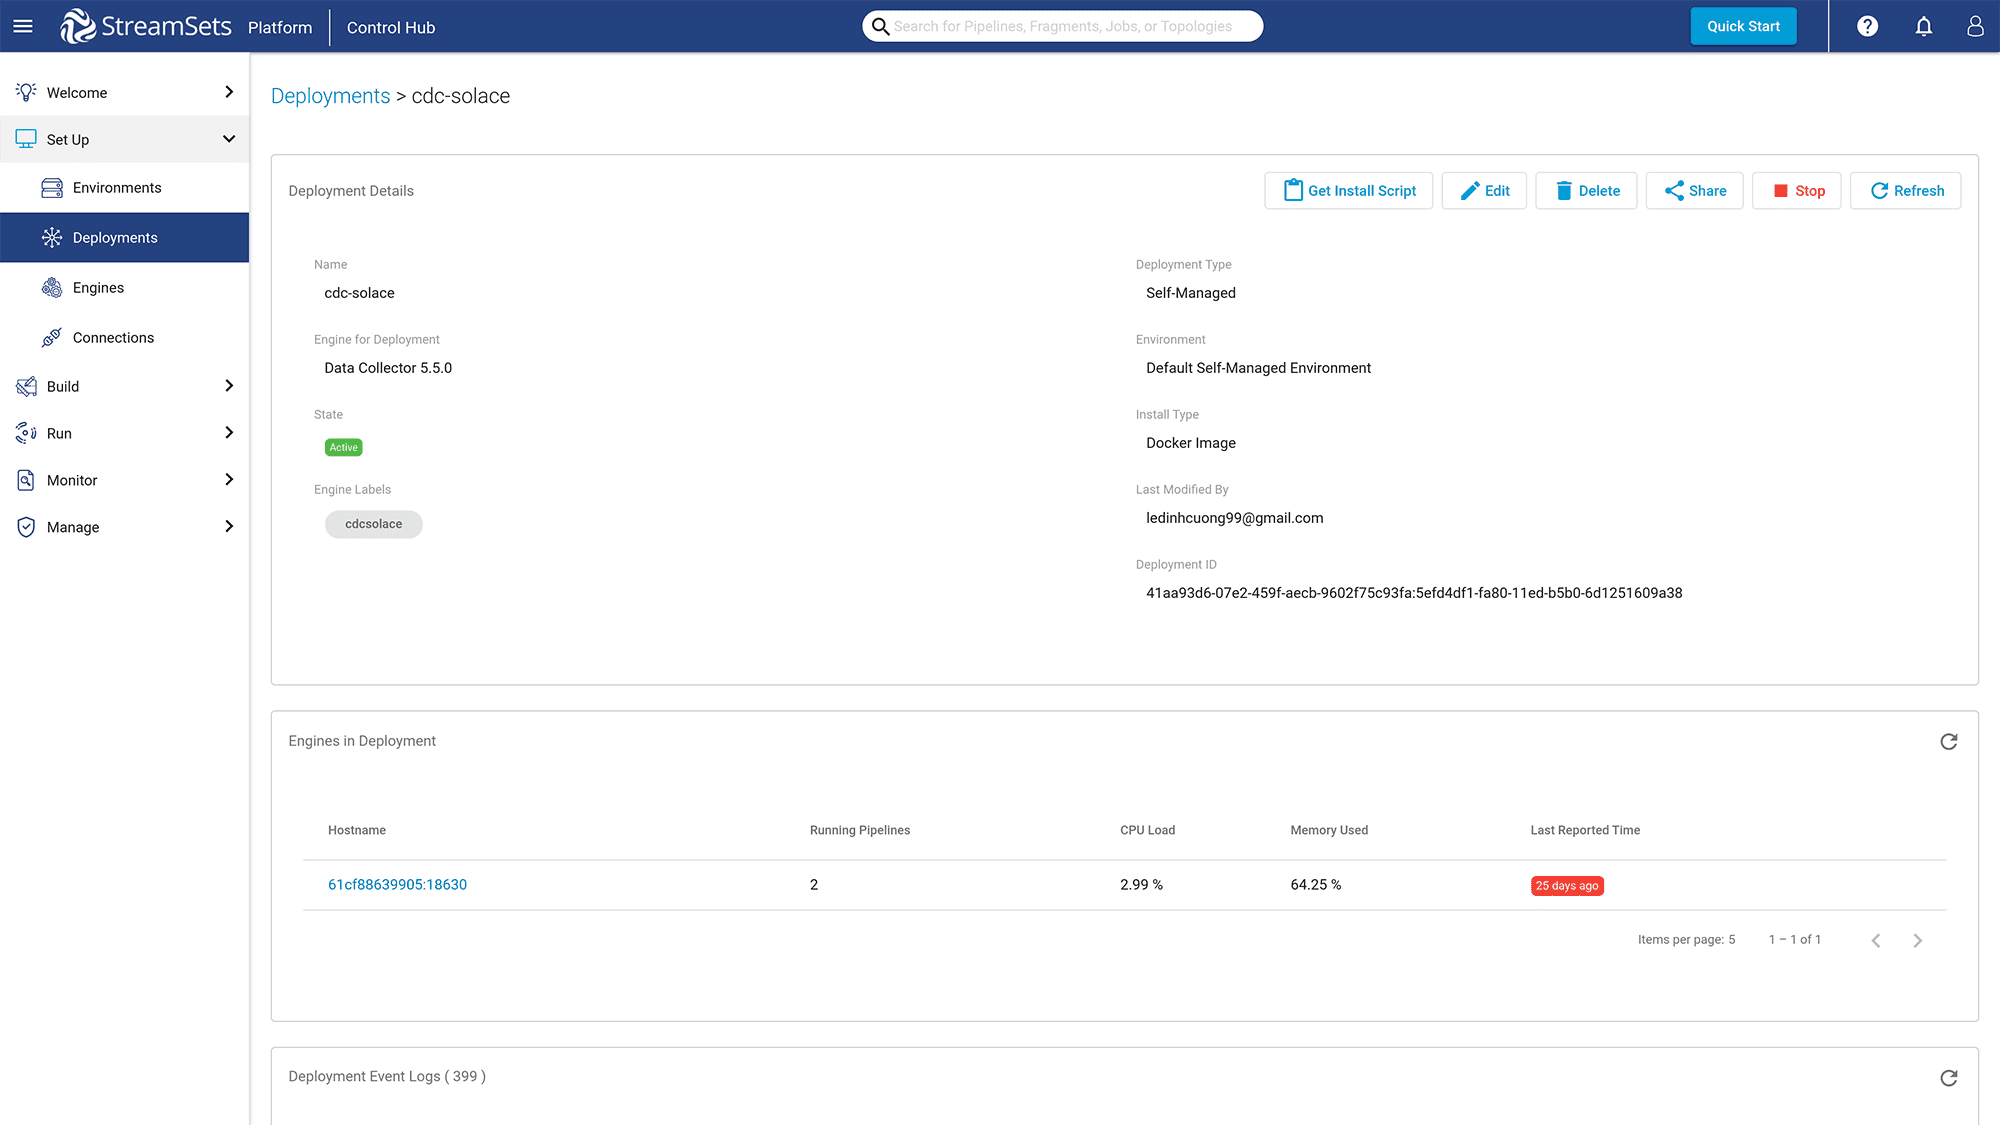
Figure 12: Go to the deployment page of the new deployment
Click “Get Install Script” and choose the “Run engine in background” option.
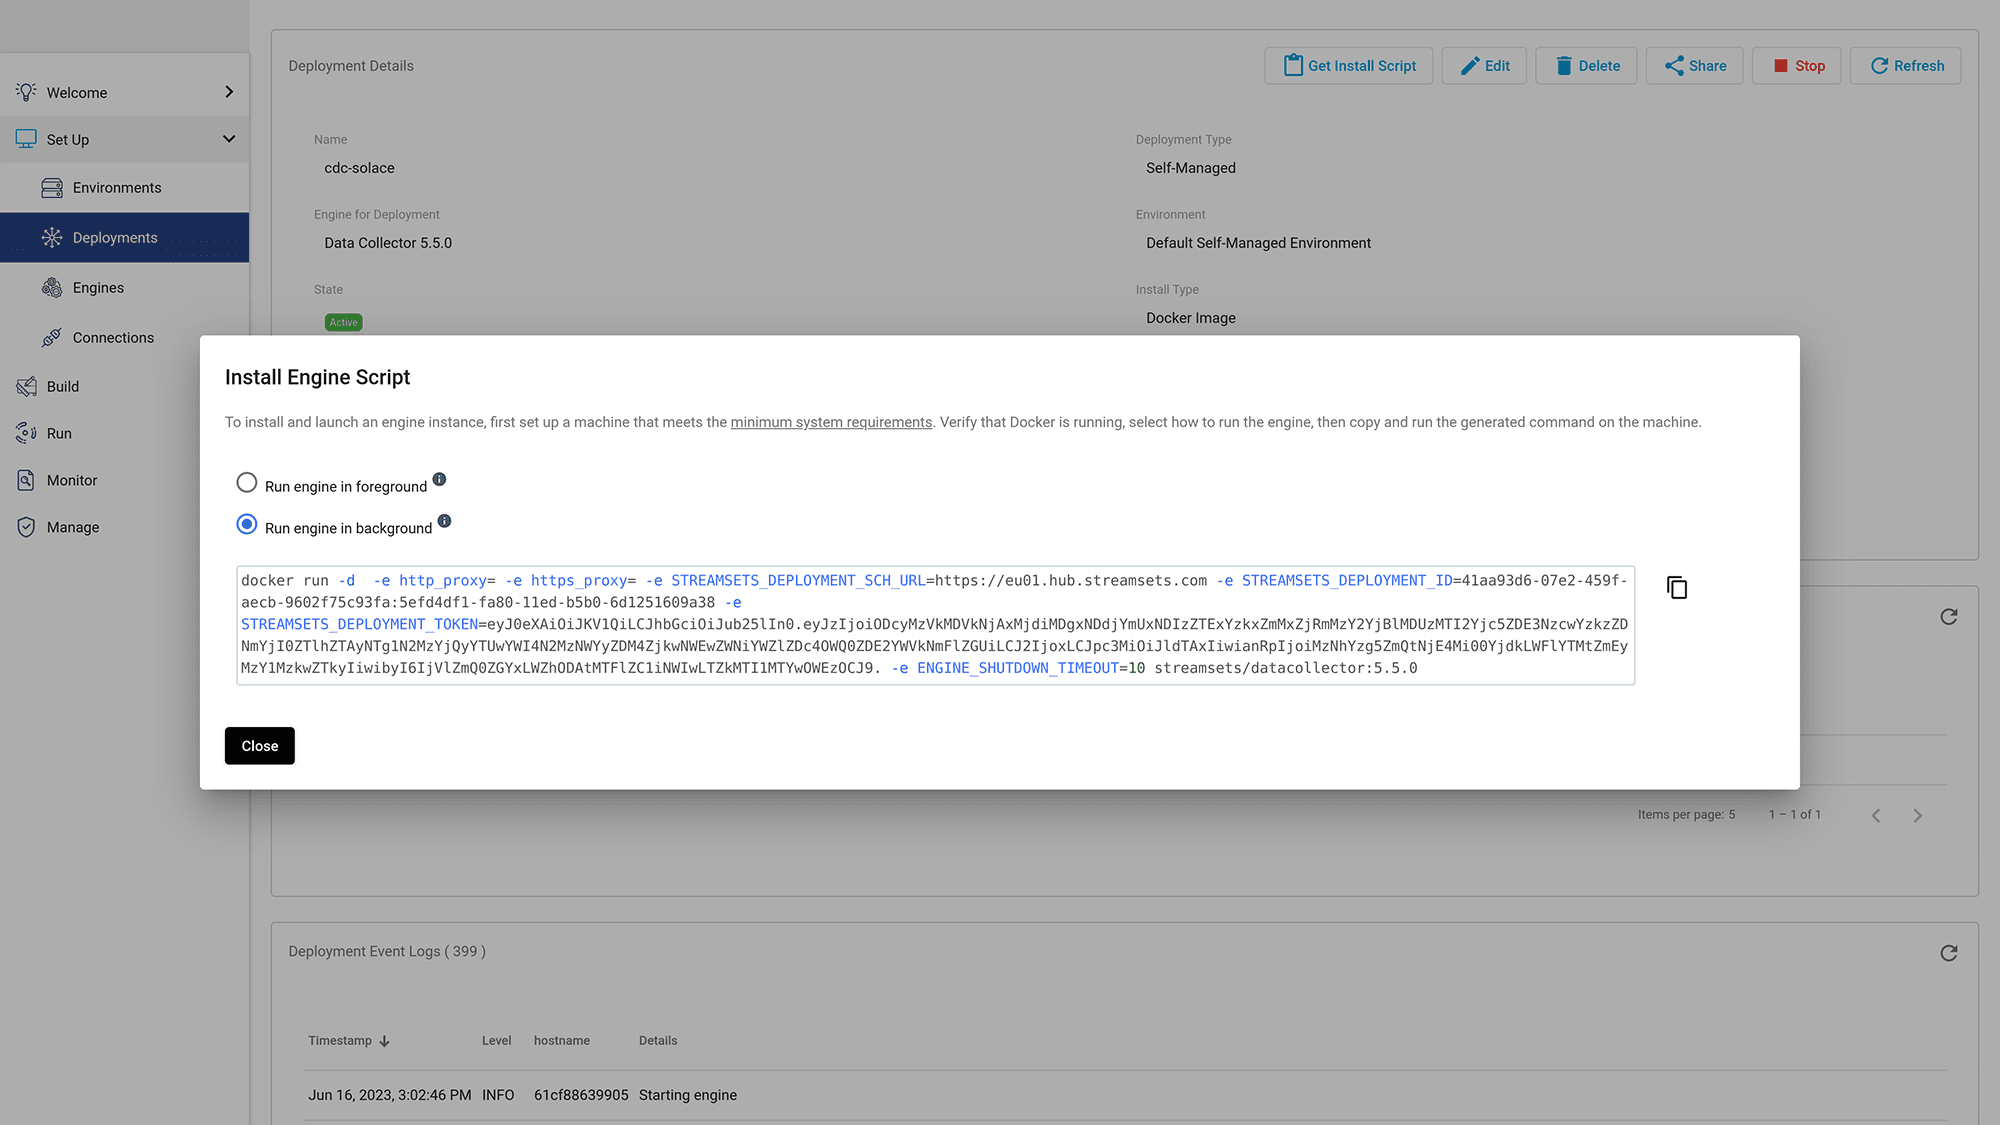
Figure 13: Copy the “Run engine in background” script
Copy the “Run engine in background” script and run it in a new terminal.
docker run -d -e http_proxy= -e https_proxy= -e STREAMSETS_DEPLOYMENT_SCH_URL=scheme-url -e STREAMSETS_DEPLOYMENT_ID=deployment-id -e STREAMSETS_DEPLOYMENT_TOKEN=your_token -e ENGINE_SHUTDOWN_TIMEOUT=10 streamsets/datacollector:5.5.0
Wait for a few minutes for a new engine to be created, then go to the engine page.
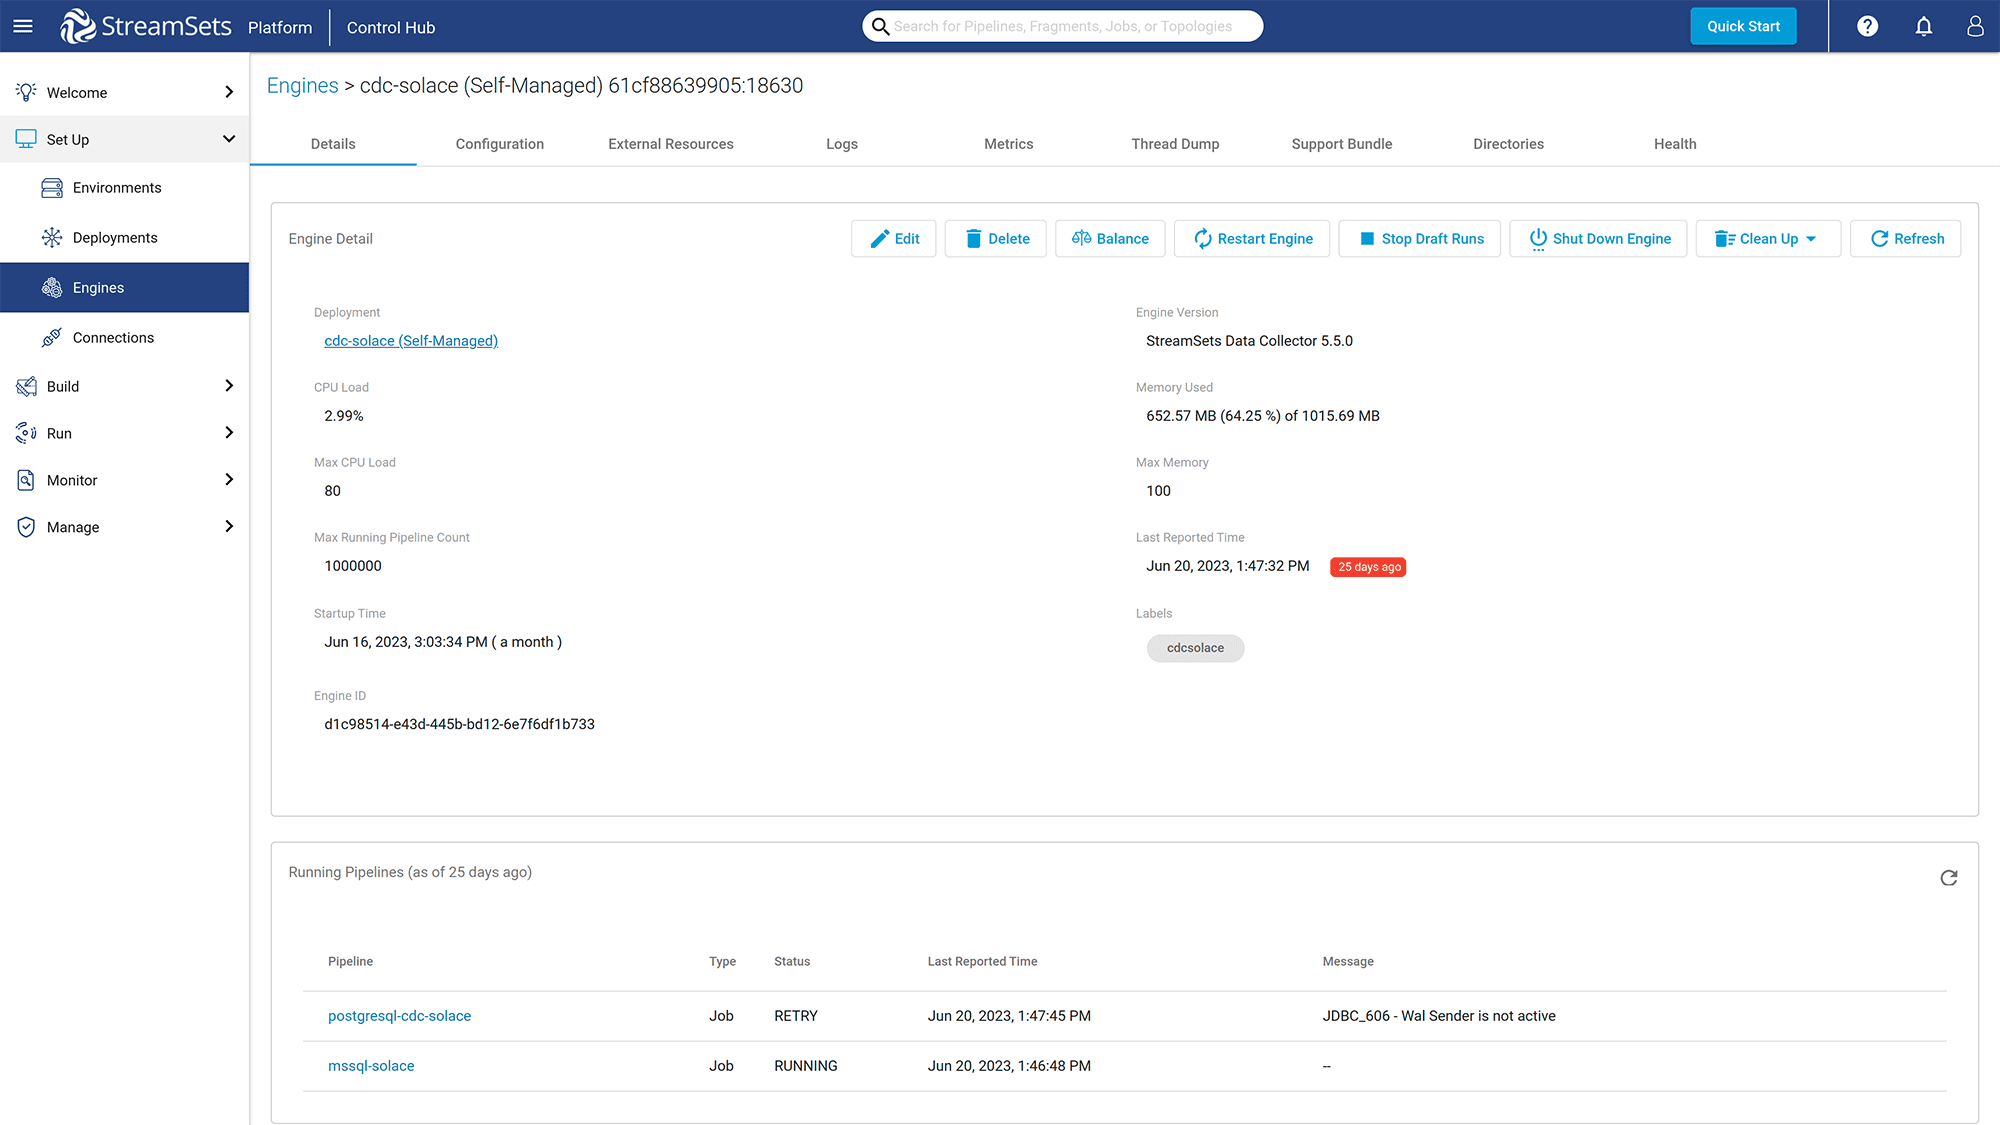
Click on the “External Resources” “External Libraries” tab to add Solace JMS API libraries. You can go to the Free Download Page to download the JMS libraries for Solace.
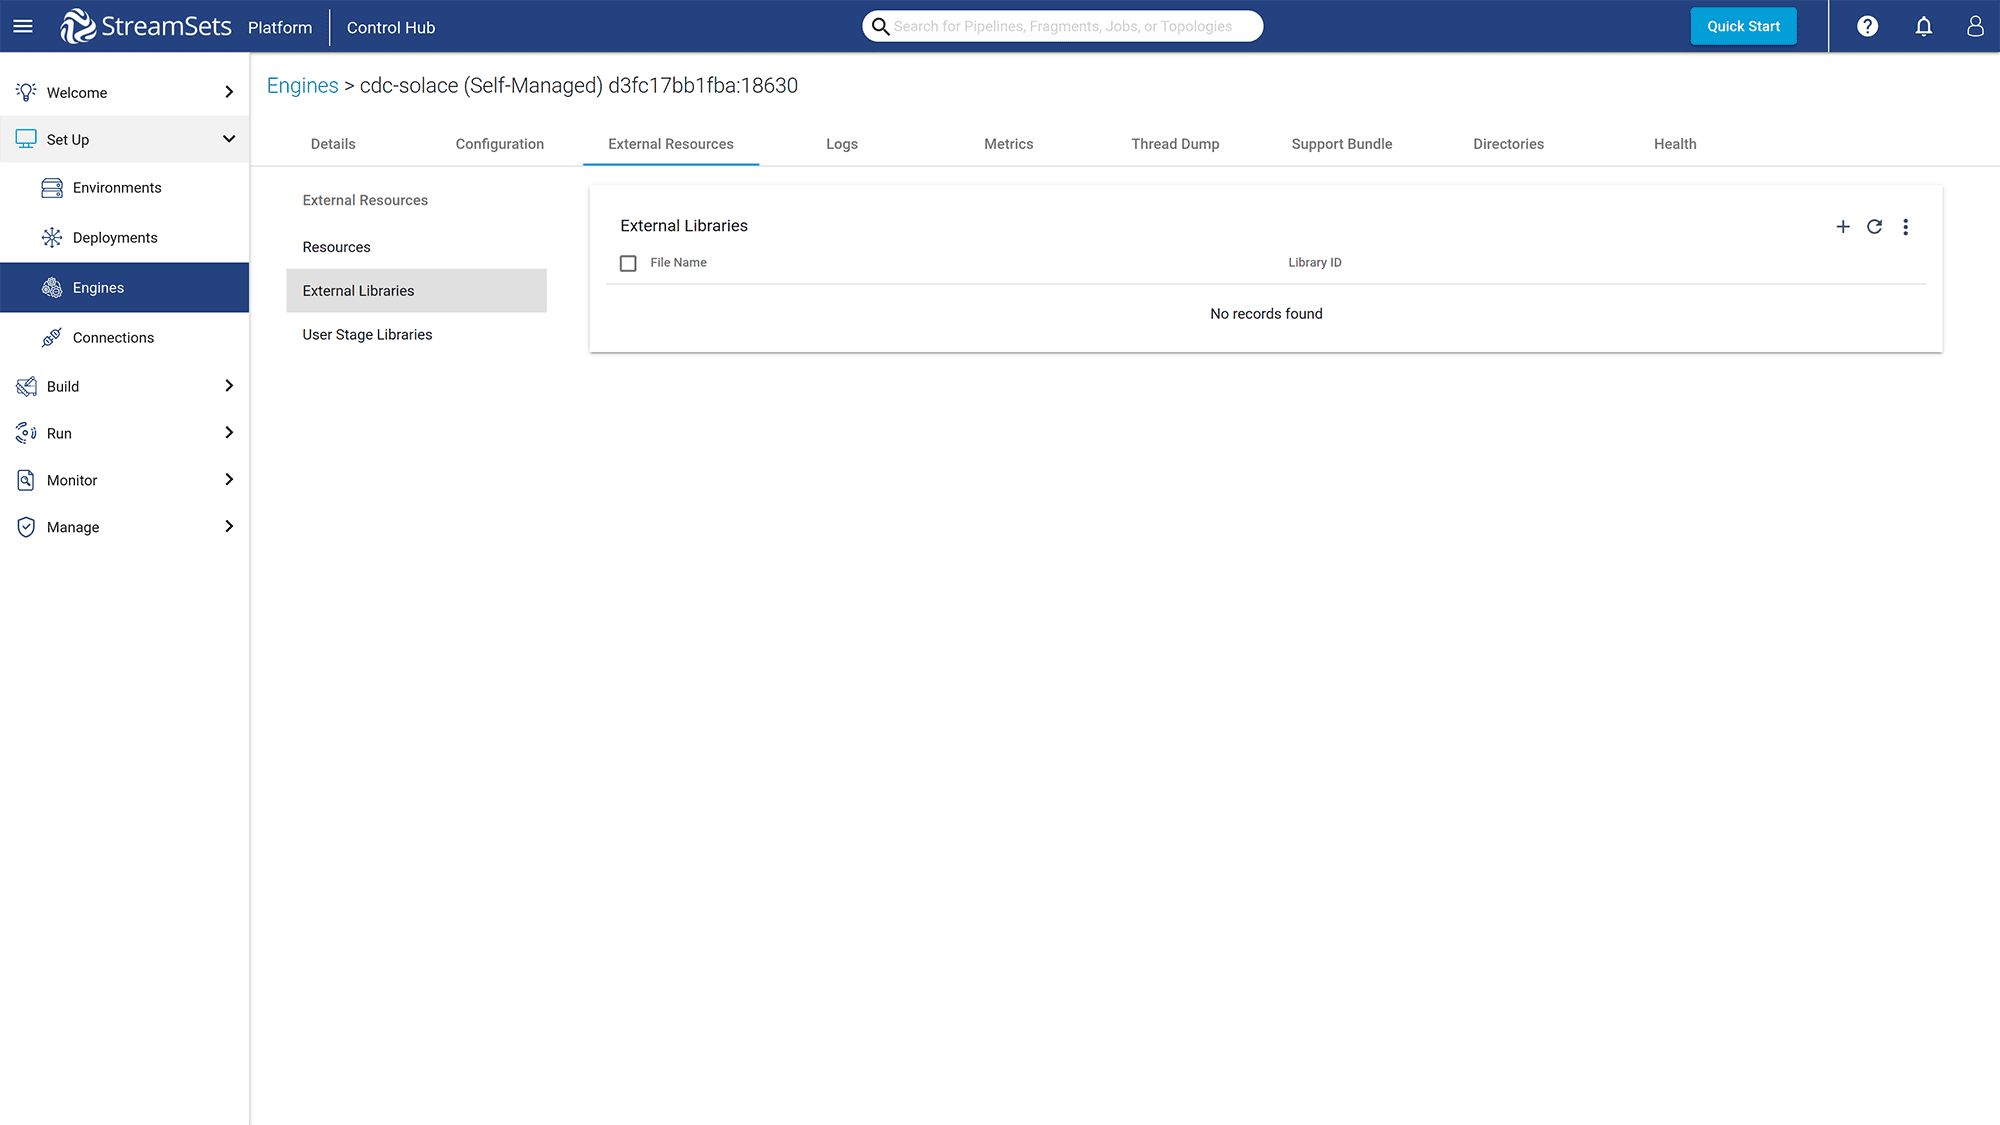
Figure 15: Add Solace JMS libraries to the External Libraries list.
Then restart the engine for the changes to be effective. Wait for a few minutes, then click on the “Pipelines” button under the “Build” section in the left panel.
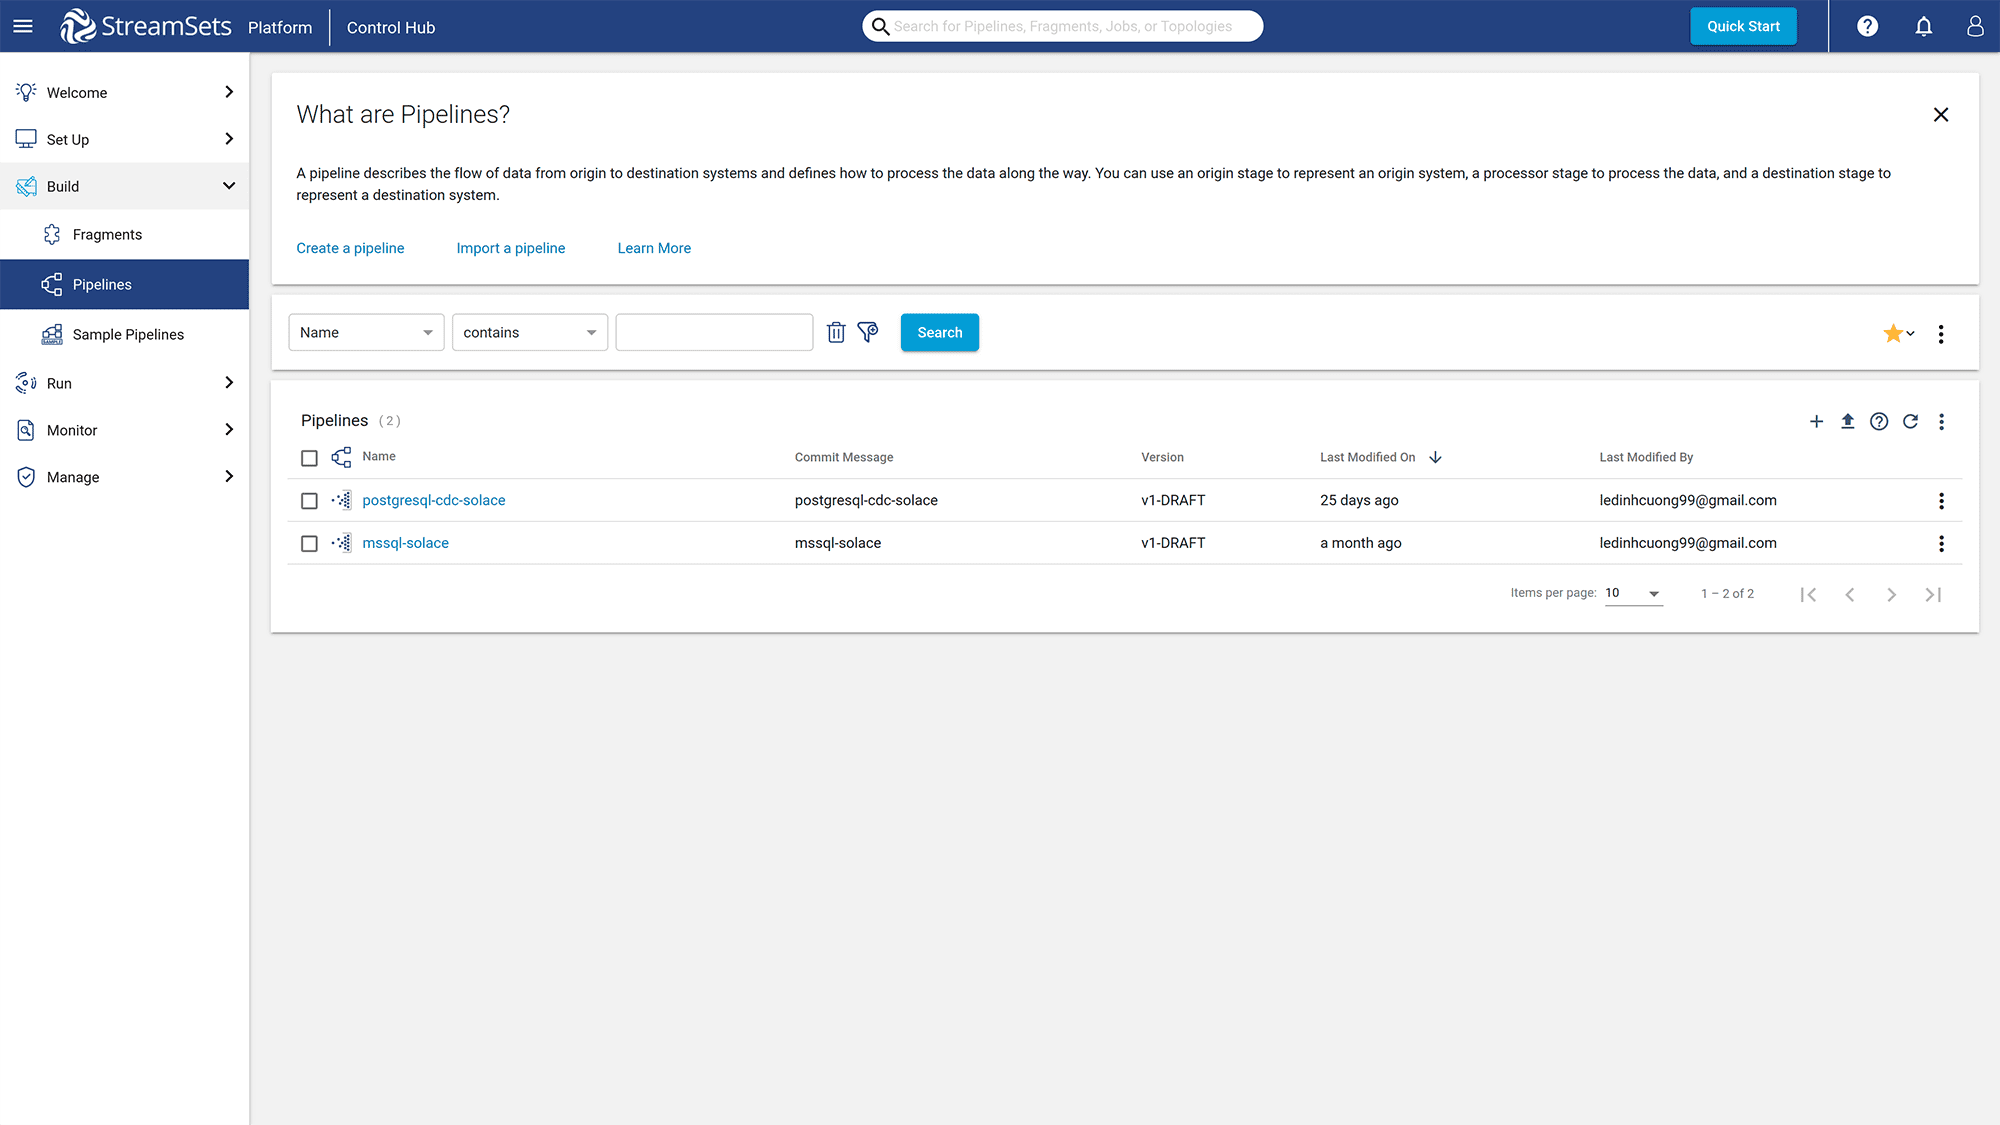
Figure 16: Click on the “Pipelines” button to go to the Pipelines page
Choose the “Create a pipeline” option to create a new pipeline and add the PostgreSQL and JMS components.
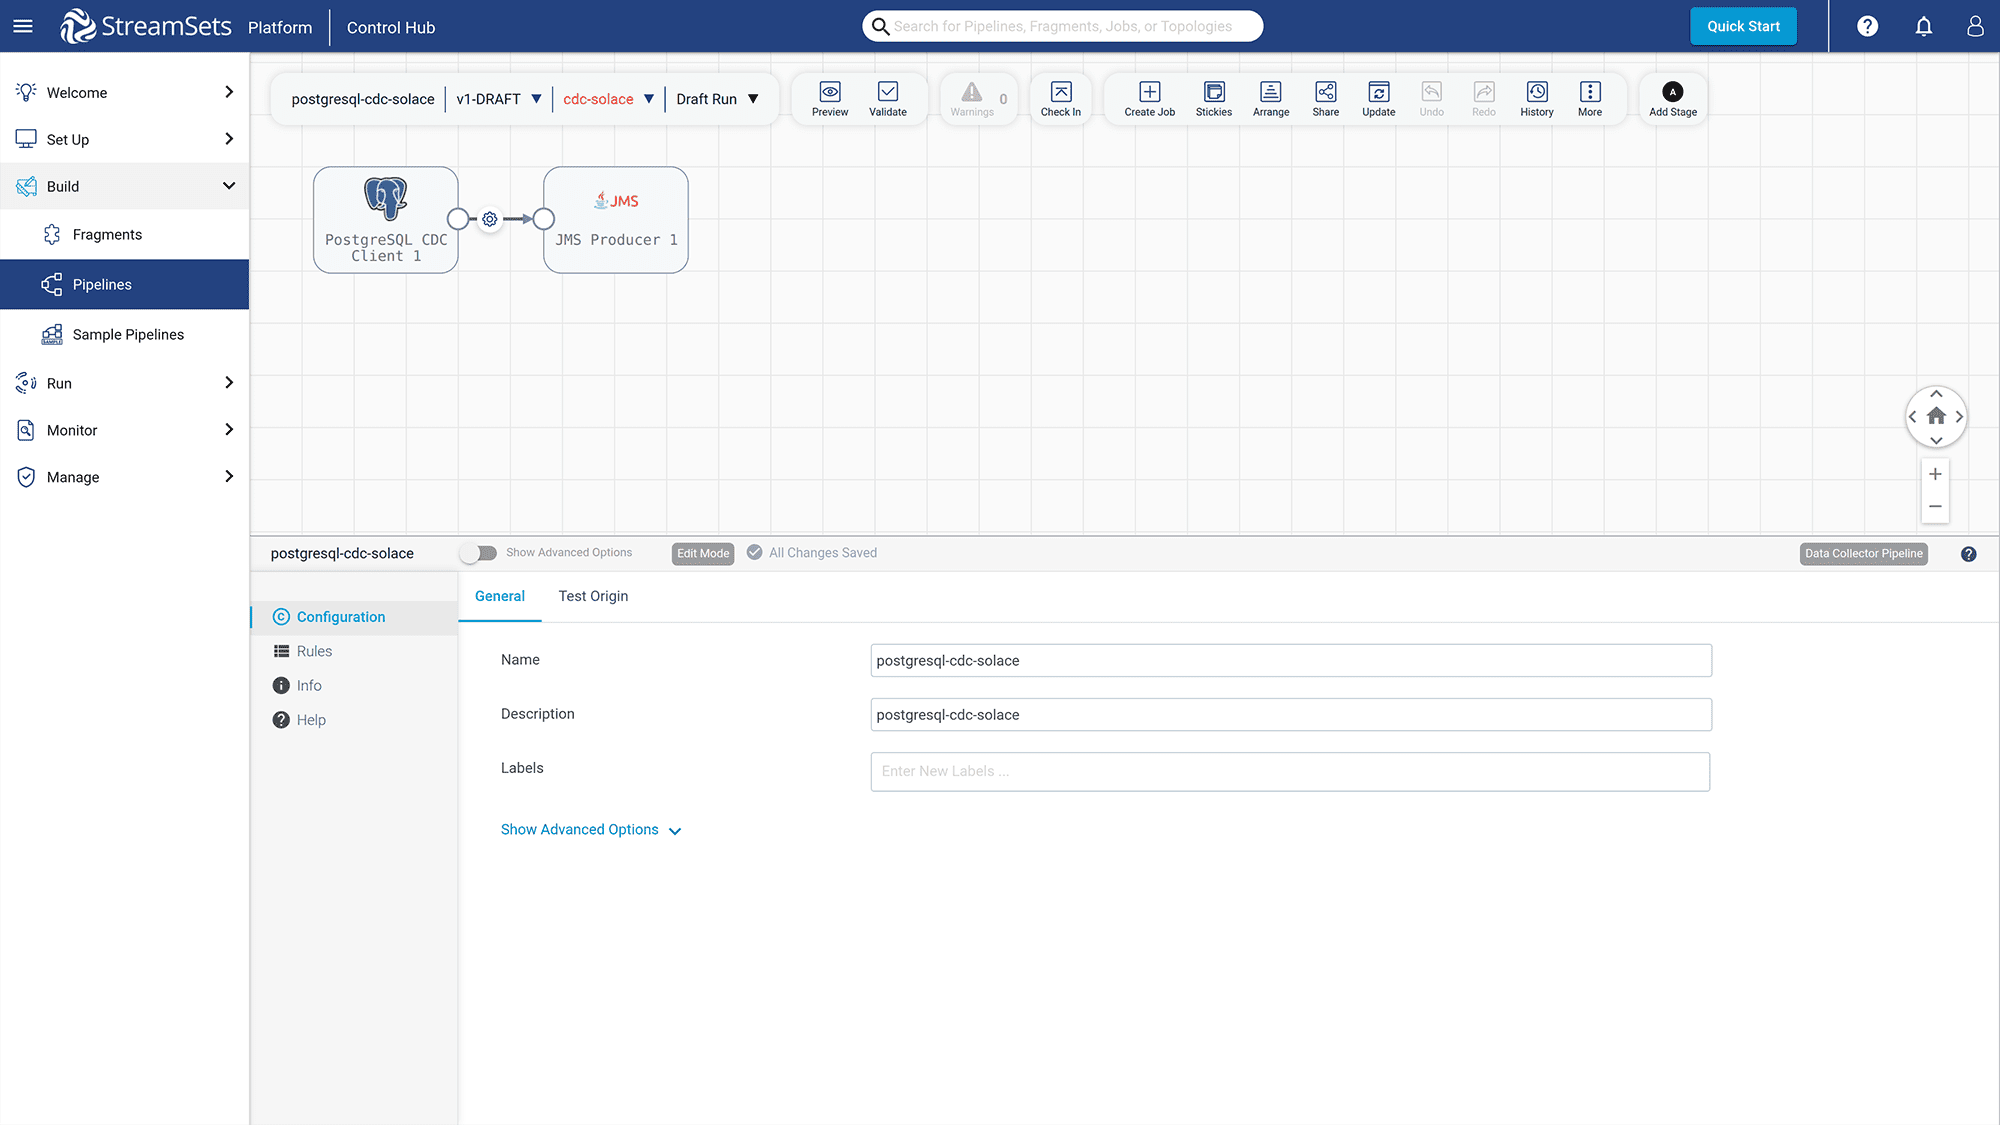
Figure 17: Add the “PostgreSQL CDC Client” and “JMS Producer” components to the deployment pipeline
Click on the “PostgreSQL CDC Client” – “PostgreSQL CDC” column to edit the configuration for capturing data changes.
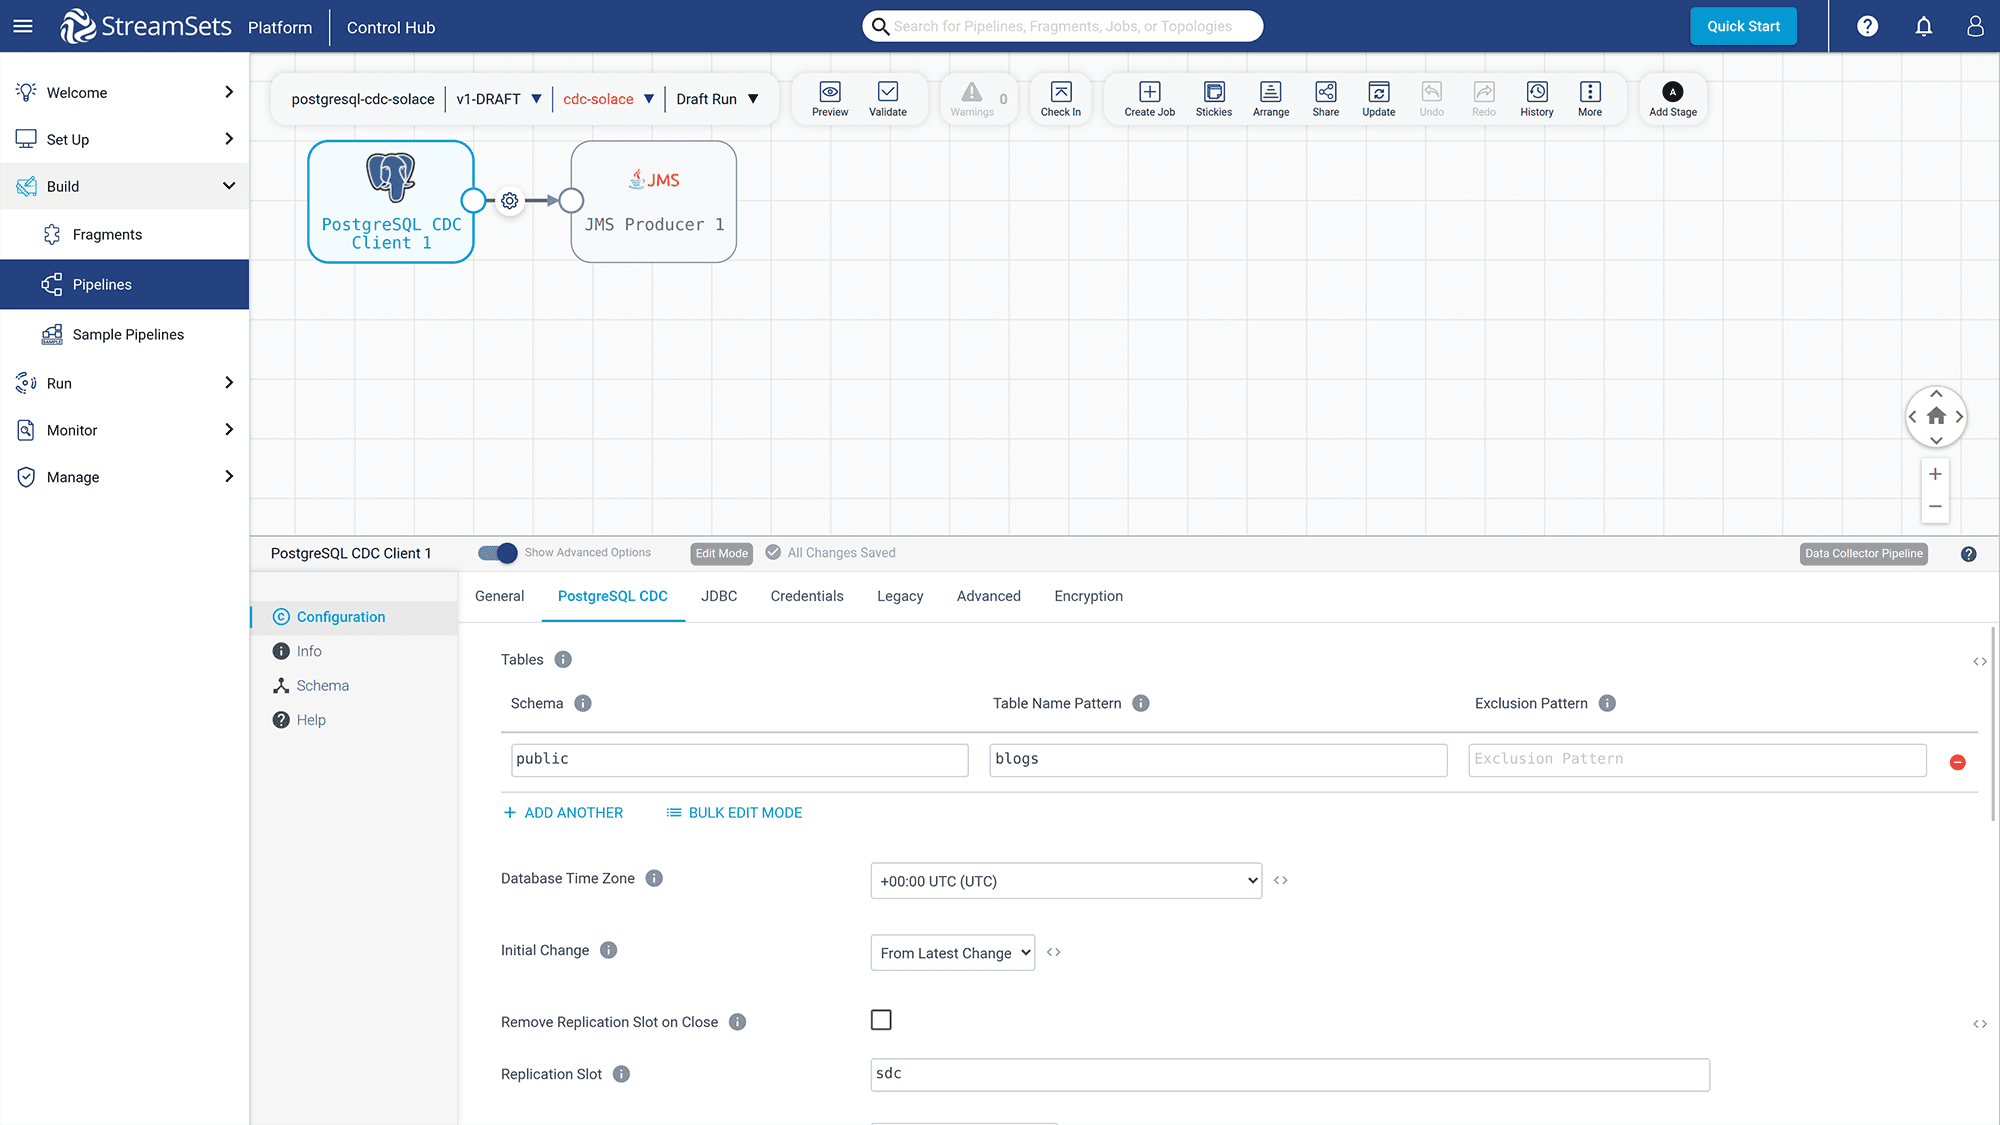
Figure 18: Config “PostgreSQL CDC” information for capturing data changes
- Set the “Schema” to “public” and “Table Name Pattern” to “blogs”
- Set the Replication Slot to “sdc”
- Set “Operations” values with “INSERT”, “UPDATE”, and “DELETE” so for these commands, StreamSets will forward the changes to the Event Broker Service
Click on the “JDBC” tab to edit information for the JDBC connection.
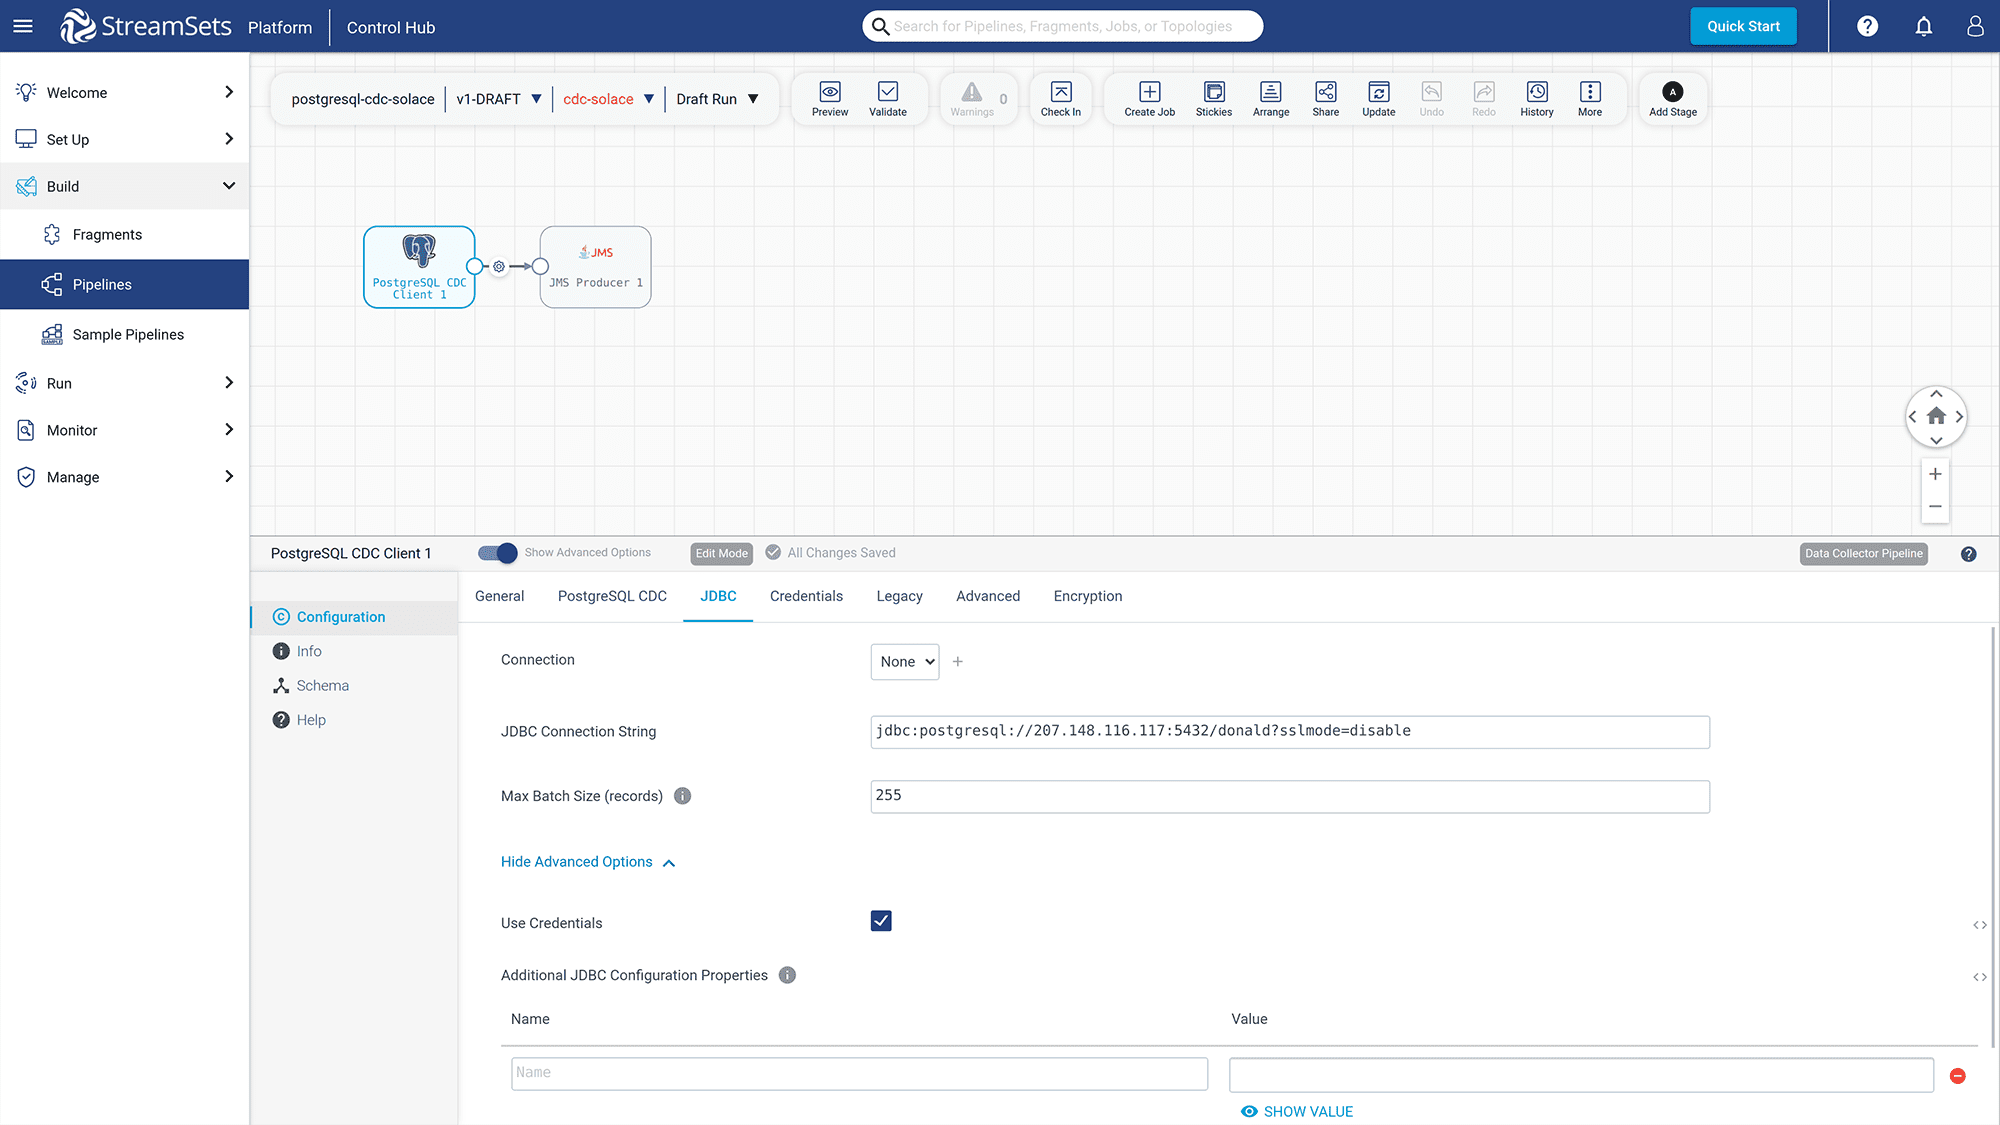
Figure 19: Config “JDBC” information for connecting with the PostgreSQL database
For the “JDBC Connection String”, you set the value to it as follows (Replace “your_machine_ip” with your actual IPv4 address value):
jdbc:postgresql://your_machine_ip:5432/donald?sslmode=disable
Click on the “Credentials” tab and set “username” and password values to “donald”.
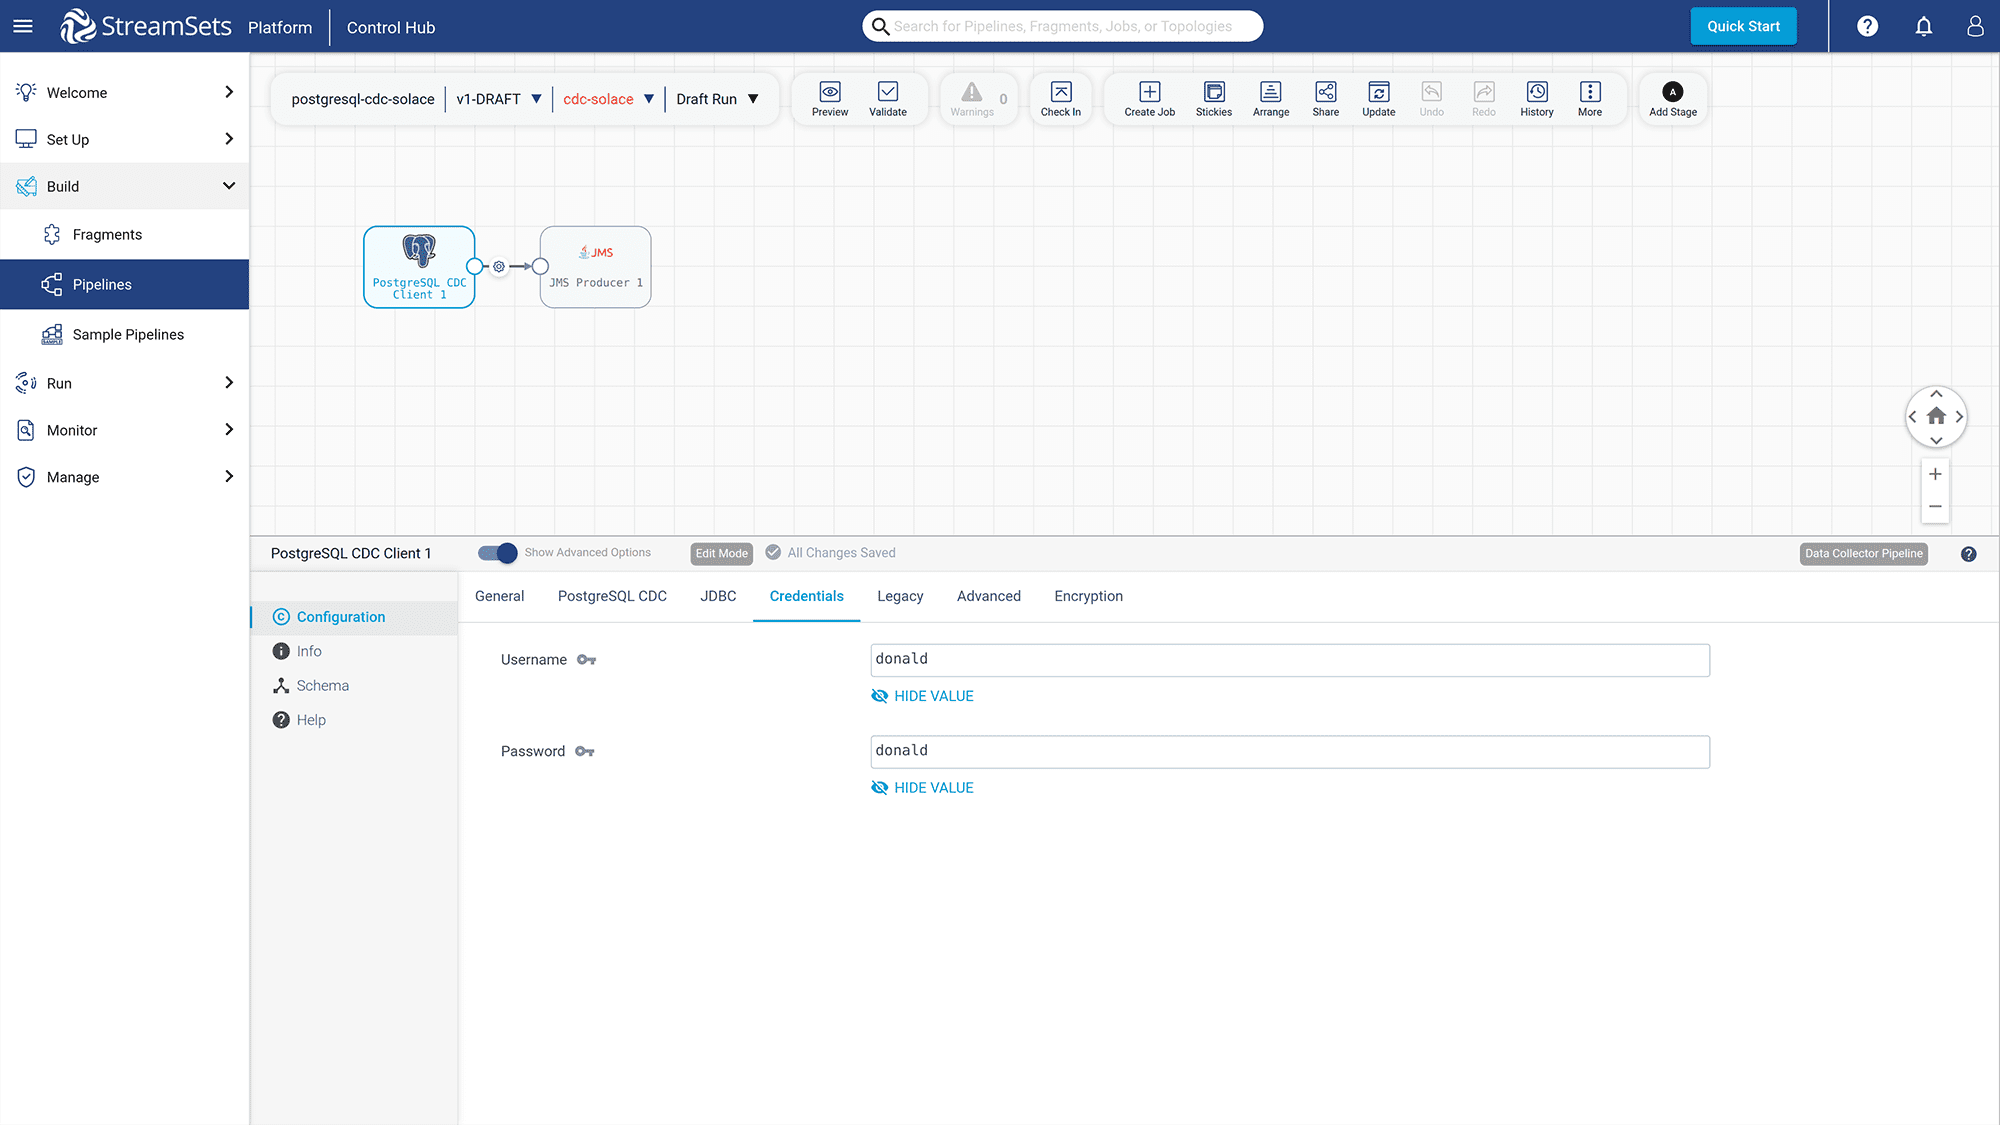
Figure 20: Add “Username” and “Password” of the PostgreSQL db to the “Credentials” tab
After editing the PostgreSQL database configuration, click on the “JMS Producer” component to add the Event Broker Service configuration.
Put the following information into the “JMS” tab.
JMS Initial Context Factory: com.solacesystems.jndi.SolJNDIInitialContextFactory
JNDI Connection Factory: /jms/cf/default
JMS Provider URL: tcps://your-solace-client:your-solace-password@your-solace-host-url:solace-port
JMS Destination Name: cdc/demo/postgresql
Also, add JMS configuration property with the following:
Solace_JMS_VPN: cdc-postgresql-app
Go to the “Credentials” tab and provide your Event Broker Service username and password.
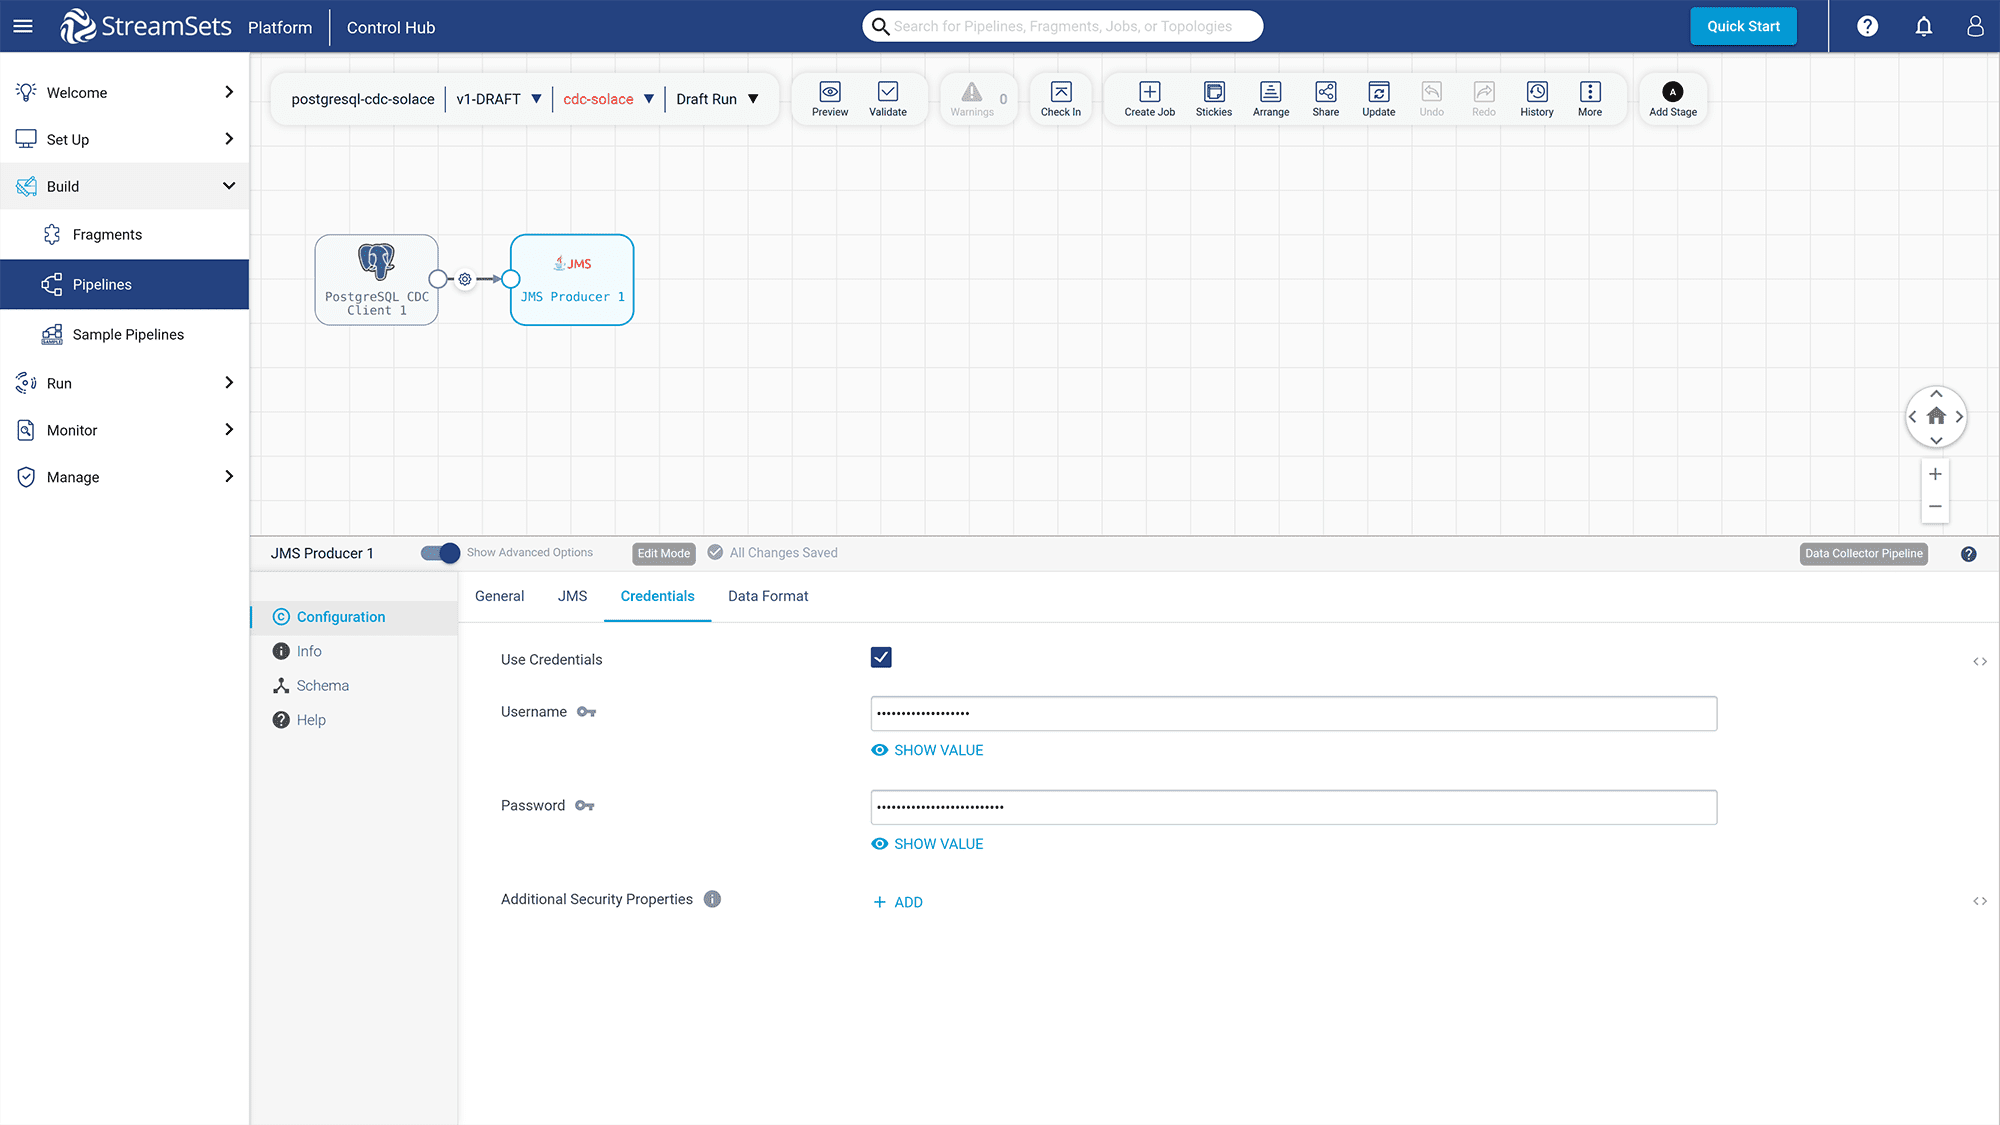
Figure 21: Add “Username” and “Password” of the Event Broker Service to “Credentials” tab
Click on the “Data Format” tab and set the “Data Format”, “JSON Content”, and “Charset” as follows:
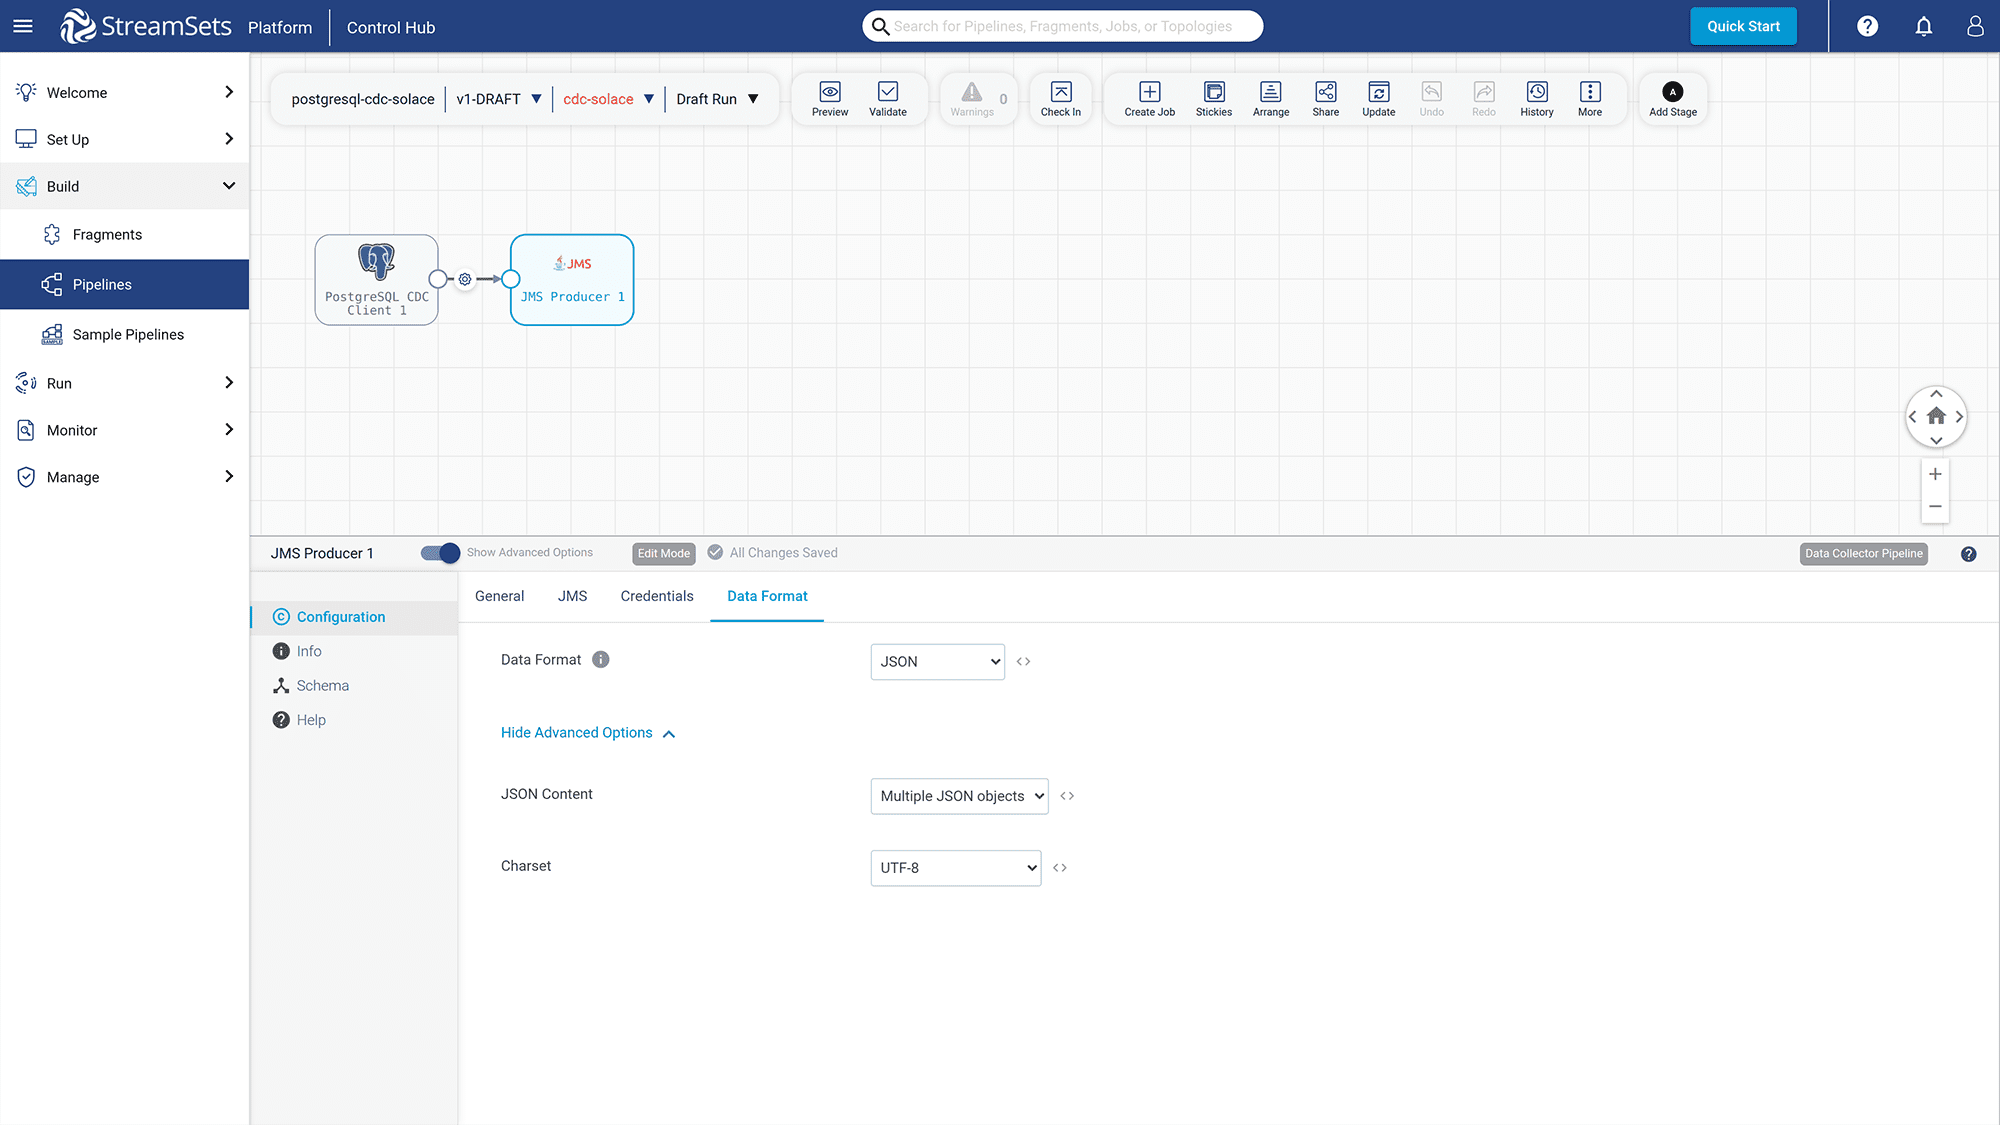
Figure 22: Configure Data Format for interacting with the Event Broker Service
You have now finished the configuration for both PostgreSQL and Solace components. To check whether StreamSets can interact with them, click the “Validate” button.
To publish this pipeline, click on “Draft Run” -> “Start Pipeline”
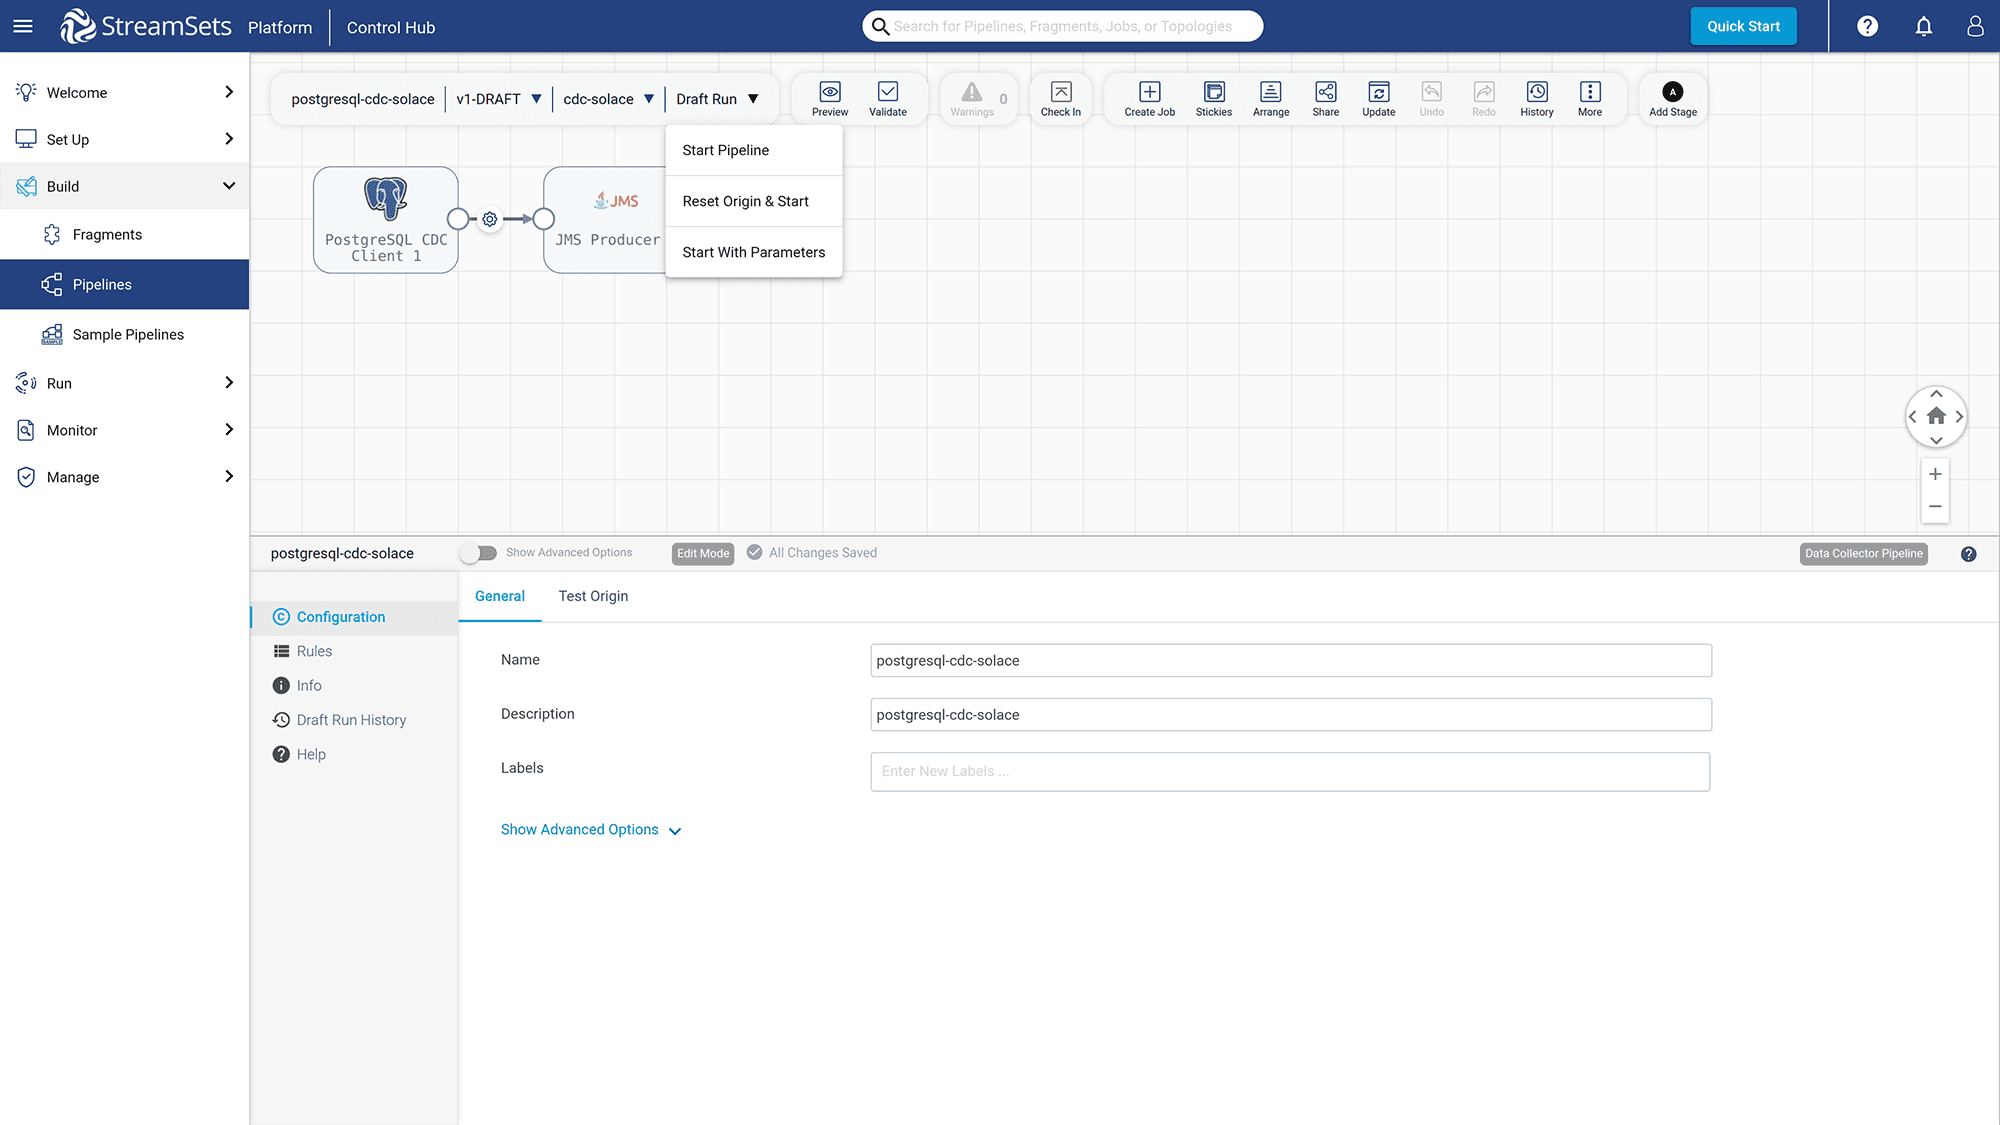
Figure 23: Click on Draft Run -> Start Pipeline to publish it
The pipeline should be started successfully with real-time summary data displayed.

Figure 24: The pipeline has started successfully
Now that you have finished setting up the StreamSets pipeline to integrate with the PostgreSQL database and the Event Broker Service, let’s set up the Redis database to store the blog data for reading operation.
Step 4: Set up the Redis Database
For simplicity, you will set up the Redis database using docker-compose. Open up a new terminal in your machine and run the following command to create a new “redis” directory in the home directory.
mkdir ~/redis
cd ~/redis
Create a new file named docker-compose.yml and copy the following content to it:
version: '3.8'
services:
    cache:
          image: redis:6.2-alpine
          restart: always
          ports:
            - '6379:6379'
          command: redis-server --save 20 1 --loglevel warning --requirepass eZAX7EwVmmxKPCDmwRyyKVge8oLd2t81
          volumes:
          - cache:/data
volumes:
  cache:
    driver: local
- Here you define the new Redis instance to use persistent data with volume at “/data” directory.
- The Redis instance will require password with value “eZAX7EwVmmxKPCDmwRyyKVge8oLd2t81” to access
- This Redis instance will be accessible via port 6379
To bring up this Redis instance and run it in the background, run the following command:
docker compose up -d
To expose the local machine port 6379 to outside, run the following command:
sudo ufw allow 6379/tcp
You have now successfully deployed the Redis instance in your local machine. Let’s move on to build the blog service.
Step 5: Build the Blog Service
The blog service is implemented using the Go programming language. The source code of the blog service is in GitHub blog-service repository.
To clone the blog service code, run the following command:
mkdir ~/Projects
cd ~/Projects
git clone <a href="https://github.com/cuongld2/blog-service.git">https://github.com/cuongld2/blog-service.git</a>
cd blog-service
The source code of the blog service has the following files:
.gitignoreis for defining the directories and files that git will ignoremain.gois the entry point of the blog service where you define the API path with its corresponding implementationhandler/handlers.gois for defining the functions that are used for creating the blog APIsconfig/db.go` is for making a connection to the PostgreSQL databasego.modandgo.sumfiles define the dependencies that the blog service needs such asgo-redis,httprouter, orpq.
The most important file is handler/handlers.go, which contains all the functions for defining the creating, updating, deleting, and getting blog content.
When making API requests to create/update/delete blogs, you will interact with the PostgreSQL database. Below is the CreateBlog function to add a new blog to the PostgreSQL database.
func CreateBlog(w http.ResponseWriter, r *http.Request, _ httprouter.Params) {
	var blog CreatingBlog
	err := json.NewDecoder(r.Body).Decode(&blog)
	if err != nil {
		w.WriteHeader(http.StatusForbidden)
		fmt.Fprint(w, "Error in request")
		return
	}
	_, err = config.DB.Exec("INSERT INTO blogs (CONTENT,TITLE,AUTHOR,CREATED_ON,LAST_UPDATED) VALUES ($1,$2,$3,$4,$5)", blog.Content, blog.Title, blog.Author, time.Now().UTC(), time.Now().UTC())
	if err != nil {
		http.Error(w, http.StatusText(500), http.StatusInternalServerError)
		fmt.Println(err)
		return
	}
}
When making API requests for reading operation (get blog by its ID and get all blogs), you will look for the blogs in the Redis database instead. Below is the `OneBlog` function which will get the blog by its id from the Redis database.
func OneBlog(w http.ResponseWriter, r *http.Request, ps httprouter.Params) {
	// We only accept 'GET' method here
	if r.Method != "GET" {
		http.Error(w, http.StatusText(405), http.StatusMethodNotAllowed)
		return
	}
	blogID := ps.ByName("id")
	blogCached := getOneBlogRedis(getEnv("RedisHost", "tcps://"), getEnv("RedisPassword", "password"), "blogId-"+blogID)
	blog := Blogs{}
	err := json.Unmarshal([]byte(blogCached), &blog)
	if err != nil {
		fmt.Println(err)
		return
	}
	w.Header().Set("Content-Type", "application/json; charset=UTF-8")
	w.WriteHeader(http.StatusOK)
	if err := json.NewEncoder(w).Encode(blog); err != nil {
		panic(err)
	}
}
Run the following commands to create the environment variables for the PostgreSQL database and Redis database credentials.
export POSTGRES_PASSWORD=”donald”
export POSTGRES_DB=”donald”
export POSTGRES_USER=”donald”
export POSTGRES_HOST=”your_machine_ip:5432”
export RedisHost=”your_machine_ip:6379”
export RedisPassword=”eZAX7EwVmmxKPCDmwRyyKVge8oLd2t81”
To bring up the blog service, run the following command:
go run main.go
You should see the following output:
You connected to your database.
Remember to keep this terminal window open so that you can test the change data capture mechanism later on at step 7.
Now that the blog service is up and running, let’s move on to build the caching service.
Step 6: Build the Caching Service
The caching service code is available in the caching service GitHub repository.
To run the caching service on your local machine, you need to install the `libssl-dev` package first since the Go dependency for Solace requires it to run.
sudo apt install libssl-dev
To clone the caching service code, run the following command in the new terminal:
cd ~/Projects

git clone <a href="https://github.com/cuongld2/caching-service.git">https://github.com/cuongld2/caching-service.git</a>

cd caching-service
The caching service will subscribe to Solace topic with pattern `cdc/*/postgresql`. If any new event is received, it will insert/update/delete a key in the Redis database, depending on the content of the received event.
For example if the `changeKind` of the event is `delete`, the caching service will delete the existing blog from the Redis database.
else if changeKind == "delete" {
		blogId := result["change"].([]interface{})[0].(map[string]interface{})["oldkeys"].(map[string]interface{})["keyvalues"].([]interface{})[0]
		deleteCacheRedis(getEnv("RedisHost", "tcps://"), getEnv("RedisPassword", "password"), strconv.Itoa(int(blogId.(float64))))
	}
Before running the caching service, you need to create the environment variables for the Redis database and the Event Broker service credentials.
Export RedisHost=”your_machine_ip:6379”
Export RedisPassword=”eZAX7EwVmmxKPCDmwRyyKVge8oLd2t81”
Export TransportLayerPropertyHost=”your_Solace_transport_layer_property_host”
Export ServicePropertyVPNName=”your_Solace_broker_name”
Export AuthenticationPropertySchemaBasicUserName=”your_Solace_Broker_Service_authentication_username”
Export AuthenticationPropertySchemeBasicPassword=”your_Solace_Broker_Service_authentication_password”
To run the caching service, execute the following command:
go run main.go
Keep this terminal window open. Let’s move on to the next section to test the change data capture (CDC) mechanism.
Step 7: Test How the CDC Mechanism Works
Let’s try to create a new blog post using the blog service by running the below curl command:
curl --location 'http://localhost:8081/blog' \
--header 'Content-Type: application/json' \
--data '{
    "content":"This is a great blog",
    "title":"blog for software learning",
    "author":"donald"
}'
Checking at the caching service console log, you should see the similar message as below:
{"xid":794,"nextlsn":"0/1778C80","timestamp":"2023-06-20 06:20:40.54925+00","change":[{"kind":"insert","schema":"public","table":"blogs","columnnames":["blog_id","title","content","author","created_on","last_updated"],"columntypes":["integer","character varying(50)","character varying(3000)","character varying(100)","timestamp without time zone","timestamp without time zone"],"columnvalues":[37,"blog for software learning","This is a great blog","donald","2023-06-20 06:20:40.107967","2023-06-20 06:20:40.107967"]}]}
This means that the caching service is able to catch a new event in the Event Broker Service when a new blog record is inserted at the `blogs` table. Notice the `“columnvalues:[“37”]”`, which means that the newly created blog has id is “37”.
Let’s take a look at the Redis database to see whether a new key is inserted into it. From your terminal run the below command to access the Redis database:
docker exec -it redis_database_container_id sh
Then run the below commands to provide the password in order to access the Redis database and get the list of existing keys in the Redis DB.
redis-cli
auth eZAX7EwVmmxKPCDmwRyyKVge8oLd2t81
keys *
You should see the similar output as below:
blogId-37
It means that a new key has been created in the Redis database for the blogId is 37, which matches the blogId value in the Solace event.
Let’s try to use the get blog by its ID API to get the content of the blog numbered 37.
curl --location 'http://localhost:8081/blog/37'
You should see similar output as below:
{"blog_id":37,"title":"blog for software learning","content":"This is a great blog","author":"donald","created_on":"2023-06-20T06:20:40.107967Z","last_updated":"2023-06-20T06:20:40.107967Z"}
Let’s try to delete this blog then.
curl --location --request DELETE 'http://localhost:8081/blog/37'
Now go back to the Redis instance console and check whether the blogId-37 key is removed.
Keys *
You should see an empty result indicating that the blogId-37 kye is removed.
Let’s try to retrieve content for the blogId-37 then.
curl --location 'http://localhost:8081/blog/37'
This time, you should see an empty message which proves that the blog has been removed from the Redis database and the get blog by its ID API does not read from the PostgreSQL database.
Conclusion
Through the article, you have learned what CQRS is, the benefits of CQRS, and how to apply the CQRS pattern for your application efficiently using Solace Event Broker.
About the Author

Explore other posts from categories: For Developers | Solace Scholars


Subscribe to Our Blog
Get the latest trends, solutions, and insights into the event-driven future every week.