Solace’s PubSub+ Event Portal offers users of event-based applications a design, management, and governance platform for their event interactions. Many users start with the interactive user interface at the beginning of their event-based design, but soon the power of the platform becomes evident, and users wish to automate their interactions, for instance, as part of their CI/CD pipelines.
Fortunately, there is a full and rich API for users to programmatically interact with PubSub+ Event Portal to, for instance, create new events or applications, or to query what has already been created. One use case would be an event linter that queries a user’s design for compliance with corporate standards such as naming conventions. As far as I am aware, no such tool currently exists – I’ll start work on one soon.
Another use case, one I’ll walk you through here, is to take what is currently defined in PubSub+ Event Portal and create artefacts on the broker that will mirror what is defined in PubSub+ Event Portal. This is similar to the code generation facility offered by AsyncAPI – however, in this case, instead of generating Spring code, we’re generating queues to subscribe to selected events.
Note: Solace has design-time to runtime configuration management on the PubSub+ Event Portal roadmap, so this work is somewhat redundant. However, it is useful as an exercise in the power of the PubSub+ Event Portal API and how it can be used.
Portal2Semp
I’ve called the application that queries PubSub+ Event Portal to find out which events the user wishes to subscribe to, then automatically issue the SEMP v2 commands to create queues that subscribe to these events, portal2semp. A demo was presented at Solace Connect Virtual.
If you’d like a demo, please talk to your local Solace technical team – I’ve restricted access as a more fully featured version will be built into PubSub+ Event Portal.
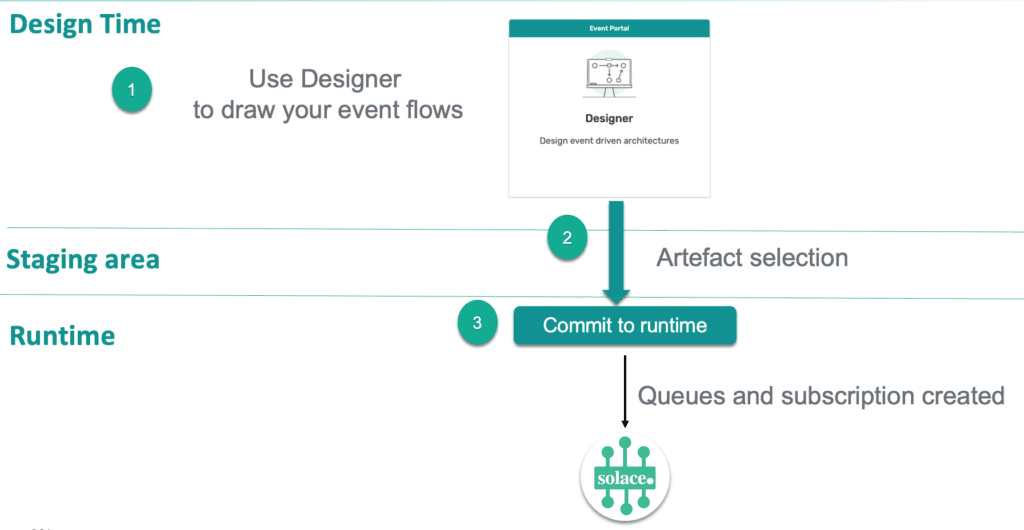
The basic idea is shown in the diagram below. You create your architecture in Designer with your events and applications. Portal 2 Semp queries your application domain, allowing you to select which applications you want to consider. It looks at the Client Delivery Endpoints you have created for your application, and once you are happy with your selection, Portal2Semp issues SEMP v2 commands to create queues that subscribe to the event associated with the Client Delivery Endpoints.
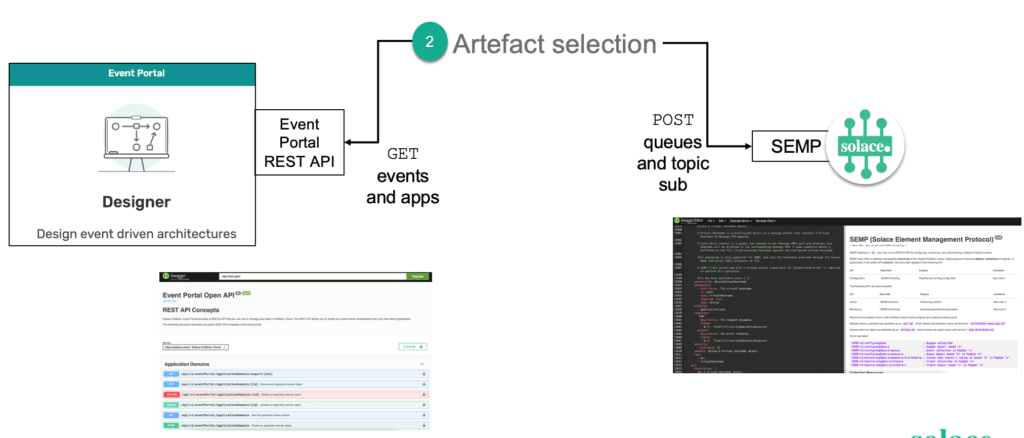
Notice that the topics to which the queues must subscribe are abstracted, so you only deal with the events. This is an excellent illustration of the power of PubSub+ Event Portal!
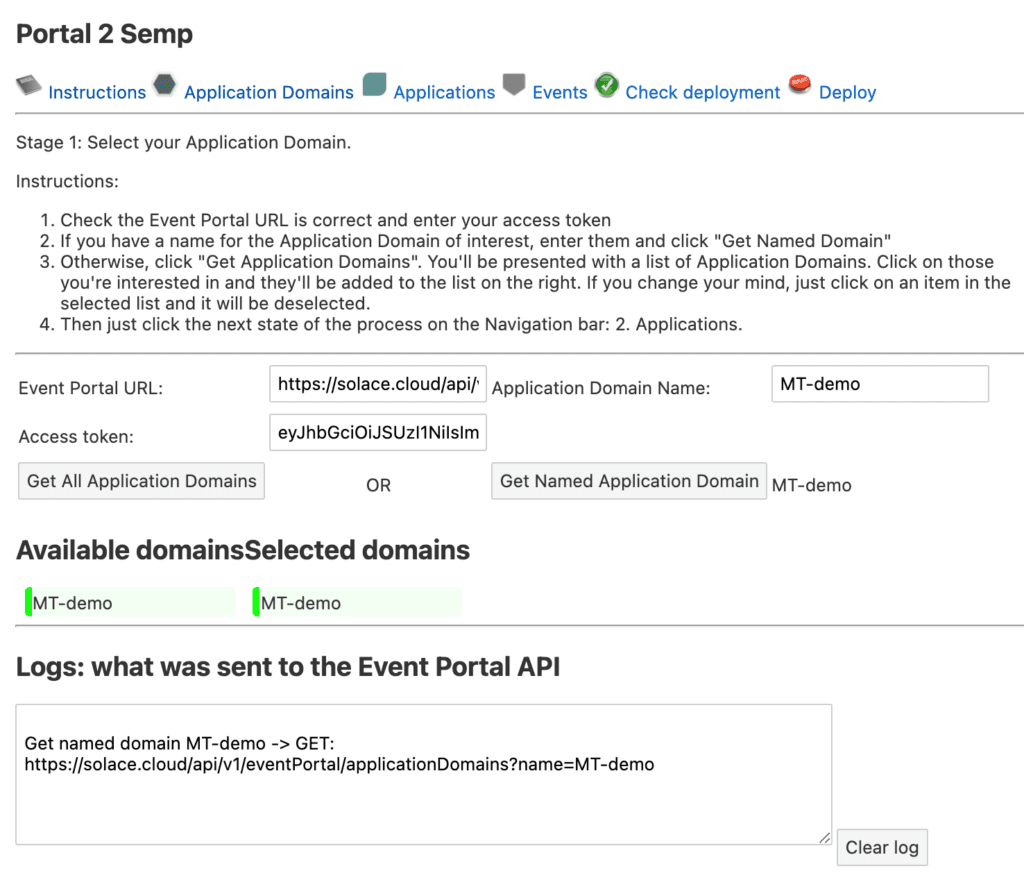
This screenshot shows the start of the Portal 2 Semp flow. An API token generated from PubSub+ Mission Control has been entered, and in this case a named application domain (“MT-demo”) is selected. Notice the log window which shows the Event Portal API call that was made to retrieve this domain.
Note: Currently CORS is disabled for the Event Portal API, so to get the web application working, I used Google Chrome with the –disable-web-security option. Solace is currently in the process of enabling CORS for applications such as this one.
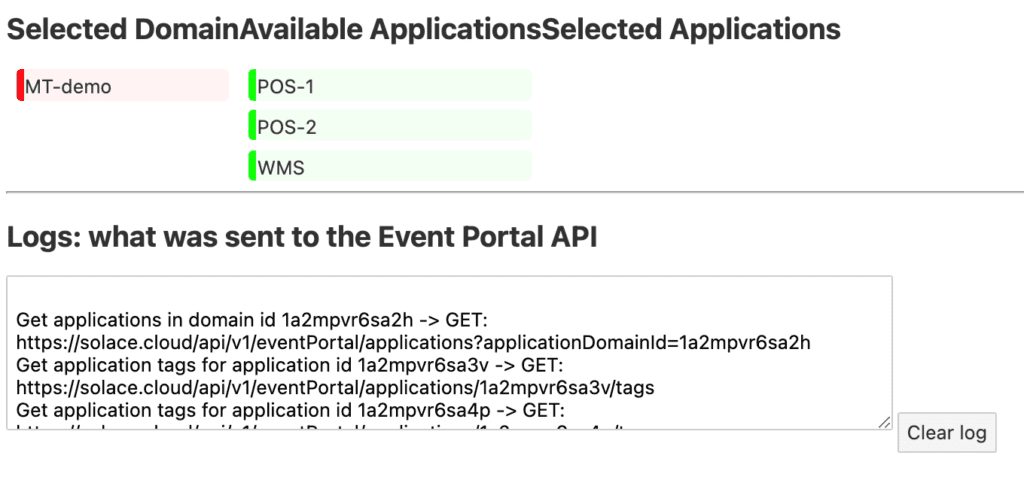
Next, the user picks which applications:
Then the user can see what will be created on the broker before the final provisioning step, where the SEMP commands are actually run.

Step 1: Using the Event Portal API
There’s a good guide and reference manual for the Event Portal. The first step is to generate an API token so that you can authenticate with the API. Go to PubSub+ Mission Control, click the User Menu button, and select Token Management.
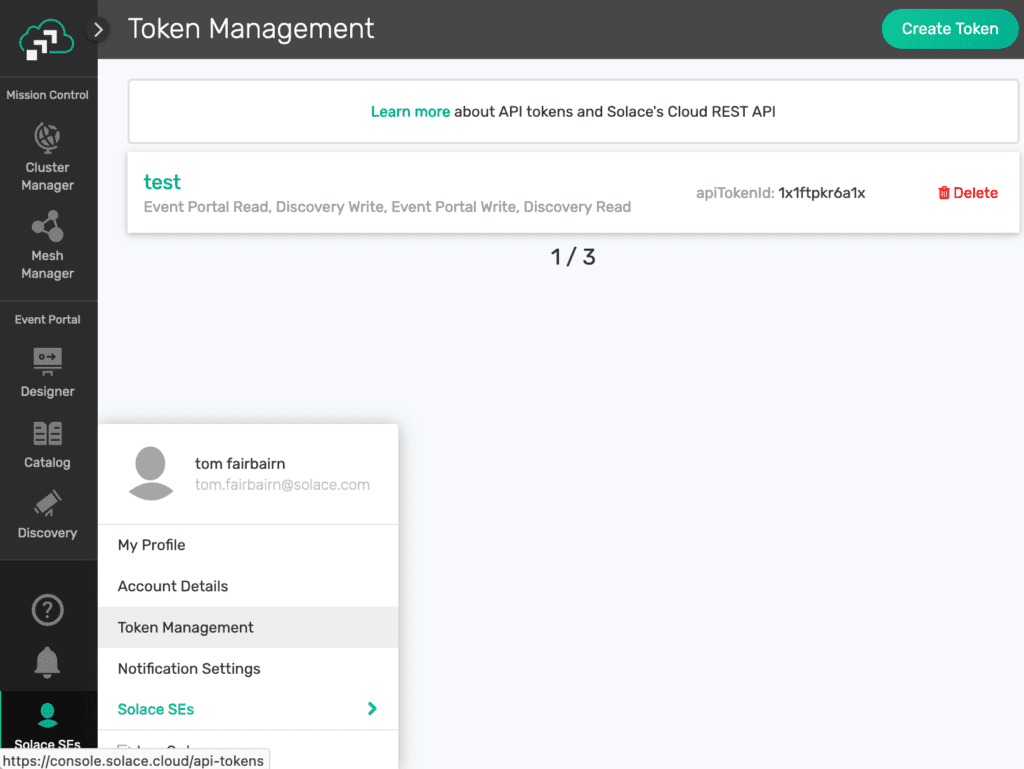
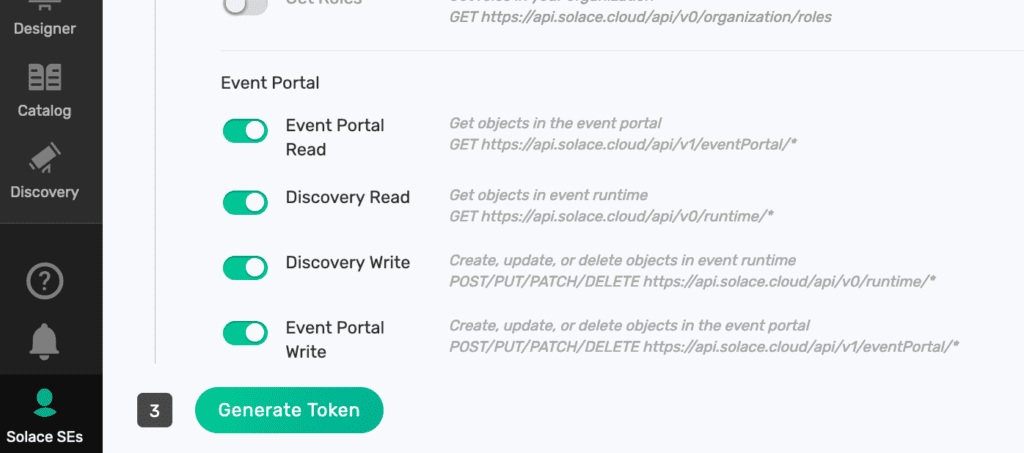
Then click the Create Token button if you haven’t already. You’ll need to ensure that the Event Portal Query permissions have been granted:
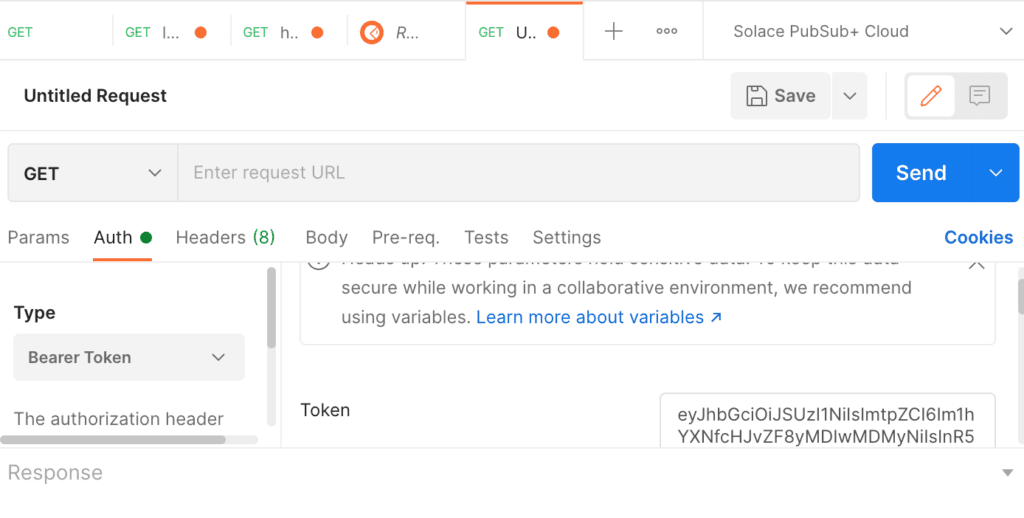
Now you can get started with the Event Portal API. I’m going to use Postman to illustrate the basic use though curl works just as well.
First, create a new request, select Bearer Token for authentication, and copy your API token into Postman:
Next, head over to the Event Portal reference manual to find the URL for getting all Application IDs:
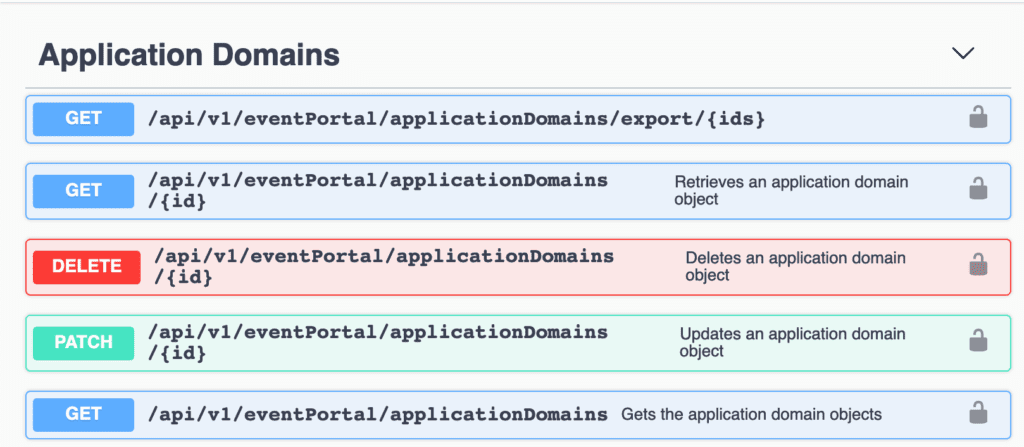
So, you want https://solace.cloud/api/v1/eventPortal/applicationDomains. Try that:
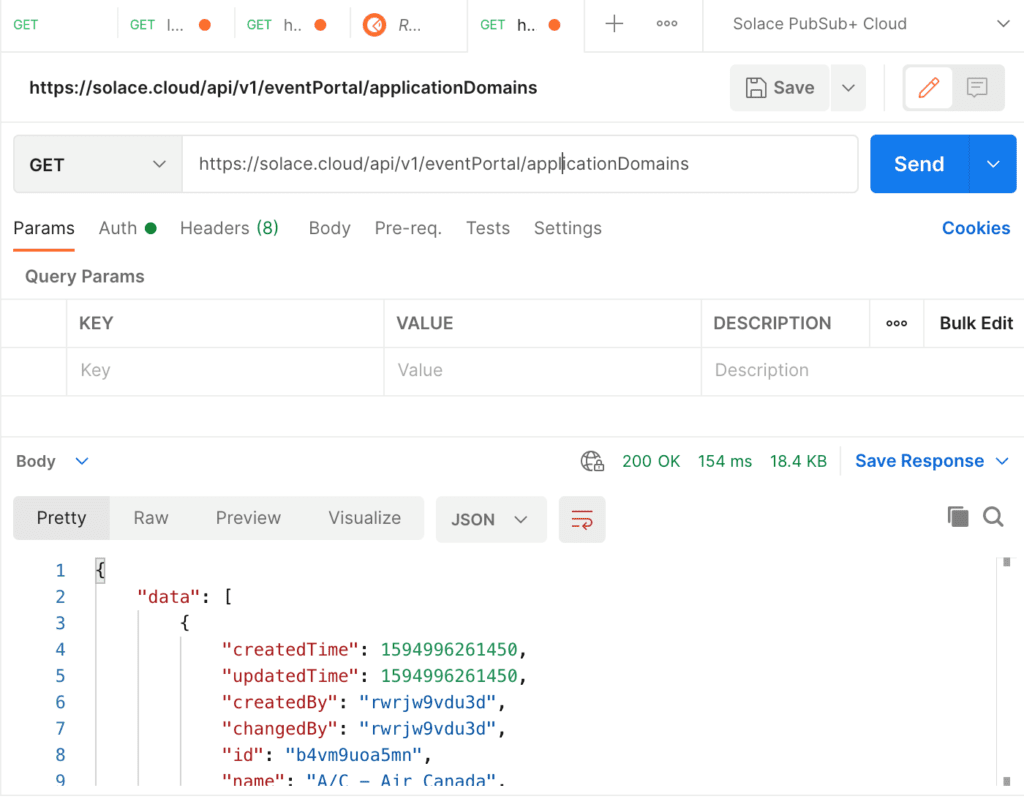
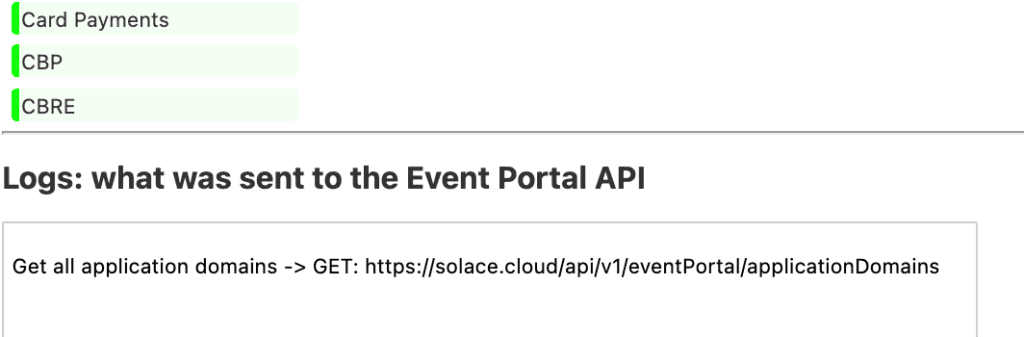
You should get back a paginated response with the first 20 Application Domains. If you look at Portal 2 Semp, you can see this is exactly what it is doing:
Once you have the Application Domains, you can see the structure of the Event Portal API. Objects are referred to by an object ID. In the case of my demonstration domain, MT-demo, I can use a parameter to query against it:
Get named domain MT-demo -> GET:
https://solace.cloud/api/v1/eventPortal/applicationDomains?name=MT-demo
Which returns JSON with the Application Domain ID:
{
    "data": [
        {
            "createdTime": 1612256630396,
          …
            "id": "1a2mpvr6sa2h",
            "name": "MT-demo",
…
From now on you’ll need that ID to refer to this Domain. Now you have the domain ID, so you can find out what’s in the domain:
Get applications in domain id 1a2mpvr6sa2h -> GET:
https://solace.cloud/api/v1/eventPortal/applications?applicationDomainId=1a2mpvr6sa2h
You can do the same with events and schemas, too.
Navigating Event Portal Objects
You can navigate around the Portal Objects just by querying application domain of interest. However, it probably most often makes more sense to follow the flow of events around the design.
In the Portal 2 Semp example we’re interested in the events that applications subscribe to. Applications subscribe to events at the application level, but these could be quality-of-service DIRECT subscriptions that applications will create for themselves. We’re only interested in events that should be persisted. The Event Portal model for this is the Client Delivery Endpoint (CDE). When a CDE is created, events that need to be persisted are added as subscriptions on the specific CDE.
If you look in the JSON returned for a particular application, you can see the CDEs:
https://solace.cloud/api/v1/eventPortal/applications/1a2mpvr6sa3v
 {
    "data": {
   …
       "id": "1a2mpvr6sa4p",
       "name": "POS-2",
       …
       "endpoints":[
         {
           "consumedEventIds": [
             "1a2mpvr6sahh",
             "1a2mpvr6saib",
             "1a2mpvr6sbpd"
           ],
           "topicSubscriptions": [
             "supplychain/warehouse/goodmvmt/CREATE/v1/>",
             "supplychain/warehouse/goodmvmt/UPDATE/v1/>",
             "supplychain/SalesDistribution/purchasing/wms/*/>"
           ],
           "name":"Q_POS-2",
           "endpointType":"solaceQueueEndpoint"
         }
  …
This gives us the name (Q_POS-2) and type of the Endpoint (Queue) and the topic subscriptions the user has entered. In Portal 2 Semp I get the event IDs and query them so that I can display the event details:
https://solace.cloud/api/v1/eventPortal/events/1a2mpvr6sahh
{
    "data": {
        …
        "id": "1a2mpvr6sahh",
        "name": "GoodShipment",
Conversely, you can get which applications produce or subscribe to an event from the event itself by looking in the same event JSON:
{
    "data": {
        …
        "id": "1a2mpvr6sahh",
        "name": "GoodShipment",
        …
        "producedApplicationIds": [
            "1a2mpvr6sa31"
        ],
        "consumedApplicationIds": [
            "1a2mpvr6sa3v",
            "1a2mpvr6sa4p"
        ],
        …
Step 2: Run SEMP to create the queues
That’s really it for the PubSub+ Event Portal API:
- Retrieve application domains.
- Retrieve the applications inside a given domain.
- Retrieve the Client Delivery Endpoints for each application and the subscriptions created for each.
- Retrieve the event details subscribed to by the applications (for display purposes only).
What you need to do next is to create the SEMP commands that will create the queues that subscribe to the events. In SEMP v2 you often have to supply extra data in JSON format to describe what you’d like to create.
POST: http://localhost:8080/SEMP/v2/config/msgVpns/default/queues
{msgVpnName":"default","queueName":"Q_POS-2","egressEnabled":true,"ingressEnabled":true,"permission":"consume"}
Then I can create the subscriptions on the queues:
Create subscription on queue Q_POS-2 -> POST:
http://localhost:8080/SEMP/v2/config/msgVpns/default/queues/Q_POS-2/subscriptions
{"msgVpnName":"default","queueName":"Q_POS-2","subscriptionTopic":"supplychain/warehouse/goodmvmt/CREATE/v1/"}
Conclusion
And that’s it! My queue is created with a subscription to the topic of interest. However, the user has never seen the topic and only dealt with the event itself — an excellent example of the type of abstraction PubSub+ Event Portal provides!
Explore other posts from category: Event Portal


Subscribe to Our Blog
Get the latest trends, solutions, and insights into the event-driven future every week.