Solace Event Broker is a message broker that allows you to send and receive messages between applications, devices, and users. It supports several protocols, including MQTT, AMQP, and JMS, and provides message routing, filtering, and transformation features.
This article provides a step-by-step guide on building two microservices with Flask and communicating between them using Solace. It covers the setup of a Solace Event Broker instance, installation of necessary Python packages, creation of Flask apps, and implementation of Solace connections, route creation for publishing and subscribing data, and testing of the microservices.
You can find the complete project and instructions on how to run on GitHub.
Prerequisites
In order to follow along with the demonstration in the article, you need:
- A Solace Cloud trial account with a Solace event broker has already been created in order to store and forward the messages from one microservice to another
- Basic understanding of Python.
- Flask installed. (
pip install Flask==2.3.1)
Introduction to Solace Platform
Solace Platform is composed of powerful technologies that enable efficient and scalable communication in distributed systems through the publish-subscribe messaging pattern. The publish-subscribe paradigm is a widely adopted messaging model that allows information to be disseminated from publishers to multiple subscribers based on their interests.
At its core, the publish-subscribe pattern involves the decoupling of message producers (publishers) and consumers (subscribers) through an intermediary known as a message broker. This decoupling allows for asynchronous and event-driven communication, where publishers do not need to have prior knowledge of subscribers, and subscribers can dynamically express interest in specific types of information.
Solace is a leading provider of messaging and event streaming solutions, and its flagship product, Solace Platform, supports the publish-subscribe model. Solace Event Broker provides a flexible and robust infrastructure for building scalable and reliable event-driven architectures.
With Solace Event Broker, developers can leverage a wide range of messaging capabilities, such as guaranteed message delivery, intelligent routing, message filtering, and content-based subscriptions. These features enable efficient and selective distribution of information to targeted subscribers, ensuring that each consumer receives only the data they require.
In this application, we will use the Solace Messaging API for Python to communicate between 2 microservices. The first microservice will be the publisher. It will publish the users created. The second microservice will be the subscriber. The subscriber will receive the published user data and save it.
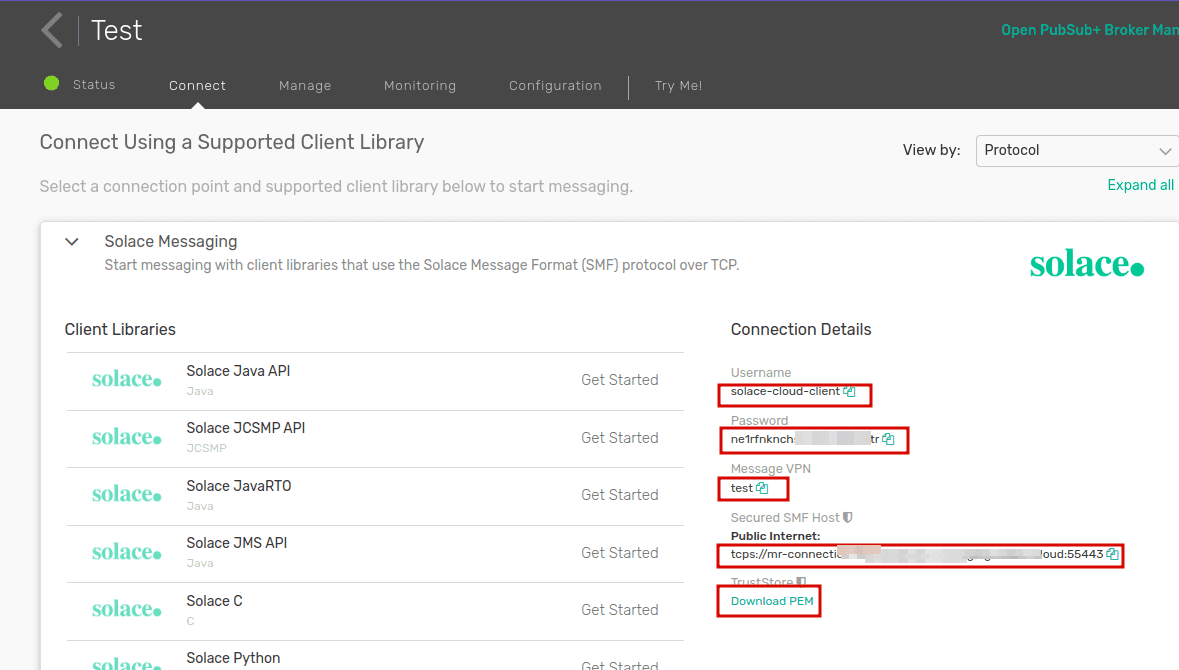
To spin up a Solace Event Broker cloud service, go to the Solace Cluster Manager page and click on the Service/event broker you created for this project. You will need the highlighted data in the image below to define the connection properties for the Solace broker in your Python code.
To use Solace on your application, you need to install solace-pubsubplus package. The solace-pubsubplus package is a Python library that allows developers to interact with the Solace messaging platform from their Python applications.
pip install solace-pubsubplus==1.5.0
Building the First Microservice
This microservice will be handling the API for the creation of users. Since this is just an illustration, you won’t need any authentication of the user. The Flask application will create an endpoint where you can create a user and when the user is created, the data for the user will be published to the topic: user/create_user.
To get started with this, create a Python file with the name “service1.py” and paste the following code:
Note: Make sure to download the PEM file at the root of your project.
We will start with importing the necessary modules:
from flask import Flask, request
from solace.messaging.messaging_service import MessagingService
from solace.messaging.config.transport_security_strategy import TLS
from solace.messaging.config.retry_strategy import RetryStrategy
from solace.messaging.resources.topic import Topic
import json
Next, initialize the Flask application and define the connection properties for the Solace broker:
app = Flask(__name__)

broker_props = {
    "solace.messaging.transport.host": "tcps://mr-connection-3xxxxxxx.messaging.solace.cloud:55443",
    "solace.messaging.service.vpn-name": "test",
    "solace.messaging.authentication.scheme.basic.username": "solace-cloud-client",
    "solace.messaging.authentication.scheme.basic.password": "xxxxxxxxxxxxxxxxxxxxx",
}
We can now configure the Solace connection. To establish a connection to the Solace broker, we need to configure transport security with TLS and create a MessagingService instance:
transport_security = TLS.create().with_certificate_validation(
    True, validate_server_name=False, trust_store_file_path="."
)

messaging_service = (
    MessagingService.builder()
    .from_properties(broker_props)
    .with_reconnection_retry_strategy(RetryStrategy.parametrized_retry(20, 3))
    .with_transport_security_strategy(transport_security)
    .build()
)
Now connect to the Solace broker. This connection establishes a communication channel between your application and the Solace messaging infrastructure, allowing your application to interact with the broker and exchange messages.
Let’s connect to the Solace broker using the messaging_service:
messaging_service.connect()
Now we will create a direct message publisher. To publish messages to the Solace broker, we need to create a direct message publisher:
publisher = messaging_service.create_direct_message_publisher_builder().build()
publisher.start()
print("Publisher started")
Finally, we can define the API endpoint that we will use to create a new user and publish. This endpoint will receive a JSON payload containing user data and publish it to the Solace broker:
@app.route("/user/create_user", methods=["POST"])
def create_user():
    user_data = request.get_json()
    print(user_data)

    destination = Topic.of("user/create_user")
    publisher.publish(message=json.dumps(user_data), destination=destination)

    return "User created successfully!"
In summary, the code above sets up a Flask app that acts as a user service and connects to a Solace messaging broker. It configures the connection properties for the broker, including the host, VPN name, and authentication credentials. It creates a MessagingService instance with the specified properties and establishes a connection to the broker. Furthermore, it then creates a direct message publisher and starts it. The code defines an endpoint /user/create_user that expects a POST request with JSON data representing user information. When a request is received, it publishes the user data to the Solace messaging service using the defined topic user/create_user.
Building the Second Microservice
This microservice will be handling the API for saving the created users. Since this is just an illustration, we will just be saving this into a list instead of saving it in a database for instance. This microservice will listen to the topic user/create_user for a message. When a message is received, it is saved in a list for the user. Then these users are displayed with the Flask application through an endpoint we will create. To get started with this, create a Python file with the name service2.py and paste the following code which are the imports of the necessary modules:
import time
from flask import Flask
from solace.messaging.messaging_service import MessagingService
from solace.messaging.resources.topic_subscription import TopicSubscription
from solace.messaging.config.transport_security_strategy import TLS
from solace.messaging.config.retry_strategy import RetryStrategy
from solace.messaging.receiver.message_receiver import MessageHandler, InboundMessage
import json
Next, initialize the Flask application and define the connection properties for the Solace broker:
app = Flask(__name__)

broker_props = {
    "solace.messaging.transport.host": "tcps://mr-connection-xxxxxxx.messaging.solace.cloud:55443",
    "solace.messaging.service.vpn-name": "test",
    "solace.messaging.authentication.scheme.basic.username": "solace-cloud-client",
    "solace.messaging.authentication.scheme.basic.password": "ne1rfnkxxxxxxxxxxbi2ltr",
}
Now we will configure the Solace connection. To establish a connection to the Solace broker, we need to configure transport security with TLS and create a MessagingService instance:
transport_security = TLS.create().with_certificate_validation(
    True, validate_server_name=False, trust_store_file_path="."
)

messaging_service = (
    MessagingService.builder()
    .from_properties(broker_props)
    .with_reconnection_retry_strategy(RetryStrategy.parametrized_retry(20, 3))
    .with_transport_security_strategy(transport_security)
    .build()
)
For the message handling, we will define a message handler class that will handle the received messages. In the MessageHandlerImpl class, we override the on_message method, which is called when a message is received. Inside this method, we extract the topic and payload of the received message. If the payload is in byte form, we convert it to a string using get_payload_as_string(). We then print the payload and topic for debugging purposes.
Additionally, we convert the payload into a dictionary using json.loads() and append it to the out_payload list. You can modify this logic to suit your specific requirements, such as storing the messages in a database or performing further processing.
class MessageHandlerImpl(MessageHandler):
    def on_message(self, message: InboundMessage):
        topic = message.get_destination_name()
        payload = (
            message.get_payload_as_string()
            if message.get_payload_as_string() is not None
            else message.get_payload_as_bytes()
        )

        print("\n" + f"Message Payload String: {payload} \n")
        print("\n" + f"Message Topic: {topic} \n")

        message_dict = json.loads(payload)
        out_payload.append(message_dict)
Next, let’s connect to the Solace broker using the messaging_service.
messaging_service.connect()
Now we will create the message subscriptions. We will create topic subscriptions to specify which topics we want to receive messages from. In this case, we will subscribe to the “user/create_user” topic:
CREATE_USER_TOPIC = ["user/create_user"]

topics_sub = []
for t in CREATE_USER_TOPIC:
    topics_sub.append(TopicSubscription.of(t))
Next, we will start the message receiver. We will create a direct message receiver and start it to receive messages:
direct_receiver = (
    messaging_service.create_direct_message_receiver_builder()
    .with_subscriptions(topics_sub)
    .build()
)
direct_receiver.start()
The time.sleep(4) statement provides a delay to allow time for message reception. You can adjust the sleep duration based on your specific requirements.
Now we will set up messages to be received asynchronously. By using asynchronous message reception, the application can continue executing other tasks without waiting for each individual message to arrive.
To receive messages asynchronously, we use the message handler we defined earlier:
message_handler = MessageHandlerImpl()
direct_receiver.receive_async(message_handler)
The receive_async method starts the message receiver and listens for incoming messages.
All the settings for Solace are done, we can now create the API endpoint that will display the messages stored.
Let’s create an API endpoint that will return the received messages:
@app.route("/")
def index():
    return out_payload
The “/” route is mapped to the index function, which returns the out_payload list. You can customize the endpoint and response based on your application’s requirements.
Finally, we will add a condition to run the Flask application only if the script is executed directly:
if __name__ == "__main__":
    app.run(debug=True, port=5001)
You can adjust the debug and port parameters to suit your preferences.
In summary, the code sets up a Flask app that connects to a Solace messaging broker using provided properties for authentication. It creates a message receiver that subscribes to the user/create_user topic. When messages are received, the MessageHandlerImpl class processes them. It extracts the payload and topic information, prints them, converts the payload to a dictionary, and appends it to the out_payload list. The Flask app’s root route (“/”) returns the contents of the out_payload list as the response. The app runs on debug mode and listens on port 5001.
Testing the Application
You can test the application by running the servers for each microservice independently.
- To run the service1.py run:
python service1.py - To run service2.py run:
python service2.py
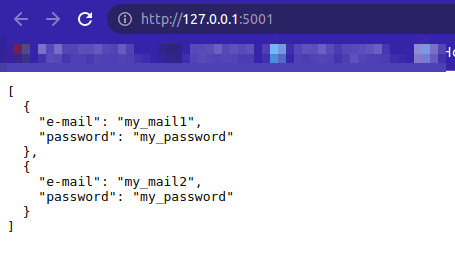
While the microservices are running, on another terminal window, run the following cURL command to save users.
curl -X POST  http://127.0.0.1:5000/user/create_user -H 'Content-Type: application/json' -d '{"e-mail":"my_mail1","password":"my_password"}'
curl -X POST  http://127.0.0.1:5000/user/create_user -H 'Content-Type: application/json' -d '{"e-mail":"my_mail2","password":"my_password"}'
You can now go to the endpoint http://127.0.0.1:5001 to view your created users. You should see something like the image below. This shows that the second microservice successfully received the message from the first microservice, completing the publish-subscribe cycle.
Conclusion
The article explains how to build two microservices using Flask and communicate between them using the Solace Event Broker and the Solace Messaging API for Python. The first microservice acts as a user service and publishes user data to a topic when a user is created. The second microservice acts as a subscriber and receives the published user data, storing it in an array.
The article provides a step-by-step guide for setting up the microservices. It covers the installation of necessary Python packages, the configuration of Solace Platform connection properties, and the implementation of the Flask apps.
You can improve on the knowledge you have gotten here by including some sort of authentication before each user is saved. You can also include a database in the application. When the message user message is received, it can be serialized into a format that can be saved into a database.
About the Author

Explore other posts from categories: For Developers | Solace Scholars


Subscribe to Our Blog
Get the latest trends, solutions, and insights into the event-driven future every week.