Chat messaging applications (like WhatsApp, Messenger, and so on) have become increasingly popular in recent years. They provide users with a convenient and efficient means of communication.
In this article, I will walk you through building the messaging part of a chat messaging application in JavaScript with Solace Platform. Making a complete chat messaging application will shift the focus of this article onto other topics. So, we’ll focus on the essential aspect, messaging, and how you can apply Solace Platform to it.
JavaScript and Solace Platform are potent tools for building chat messaging applications. In addition, Solace Platform provides robust messaging capabilities. As a result, we can create scalable and high-performance messaging applications with JavaScript on any platform.
By the end of this article, you will know how messaging works, and you’ll learn how to apply events to developing chat messaging applications with JavaScript and Solace Platform. This article will also equip you to build your high-performance messaging systems.
What does Solace Platform do in the application?
Solace Platform provides an event broker for creating and managing topics. In addition, solace plays a significant part in getting the chat messaging application to work.
Any program can subscribe to a topic or publish messages to a topic. An application that is subscribed to a topic receives real-time updates from the topic. Likewise, an application that publishes a message on a topic updates the data on that topic.
Solace promotes real-time communication between programs, which makes it perfect for building our chat messaging application.
Getting started
In this section, I’ll walk you through setting up all you need to build your application. But first, you must set up a local broker and clone this starter project to create the application.
This setup has all you need to build the application. The local broker allows you to develop Solace applications directly on your system. The starter project includes the Solace client JavaScript library and the complete user interface we’ll operate on in this project.
Building the application
It’s time to build the application now that we have set everything up. This section walks you through getting the project from where it is now to the fully working chat messaging application.
Without any delay, let’s get started!
Step 1: Understand the current project
While this isn’t a direct step in building the application, It is helpful to understand where the project is, compared to the goal of this tutorial.
Currently, the project has two HTML files, two JavaScript files, and the solclient JavaScript library. Next, we will work on this tutorial’s two JavaScript files and the chat.html file.
Each file serves the following purpose for this project:
index.htmldoes basic authentication for the application.chat.htmlis where the messaging happens. In the starter project, this file includes only the necessary imports and UI codes to help us quickly get started with the application.Publisher.jswill contain aPublisherclass that makes publishing to a topic more accessible.Subscriber.jswill contain aSubscriberclass that makes subscribing to a topic more accessible.
Step 2: Revising our goal
After understanding the current position of this project, looking at what we want to build will help us better find a path from where the project is currently.
This section reviews the chat messaging application to get a big picture of the final project. Take a look at the diagram below:
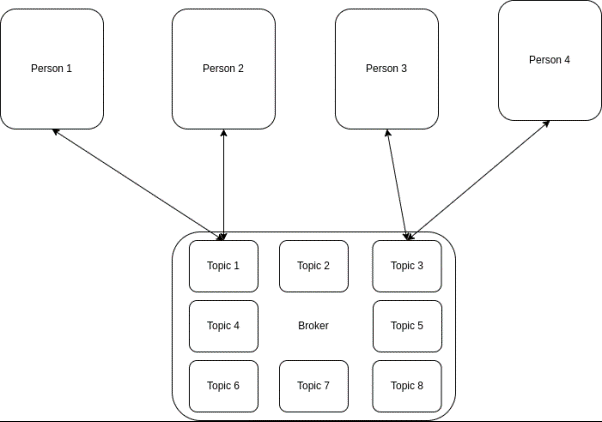
When two users subscribe to a topic, they get updated in real-time.
A broker allows you to create and manage topics. An application can subscribe to or publish events on a topic. A topic runs similarly to a chat room (or group chat) in chat messaging applications. Two or more users can send and receive messages within that room.
One or more application instances can subscribe to and publish on a topic on the developer level. Whenever a program publishes a message on a topic, all programs subscribed to that topic will receive that message in real-time. The diagram below demonstrates that:

When a program sends out a message, it’s picked up quickly by subscribed programs.
And here is a screenshot of the final application:
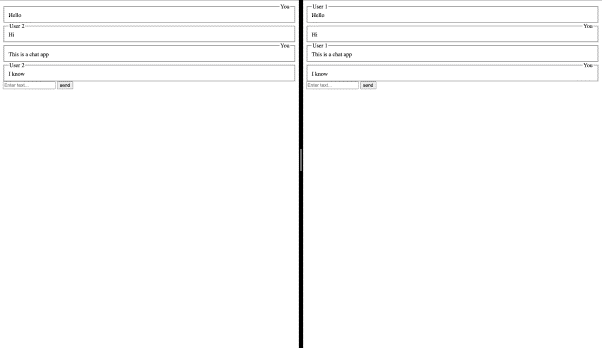
An example of two users using the chat application.
You can clone this project and follow the steps in its readme to run and test it for yourself.
Step 3: Creating a plan for the project
Before building the application, we need a plan. A plan helps with defining how we will make the application. A good definition helps us understand what path we can take to reach our goal.
In this section, we’ll follow a plan for the rest of this tutorial. The plan involves these three significant steps:
- Implementing the Publisher class.
- Implementing the Subscriber class.
- Wiring Publisher and Subscriber in the HTML code.
Step 4: Implementing the Publisher class
Implementing the Publisher class is the first significant step in building the application. The publisher class provides an interface to publish messages to a topic in the Solace broker.
Our publisher class will contain two methods for interacting with the broker. These methods include:
connectfor connecting to the broker.publishfor publishing messages to a broker.
To start implementing the class, open the Publisher.js file and initialize some object properties in the Publisher class. We will use these object properties throughout the class:
session = null;
topicName = '';
subscribed = false;
url = '';
vpnName = '';
userName = '';
password = '';</td>
Next, define a constructor method for the class. The constructor method will allow you to initialize an object from the class efficiently:
constructor (topicName, url, userName, password, vpnName) {
this.topicName = topicName;
this.url = url;
this.vpnName = vpnName;
this.userName = userName;
this.password = password;
}

[code]
After this, start defining the connect method for the class. The connect method lets the Publisher object connect to your local solace broker. It creates a session that will enable interaction with the broker:
connect () {
  if (this.session === null) { // Make sure a session isn't running

    // Create a session
    try {
      const { url, vpnName, userName, password } = this;
      this.session = solace.SolclientFactory.createSession({ url, vpnName, userName, password });
    } catch (error) {
      console.error( error.toString() );
    }

    // Define an event listener to handle session disconnection
    this.session.on(solace.SessionEventCode.DISCONNECTED, () => {
      if (this.session !== null) {
        this.session.dispose();
        this.session = null;
      }
    });
    this.session.connect();
  }
}
Finally, add a publish method to the class. We will use the publish method to send messages to the topic specified in topicName:
publish (messageText) {
   if (this.session !== null) {
     // Prepare a message object
     let message = solace.SolclientFactory.createMessage();
     message.setDestination( solace.SolclientFactory.createTopicDestination(this.topicName) );
     message.setBinaryAttachment( messageText );
     message.setDeliveryMode( solace.MessageDeliveryModeType.DIRECT );

     // Send the message object
     try {
       this.session.send(message);
     } catch (error) {
       console.log(error.toString());
     }
   }
}
After this, the Publisher.js file should look like this:
"use strict";
class Publisher {
session = null;
topicName = '';
url = '';
userName = '';
password = '';
vpnName = '';

constructor(topicName, url, userName, password, vpnName) {
   this.topicName = topicName;
   this.url = url;
   this.userName = userName;
   this.password = password;
   this.vpnName = vpnName;
}

connect () {
   if (this.session === null) { // Make sure a session isn't running

     // Create a session
     try {
       const { url, vpnName, userName, password } = this;
       this.session = solace.SolclientFactory.createSession({ url, vpnName, userName, password });
     } catch (error) {
       console.error( error.toString() );
     }

     // Define an event listener to handle session disconnection
     this.session.on(solace.SessionEventCode.DISCONNECTED, () => {
       if (this.session !== null) {
         this.session.dispose();
         this.session = null;
       }
     });

     this.session.connect();
   }
}

publish (messageText) {
   if (this.session !== null) {
     // Prepare a message object
     let message = solace.SolclientFactory.createMessage();
     message.setDestination( solace.SolclientFactory.createTopicDestination(this.topicName) );
     message.setBinaryAttachment( messageText );
     message.setDeliveryMode( solace.MessageDeliveryModeType.DIRECT );

     // Send the message object
     try {
       this.session.send(message);
     } catch (error) {
       console.log(error.toString());
     }
   }
}
}
Step 5: Implementing the Subscriber class
Implementing the Subscriber class is the next major step in building the application. The Subscriber class provides an interface that allows you to easily create a session with the broker and subscribe to a topic.
Our Subscriber class will contain two methods for interacting with the broker. These methods include:
connect, similar toPublisher.connect.subscribe, for subscribing to a topic in the broker.
To implement the class, open the Subscriber.js file and initialize some object properties in the Subscriber class. We will use these object properties throughout the class:
session = null;
topicName = '';
subscribed = false;
url = '';
vpnName = '';
userName = '';
password = '';</td>
Next, create a constructor method. A constructor method will allow you to define the object properties during initialization efficiently:
constructor (topicName, url, userName, password, vpnName) {
  this.topicName = topicName;
  this.url = url;
  this.vpnName = vpnName;
  this.userName = userName;
  this.password = password;
}
Now, we write the connect method for the Subscriber class:
connect () {
   if (this.session === null) { // Make sure a session isn't running

     // Create a session
     try {
       const { url, vpnName, userName, password } = this;
       this.session = solace.SolclientFactory.createSession({ url, vpnName, userName, password });
     } catch (error) {
       console.error(error.toString());
     }

     // Define session event listeners
     this.session.on( solace.SessionEventCode.UP_NOTICE, () => {
       this.subscribe();  // Subscribe to the topic immediately after the session is active
     });

     this.session.on( solace.SessionEventCode.DISCONNECTED, () => {
       this.subscribed = false;
         if (this.session !== null) {
           this.session.dispose();
           this.session = null;
         }
       }
     );

     this.session.on(solace.SessionEventCode.SUBSCRIPTION_OK, function () {
       this.subscribed = !this.subscribed;   // Toggle `this.subscribed` when subscribtion changes
     });

     this.session.connect();
   }
}
And finally, write a subscribe method for the class:
subscribe () {
   if (this.session !== null) {
     if (!this.subscribed) {

       try {
         const topicDestination = solace.SolclientFactory.createTopicDestination( this.topicName );
         const timeout = 10000; // 10 seconds timeout for this operation

         this.session.subscribe( topicDestination, true, this.topicName, timeout );
       } catch (error) {
         console.error( error.toString() );
       }
     }

   }
}
After this, the Subscriber.js file should look like this:
"use strict";
class Subscriber {
session = null;
topicName = '';
subscribed = false;
url = '';
vpnName = '';
userName = '';
password = '';

constructor (topicName, url, userName, password, vpnName) {
   this.topicName = topicName;
   this.url = url;
   this.vpnName = vpnName;
   this.userName = userName;
   this.password = password;
}

connect () {
   if (this.session === null) { // Make sure a session isn't running

     // Create a session
     try {
       const { url, vpnName, userName, password } = this;
       this.session = solace.SolclientFactory.createSession({ url, vpnName, userName, password });
     } catch (error) {
       console.error(error.toString());
     }

     // Define session event listeners
     this.session.on( solace.SessionEventCode.UP_NOTICE, () => {
       this.subscribe();  // Subscribe to the topic immediately after the session is active
     });

     this.session.on( solace.SessionEventCode.DISCONNECTED, () => {
       this.subscribed = false;
         if (this.session !== null) {
           this.session.dispose();
           this.session = null;
         }
       }
     );

     this.session.on(solace.SessionEventCode.SUBSCRIPTION_OK, function () {
       this.subscribed = !this.subscribed;   // Toggle `this.subscribed` when subscribtion changes
     });

     this.session.connect();
   }
}

subscribe () {
   if (this.session !== null) {
     if (!this.subscribed) {

       try {
         const topicDestination = solace.SolclientFactory.createTopicDestination( this.topicName );
         const timeout = 10000; // 10 seconds timeout for this operation

         this.session.subscribe( topicDestination, true, this.topicName, timeout );
       } catch (error) {
         console.error( error.toString() );
       }
     }

   }
}
}
Step 6: Wiring Publisher and Subscriber in the HTML code
Now that you have implemented the Publisher.js and Subscriber.js files, it’s time to use the classes in them to implement the messaging functionality of our HTML code.
Most of the code directly related to the messaging functionality can be found in the chat.html file. At the start of your project, it should look like this:
<!DOCTYPE html>
<html lang="en">
<head>
   <meta charset="UTF-8">
   <meta http-equiv="X-UA-Compatible" content="IE=edge">
   <meta name="viewport" content="width=device-width, initial-scale=1.0">
   <title>Messaging application</title>
   <script src="./solclientjs-10.13.0/lib/solclient-debug.js"></script>
   <script src="./Publisher.js"></script>
   <script src="./Subscriber.js"></script>
   <script>
       window.onload = () => {
           // ...
       };
   </script>
</head>
<body>
   <div id="chat"></div>
   <form id="form">
       <input type='text' id='message' placeholder='Enter text...'/>
       <input type='submit' value='send'/>
   </form>
</body>
</html>
This code will focus on lines 11-15 script tag. We will write all our code in these lines. The script tag on line 8 imports the solclient library into the HTML page, and lines 9 and 10 import our Publisher and Subscriber classes.
Start by initializing a publisher and subscriber variable above the window.onload:
let publisher = null;
let subscriber = null;

window.onload = () => {
  // ...
};
Then, write the display function below, under the window.onload:
window.onload = () => {
  // ...
};

function display(text) {
  const {user, message} = JSON.parse(text);
  const isUser = user === localStorage.getItem('username');
  return `
    <fieldset>
      <legend align="${isUser ? 'right' : 'left'}">${isUser ? 'You': user }</legend>
      <div>${message}</div>
    </fieldset>
  `;
}
Later in our code, we’ll use this display function to display messages the subscriber will receive from the broker.
Now, let’s begin work on window.onload. In the first line of window.onload initialize the solace client factory for our application:
var factoryProps = new solace.SolclientFactoryProperties();
factoryProps.profile = solace.SolclientFactoryProfiles.version10;
solace.SolclientFactory.init(factoryProps);
Next, initialize all the variables that the rest of the application will need:
const topicName = 'messages';
const hosturl = 'http://localhost:8008';
const username = 'admin';
const pass = 'admin';
const vpn = 'default';
const user = localStorage.getItem('username');
After that, we should check that user isn’t null. If user is null, the application should take the user back to the index page. If user isn’t null, the application should start initializing the publisher, the subscriber, and the application:
if (user === null) {
  document.location.assign('/');
  return ;
}

document.getElementById('form').onsubmit = (e) => {
  e.preventDefault();
  if (publisher !== null && subscriber !== null) {
    const element = document.getElementById('message');
    const obj = JSON.stringify({message: element.value, user});
    publisher.publish(obj);
    element.value = '';
  }
}
After checking that user isn’t null, instantiate the Publisher and Subscriber objects:
publisher = new Publisher(topicName, hosturl, username, pass, vpn);
subscriber = new Subscriber(topicName, hosturl, username, pass, vpn);
Next, connect the publisher and subscriber to the broker:
publisher.connect();
subscriber.connect();
Now, set up an event listener that displays messages that subscriber receives to the div with “chat” as its id attribute:
subscriber.session.on(solace.SessionEventCode.MESSAGE, (message) => {
  const chat = document.getElementById('chat');
  chat.innerHTML += display(message.getBinaryAttachment());
});
Finally, write an event listener for the form with “form” as its id attribute. Whenever the user clicks send, we want the app to publish the value of the message input to the “message” broker:
document.getElementById('form').onsubmit = (e) => {
  e.preventDefault();
  if (publisher !== null && subscriber !== null) {
    const element = document.getElementById('message');
    const obj = JSON.stringify({message: element.value, user});
    publisher.publish(obj);
    element.value = '';
  }
}
At the end of this step, the script should now look like this:
<script>
  let publisher = null;
  let subscriber = null;

  window.onload = () => {
    var factoryProps = new solace.SolclientFactoryProperties();
    factoryProps.profile = solace.SolclientFactoryProfiles.version10;
    solace.SolclientFactory.init(factoryProps);

    const topicName = 'messages';
    const hosturl = 'http://localhost:8008';
    const username = 'admin';
    const pass = 'admin';
    const vpn = 'default';
    const user = localStorage.getItem('username');

    if (user === null) {
      document.location.assign('/');
      return ;
    }

    publisher = new Publisher(topicName, hosturl, username, pass, vpn);
    subscriber = new Subscriber(topicName, hosturl, username, pass, vpn);
    const chat = document.getElementById('chat');

    publisher.connect();
    subscriber.connect();

    subscriber.session.on(solace.SessionEventCode.MESSAGE, function (message) {
      chat.innerHTML += display(message.getBinaryAttachment());
    });

    document.getElementById('form').onsubmit = (e) => {
      e.preventDefault();
      if (publisher !== null && subscriber !== null) {
        const element = document.getElementById('message');
        const obj = JSON.stringify({message: element.value, user});
        publisher.publish(obj);
        element.value = '';
      }
    }
  };

  function display(text) {
    const {user, message} = JSON.parse(text);
    const isUser = user === localStorage.getItem('username');
    return `
      <fieldset>
        <legend align="${isUser ? 'right' : 'left'}">${isUser ? 'You' : user }</legend>
        <div>${message}</div>
      </fieldset>
    `;
  }
</script>
Conclusion
Building a chat messaging application with Solace Platform is excellent. It enables reliable and efficient communication between various components of your application. I hope this tutorial has taught you how to build a chat messaging application with Solace Platform. We also hope you will find this valuable technology for your next project.
About the Author

Explore other posts from categories: For Developers | Solace Scholars


Subscribe to Our Blog
Get the latest trends, solutions, and insights into the event-driven future every week.