A number of basic authentication and authorization options are available in Solace for both CLI users and messaging clients. Those options include internal, radius and LDAP.
Increasingly, LDAP is the preferred approach for authorization, using LDAP group membership to restrict access to members of those LDAP groups.
Due to the way that LDAP based authorization works, membership of a group is insufficient in itself without a “reverse group membership” attribute (also known as “back reference” or “back link”) also being maintained on the LDAP server.
In this blog I will describe an example setup for OpenLDAP and the corresponding Solace configuration for CLI user authentication and authorization.
The Solace configuration for messaging client authentication and authorization using LDAP will be covered in a future blog.
Finally I describe one of the benefits of having users and groups maintained in an external corporate directory – namely managing “Temporary Privileged Access” or TPA.
Authentication
Authentication is the process of verifying that “you are who you say you are”.
In Solace at the time of writing (SolOS 7.1.1) CLI Users may be authenticated using:
- Basic Authentication (username/password credentials)
When using basic authentication, Solace may be configured to use either of the following to verify the username/password credentials:
- Internal (username/password are checked against the internal appliance database)
- RADIUS (username/password are forwarded to an external RADIUS server)
- LDAP (username/password are forwarded to an external LDAP server)
In this blog I will be describing basic authentication with LDAP.
Authorization
Authorization is the process of verifying that “you are permitted to do what you are trying to do”, and to be authorised “you” must already be authenticated.
For CLI Users, the authentication and authorization methods are inextricably linked and are configured simultaneously through the authentication->user-class cli configuration settings. When you configure the CLI authentication type, you are also configuring the authorization type – there is no separate configuration for CLI authorization type.
In order to authorise a CLI User that user must be associated with a particular access level.
For CLI Users the permitted global access levels are as follows:
- None
- Read-only
- Read-write
- Admin
Note that per-vpn access levels are also available.
For further details of the available CLI User Access Levels refer to the Solace Messaging Platform Feature Guide – User Access To CLI Commands
If you are using the internal database for CLI user authentication, then the internal CLI user, when it is configured, is directly associated with the appropriate access level – for example username->global-access-level->read-only.
But when you are using LDAP the CLI user credentials are not stored on the appliance, instead they are stored in LDAP. So now how do you associate these users with the appropriate access levels?
The answer is to use LDAP group membership and to associate each LDAP group with access levels on the appliance.
In this paper I will be describing how to use LDAP group membership for authorization.
LDAP Server Implementations and Reverse Group Membership Maintenance
So how does the Solace appliance retrieve group membership information from LDAP?
It does so by searching for the username in LDAP and retrieving a group membership attribute.
This group-membership-attribute-name is separately configurable. By default in Solace it is named memberOf (note that in Solace this is case sensitive).
There are various LDAP server implementations and they vary in the way that they support the group membership attribute.
In general, users are added to groups as members – using a member attribute that contains the dn of the users.
However what we need is a memberOf attribute in the users that contains the dn of the groups.
Unfortunately, just adding the members to the groups does not always automatically result in a corresponding memberOf attribute appearing in the users.
Automatically maintaining these relationships is known as “reverse group membership maintenance”.

For example looking at the two most common LDAP server implementations I have seen in the field: Microsoft Active Directory (AD) and OpenLDAP.
AD natively supports reverse group membership using link-pair relationships defined within the Active Directory schema. A link-pair comprises exactly two attributes, the first is a writable “forward-link” (by default member) and the other is a read-only “back-link” (by default memberOf).
OpenLDAP needs the memberOf overlay. This overlay updates an attribute (by default memberOf) whenever changes occur to the membership attribute (by default member) of entries of the configured objectclass (groupOfNames by default) to trigger updates.
Refer to the OpenLDAP Administrators Guide for more details: Reverse Group Membership Maintenance
The trouble with the above reference and most other references is that it describes how to configure the overlay using slapd.conf, which is no longer supported.
Instead, OpenLDAP should be configured using “On Line Configuration” (OLC) – which I describe below.
Note that other LDAP server implementations have similar functionality and need to be setup and configured appropriately to support group membership maintenance (as most do not support it by default).
Other common LDAP implementations:
- Oracle Directory Server (needs a
memberOfPlugin – attribute nameismemberOf) - RedHat Directory Server (needs a
memberOfPlugin – attribute namememberOf)
OpenLDAP
OpenLDAP is an Open Source implementation of the LDAP directory service, widely used by many enterprise customers. Linux packages are available and in my final setup as described below, I used yum to install the latest package. Contrary to the warnings on openldap.org, I found this package to be up to date and to include all the various modules and overlays.
The recent versions of OpenLDAP (the last 5 years or so) should be set up using “On Line Configuration” (OLC) which allows dynamic configuration. Earlier versions were configured statically using a slapd.conf file – most of the resources you will find online give examples using slapd.conf – but this approach is no longer supported and so I have taken the OLC approach.
OpenLDAP Installation
I installed OpenLDAP on one of our lab servers (running CentOS 6.7).
To do this I ran yum as root to install the openldap related packages as follows:
# yum install -y openldap openldap-clients openldap-servers
This installed the LDAP server as well as ensuring the LDAP client/support libraries were up to date.
OpenLDAP Base Level Configuration
After installing OpenLDAP as above I found the configuration under /etc/openldap but unlike older versions of OpenLDAP there is no slapd.conf file – instead there is a directory structure under /etc/openldap/slapd.d containing the “On Line Configuration” (OLC) files.
Now there are plenty of links on the internet describing how to configure these files by editing them directly, but this is not the recommended approach.
# AUTO-GENERATED FILE - DO NOT EDIT!! Use ldapmodify.
Instead of editing these files I started up the LDAP server in its initial configuration state and then used the LDAP client utilities to dynamically configure the server “on line”.
First, I created an LDIF file containing the base level configuration as follows (note the leading spaces, hyphens and blank lines are important):
# cat olc-base-config.ldif
dn: olcDatabase={2}bdb, cn=config
changetype: modify
replace: olcSuffix
olcSuffix: dc=solacesystems, dc=com
-
replace: olcRootDN
olcRootDN: cn=Manager, dc=solacesystems, dc=com
-
add: olcRootPW
olcRootPW: {SSHA}MsOfEPxo6E13qKnAl8hDlLDTIpq+nP+S

dn: olcDatabase={1}monitor, cn=config
changetype: modify
replace: olcAccess
olcAccess: {0}to *  by dn.base="gidNumber=0+uidNumber=0, cn=peercred, cn=exter
 nal, cn=auth" read  by dn.base="cn=Manager, dc=solacesystems, dc=com" read  by * n
 one
This modifies the configuration of the default bdb database as follows:
- Changes the suffix from the initial value of dc=my-domain, dc=com to a new value of dc=solacesystems, dc=com
- Changes the root DN from the initial value of cn=Manager, dc=my-domain, dc=com to a new value of cn=Manager, dc=solacesystems, dc=com
- Sets a root password – using a slappasswd generated hash (see note below)
It also changes the monitor database olcAccess attribute value to match.
Note that these values would vary depending on your particular organizational/domain setup. For example instead of dc=solacesystems you might have dc=mycompany. A secure password is configured using ‘slappasswd –s secret’ to generate a password hash.
To apply the above LDIF file to the LDAP server it had to be started first:
# service slapd start
Then I ran the following as Linux root:
# ldapmodify -Y EXTERNAL -H ldapi:/// -f olc-base-config.ldif
Note the unusual options:
- -Y EXTERNAL (external SASL for authentication)
- -H ldapi:/// (connect to LDAP locally over IPC)
- -f olc-base-config.ldif (file specified)
These options allowed me to apply the modifications to OpenLDAP as Linux root.
Note that although the suffix and root DN are configured there are still no entries, so for example I cannot search for the suffix dc=solacesystems, dc=com, because that entry still needs to be created (see below).
OpenLDAP memberOf Overlay Configuration
For Open LDAP to support reverse group membership maintenance, the memberOf module needs to be loaded and the overlay configured.
To load the module and configure the overlay I created another LDIF file as follows:
# cat olc-overlay-config.ldif
dn: cn=module, cn=config
objectClass: olcModuleList
cn: module
olcModulePath: /usr/lib64/openldap
olcModuleLoad: memberOf

dn: olcOverlay=memberOf, olcDatabase={2}bdb, cn=config
objectClass: olcmemberOf
objectClass: olcOverlayConfig
objectClass: olcConfig
objectClass: top
olcOverlay: memberOf
This modifies the configuration as follows:
- Sets the path to the directory where the dynamic modules may be found
- Loads the
memberOfmodule - Adds the
memberOfoverlay to the default bdb database
Note that I have left the memberOf overlay in its default configuration, which sets the group objectclass to groupOfNames, the forward reference attribute name to member and the back reference attribute name to memberOf by default. Additional attributes are available to change those configurations if desired.
To apply this I ran the following as Linux root (note this is ldapadd not ldapmodify):
# ldapadd -Y EXTERNAL -H ldapi:/// -f olc-overlay-config.ldif
Again note the options which allow me to apply the modifications to OpenLDAP as Linux root:
- -Y EXTERNAL (external SASL for authentication)
- -H ldapi:/// (connect to LDAP locally over IPC)
- -f olc-overlay-config.ldif (file specified)
Once this configuration is applied, the memberOf overlay will dynamically create the linked memberOf back reference attributes whenever any new members are added to groups.
IMPORTANT NOTE: Any group members that were created before this point would have had to be deleted and recreated so that the memberOf overlay can dynamically create the linked memberOf back reference attributes.
ADDITIONAL NOTE: It is also worthwhile configuring the refint overlay. This overlay ensures that when entries are deleted any forward references to them are also removed (I have not done so in this blog).
OpenLDAP Suffix Configuration
To configure the suffix entry for my directory, I created another LDIF file as follows:
$ cat solacesystems.ldif
dn: dc=solacesystems, dc=com
objectClass: dcObject
objectClass: organization
dc: solacesystems
o: solacesystems
Then I ran the following as a regular user (does not need to run as Linux root):
$ ldapadd -x -D cn=Manager, dc=solacesystems, dc=com -W -f solacesystems.ldif
Enter LDAP Password:
At the prompt enter the password you set for the root DN (hashed in olc-base-config.ldif above).
Note the options:
- -x (use simple authentication instead of SASL)
- -D cn=Manager, dc=solacesystems, dc=com (bind to the root dn)
- -W (prompt for simple password)
- -f solacesystems.ldif (file specified)
Note that I have not specified the ldapuri so it will connect to the localhost on the default LDAP port 389 – if you are running this command remotely you can specify –H for the ldapuri.
Configuring Users
To configure some users – for example for CLI, I created another LDIF file as follows:
$ cat solace-cli-users.ldif
dn: ou=solace-cli-users, dc=solacesystems, dc=com
ou: solace-cli-users
description: Solace CLI Users
objectClass: organizationalUnit

dn: cn=test-cli-user1, ou=solace-cli-users, dc=solacesystems, dc=com
objectClass: person
cn: test-cli-user1
sn: test-cli-user1
userPassword: {SSHA}yRi7Q5ido56674L2O7X+qOr8KbS0P0uF

dn: cn=test-cli-user2, ou=solace-cli-users, dc=solacesystems, dc=com
objectClass: person
cn: test-cli-user2
sn: test-cli-user2
userPassword: {SSHA}n5tJMssIPH+T/6/LDw2v1Bh5z5iA2CYA

dn: cn=test-cli-user3, ou=solace-cli-users, dc=solacesystems, dc=com
objectClass: person
cn: test-cli-user3
sn: test-cli-user3
userPassword: {SSHA}swoKYLzNmf0DacVmuVbBXWLI3ijAkmAo
This contains the following:
- One ou=solace-cli-users entry as a base for the cli-users
- Three example cli-user entries
- Note that the passwords are hashed using slappasswd as above)
Then I ran the following as a regular user:
$ ldapadd -x -D cn=Manager, dc=solacesystems, dc=com -W -f solace-cli-users.ldif
Enter LDAP Password:
At the prompt enter the password you set for the root DN (hashed in olc-base-config.ldif above).
Note the options:
- -x (use simple authentication instead of SASL)
- -D cn=Manager, dc=solacesystems, dc=com (bind to the root dn)
- -W (prompt for simple password)
- -f solace-cli-users.ldif (file specified)
Again, if you are running this command remotely you can specify –H for the ldapuri.
Configuring Groups
To configure groups – for example some groups for CLI, I created another LDIF file as follows:
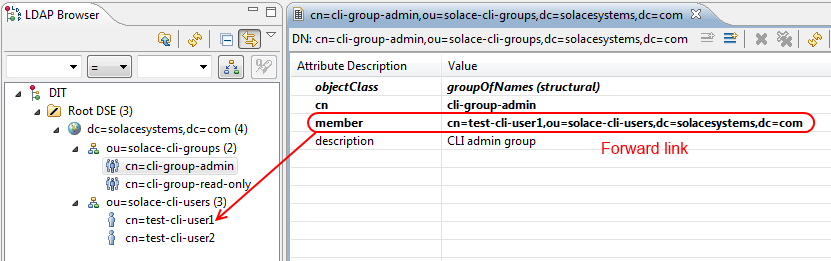
$ cat solace-cli-groups.ldif
dn: ou=solace-cli-groups, dc=solacesystems, dc=com
ou: solace-cli-groups
description: Solace CLI Groups
objectClass: organizationalUnit

dn: cn=cli-group-admin, ou=solace-cli-groups, dc=solacesystems, dc=com
cn: cli-group-admin
description: CLI admin group
objectClass: groupOfNames
member: cn=test-cli-user1, ou=solace-cli-users, dc=solacesystems, dc=com

dn: cn=cli-group-read-only, ou=solace-cli-groups, dc=solacesystems, dc=com
cn: cli-group-read-only
description: CLI read-only group
objectClass: groupOfNames
member: cn=test-cli-user2, ou=solace-cli-users, dc=solacesystems, dc=com
This contains the following:
- One ou=solace-cli-groups entry as a base for the cli-groups
- Two example cli-group entries
- The first group-admin contains test-cli-user1 as a member
- The second group-read-only contains test-cli-user2 as a member
Then I ran the following as a regular user:
$ ldapadd -x -D cn=Manager, dc=solacesystems, dc=com -W -f solace-cli-groups.ldif
Enter LDAP Password:
At the prompt enter the password you set for the root DN (hashed in olc-base-config.ldif above).
Note the options:
- -x (use simple authentication instead of SASL)
- -D cn=Manager, dc=solacesystems, dc=com (bind to the root dn)
- -W (prompt for simple password)
- -f solace-cli-groups.ldif (file specified)
Again, if you are running this command remotely you can specify –H for the ldapuri.
Verifying Reverse Group Membership is working
To check that the overlay was configured correctly and working I ran the following search.
$ ldapsearch -LLL -x -b ou=solace-cli-users, dc=solacesystems, dc=com '(cn=*)' memberOf
dn: cn=test-cli-user1, ou=solace-cli-users, dc=solacesystems, dc=com
memberOf: cn=cli-group-admin, ou=solace-cli-groups, dc=solacesystems, dc=com

dn: cn=test-cli-user2, ou=solace-cli-users, dc=solacesystems, dc=com
memberOf: cn=cli-group-read-only, ou=solace-cli-groups, dc=solacesystems, dc=com

dn: cn=test-cli-user3, ou=solace-cli-users, dc=solacesystems, dc=com
The memberOf attribute is an operational attribute, so it must be requested explicitly.
Note the output lists the 3 user entries with the memberOf attribute set to the dn of the group those entries are members of. This is generated automatically thanks to the memberOf overlay!
Remember, if you are running this command remotely you can specify –H for the ldapuri.
Configuring Solace
CLI/SEMP Authentication and Authorization
Now we have our LDAP server installed and configured it is time to configure Solace to use it.
In the previous section I have configured a set of users and groups for CLI authentication and authorization.
To configure Solace to use these I ran the following commands on the appliance to create an ldap-profile:
! LDAP PROFILE FOR CLI
home
enable
configure
authentication
create ldap-profile cli_users_profile
ldap-server ldap://192.168.32.40 index 1
search base-dn ou=solace-cli-users, dc=solacesystems, dc=com
search filter (cn=$CLIENT_USERNAME)
no shutdown
exit
exit
I have named the ldap-profile cli_users_profile.
I have specified the same search base and filter we used to test the LDAP configuration above.
Note that I did not configure an admin dn or password or configure tls (which would be recommended to improve security)
Also note that I have only configured 1 ldap-server (up to 3 are recommended for resilience).
Then I ran the following CLI commands to configure the authentication for CLI:
! CLI AUTHENTICATION
home
enable
configure
authentication
user-class cli
auth-type ldap cli_users_profile
access-level
default
global-access-level "none"
exit
ldap
group-membership-attribute-name "memberOf"
create group cn=cli-group-admin, ou=solace-cli-groups, dc=solacesystems, dc=com
global-access-level "admin"
exit
create group cn=cli-group-read-only, ou=solace-cli
groups, dc=solacesystems, dc=com
global-access-level "read-only"
exit
exit
exit
exit
exit
I have configured authentication for user-class cli to use the ldap-profile defined above.
Notice I have set the default access-level to “none” – this means that if the user successfully authenticates (that is they exist in LDAP and provide the correct password) but is not the member of any group they will get this level of authorization.
Then I have defined 2 groups corresponding to the groups I have configured in LDAP and matched those to appropriate global-access-level in Solace.
Note that you could also define groups for individual message-vpn access-levels for which you would need corresponding groups created in LDAP (I have not done so in this blog).
Trying out the CLI Login
To try out this setup I logged in as each of the users that were configured in LDAP above.
First, logged in as test-cli-user1 which is a memberOf cli-group-admin:
login as: test-cli-user1
Using keyboard-interactive authentication.
Password:

System Software. SolOS-TR Version 7.1.1.614

Copyright 2004-2015 Solace Systems,  Inc. All rights reserved.

solace> show authentication current-user

Access Level of Current User:
Global Access Level: admin
Message VPN                      Access-Level
-------------------------------- ------------
#config-sync                     read-write
...
...
solace>
Notice that as test-cli-user1 the current user has a Global Access Level: admin.
Second, logged in as test-cli-user2 which is a memberOf cli-group-read-only:
login as: test-cli-user2
Using keyboard-interactive authentication.
Password:

System Software. SolOS-TR Version 7.1.1.614

Copyright 2004-2015 Solace Systems,  Inc. All rights reserved.

solace> show authentication current-user

Access Level of Current User:
Global Access Level: read-only
Message VPN                      Access-Level
-------------------------------- ------------
#config-sync                     read-only
...
...
solace>
Notice that as test-cli-user2 the current user has a Global Access Level: read-only.
Third, logged in as test-cli-user3 which is not a memberOf any groups:
login as: test-cli-user3
Using keyboard-interactive authentication.
Password:

System Software. SolOS-TR Version 7.1.1.614

Copyright 2004-2015 Solace Systems,  Inc. All rights reserved.

solace> show authentication current-user

Access Level of Current User:
Global Access Level: none
solace>
Notice that as test-cli-user3 the current user has a Global Access Level: none.
Temporary Privileged Access
Now we have our users in LDAP we can put in place standard security related processes such as for example “Temporary Privileged Access” (TPA).
Under normal operation users might be members of the read-only group.
Then, only if they need to make an administrative change they would be temporarily “promoted” to the admin group.
This is easy for us now as we have our users and groups in LDAP.
For example to promote test-cli-user2 to admin we only need apply the following LDIF:
$ cat test-cli-user2-promote.ldif
dn: cn=cli-group-admin, ou=solace-cli-groups, dc=solacesystems, dc=com
changetype: modify
add: member
member: cn=test-cli-user2, ou=solace-cli-users, dc=solacesystems, dc=com
As follows:
$ ldapmodify -x -D cn=Manager, dc=solacesystems, dc=com -W -f test-cli-user2-promote.ldif
Enter LDAP Password:
Note that there is no need to remove them from the lower group as the higher privileged group applies (also note that groups in ldap cannot be empty).
Now, login as test-cli-user2 to see the difference:
login as: test-cli-user2
Using keyboard-interactive authentication.
Password:

System Software. SolOS-TR Version 7.1.1.614

Copyright 2004-2015 Solace Systems,  Inc. All rights reserved.

solace> show authentication current-user

Access Level of Current User:
Global Access Level: admin
Message VPN                      Access-Level
-------------------------------- ------------
#config-sync                     read-write
...
...
solace>
Notice that as test-cli-user2 the current user now has a Global Access Level: admin.
To “demote” them back to read-only you only need to delete them as a member from the admin group:
For example to demote test-cli-user2 from admin we only need apply the following LDIF:
$ cat test-cli-user2-demote.ldif
dn: cn=cli-group-admin, ou=solace-cli-groups, dc=solacesystems, dc=com
changetype: modify
delete: member
member: cn=test-cli-user2, ou=solace-cli-users, dc=solacesystems, dc=com
As follows:
$ ldapmodify -x -D cn=Manager, dc=solacesystems, dc=com -W -f test-cli-user2-demote.ldif
Enter LDAP Password:
Login as test-cli-user2 again, to see the change back to read-only:
login as: test-cli-user2
Using keyboard-interactive authentication.
Password:

System Software. SolOS-TR Version 7.1.1.614

Copyright 2004-2015 Solace Systems,  Inc. All rights reserved.

solace> show authentication current-user

Access Level of Current User:
Global Access Level: read-only
Message VPN                      Access-Level
-------------------------------- ------------
#config-sync                     read-only
...
...
solace>
Notice that as test-cli-user2 the current user now has a Global Access Level: read-only.
Finally note that your access-level does not change if you are already logged-in when the group membership is modified – only on your next login.
Solace Documentation
For more details on CLI User Authentication and Authorization on a Solace message router, refer to the Solace Messaging Platform Feature Guide – CLI User Authentication and Authorization.
For more details on Client Authentication and Authorization on a Solace message router, refer to the Solace Messaging Platform Feature Guide – Client Authentication and Authorization.
Explore other posts from category: DevOps


Subscribe to Our Blog
Get the latest trends, solutions, and insights into the event-driven future every week.