OpenID Connect (OIDC) and OAuth are becoming increasingly popular standards for authentication and authorization because they provide a modern, standards-based method of providing client applications with secure delegated access. With OAuth and OIDC an organization can implement a federated identity and access management (IAM) platform to provide single sign-on services for web applications and APIs. Solace enhances its security feature list with OAuth 2.0 to enable clients to take advantage of a modern IAM platform.
Solace supports various protocols and APIs for messaging and event-driven enterprise integration. One of these protocols is the Solace’s native Solace Messaging Format (SMF) for PubSub+.
Securing messages sent with SMF using OIDC and OAuth is a straightforward process that can protect the accessibility and integrity of messages in transit. I’ll explain and demonstrate how using a demo environment that’s set up using Docker Desktop with Keycloak as the identity provider. The Docker Desktop environment is setup similar to the setup described in this Codelab which provides access to a Linux environment via wsl. Here is the setup we’ll explain the creation of in this blog post:
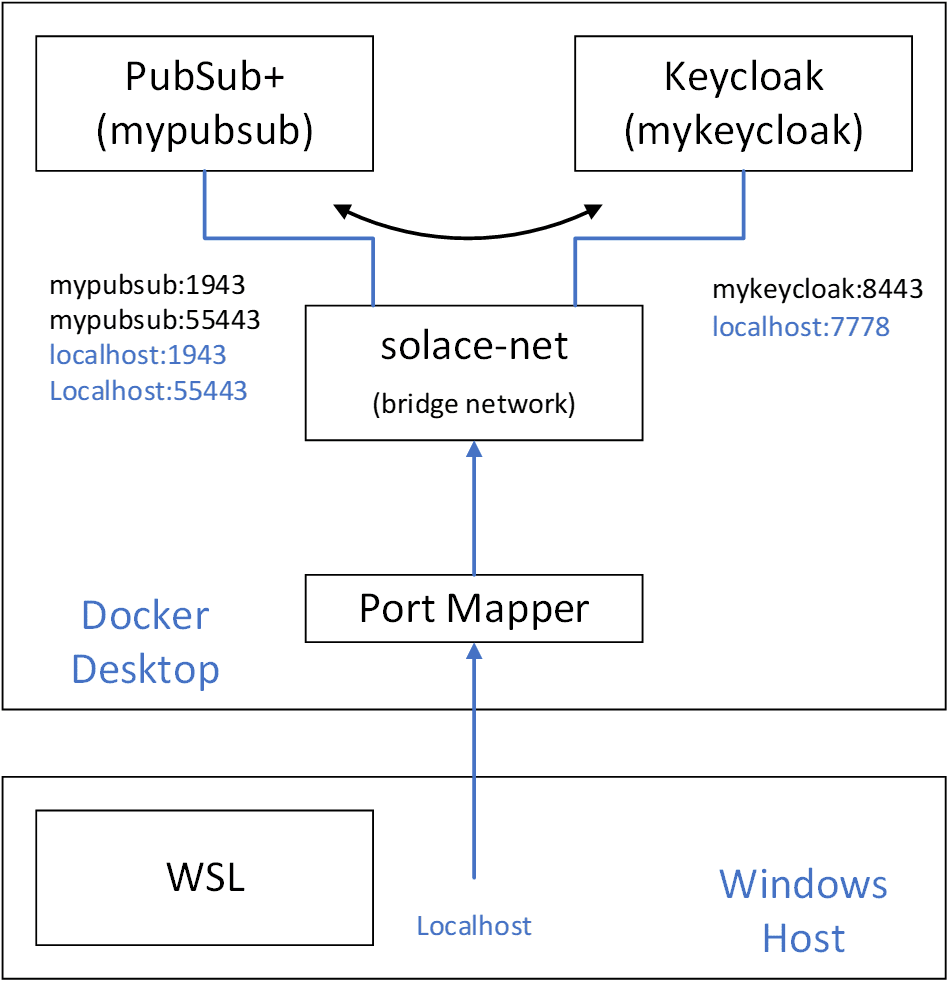
The PubSub+ Manager web interface will be reachable from https:\\localhost:1943 and the client interface for SMF secure clients will be reachable from localhost:55443. The web interface for the Keycloak server will be reachable at https://localhost:7778.
OAuth and OIDC also require that all communication take place over TLS, so we will also require some x509 certificates to get all of this working.
Prerequisites
Create x509 Certificates
The setup above requires two x509 certificates, one for the PubSub+ Event Broker instance and one for the Keycloak instance. A few points to note about how this setup works, the two container instances (mypubsub and mykeycloak) can communicate with each other over the bridge network (solace-net) using their instance names. Communication with either container instance from the Windows host (or the WSL Linux environment) are done via the localhost with the help of the port mapper. To get the certificates to validate when connecting to localhost or to the container’s hostname, the certificates must be created with two DNSnames in the subject alternate name (mypubsub and localhost or mykeycloak and localhost).
To make the certificate for the Keycloak instance, create the following file called mykeycloak.cnf:
[req]
default_bits  = 2048
distinguished_name = req_distinguished_name
req_extensions = req_ext
x509_extensions = v3_req
prompt = no
[req_distinguished_name]
countryName = CA
stateOrProvinceName = N/A
localityName = Ottawa
organizationName = Solace
emailAddress = myemail@email.com
organizationalUnitName = myorg-unit
commonName = mykeycloak
[req_ext]
subjectAltName = DNS:mykeycloak, DNS:localhost
[v3_req]
subjectAltName = DNS:mykeycloak, DNS:localhost
The following OpenSSL command uses the configuration file to generate a key and certificate:
$ openssl req -x509 -nodes -days 730 -newkey rsa:2048 -keyout tls.key -out tls.crt -config mykeycloak.cnf
To make the certificate for the PubSub+ instance, create the following file called mypubsub.cnf:
[req]
default_bits  = 2048
distinguished_name = req_distinguished_name
req_extensions = req_ext
x509_extensions = v3_req
prompt = no
[req_distinguished_name]
countryName = CA
stateOrProvinceName = N/A
localityName = Ottawa
organizationName = Solace
emailAddress = myemail@email.com
organizationalUnitName = myorg-unit
commonName = mypubsub
[req_ext]
subjectAltName = DNS:mypubsub, DNS:localhost
[v3_req]
subjectAltName = DNS:mypubsub, DNS:localhost
The following OpenSSL command uses the configuration file to generate a key and certificate:
$ openssl req -x509 -nodes -days 730 -newkey rsa:2048 -keyout mypubsub.key -out mypubsub.crt -config mypubsub.cnf
PubSub+ requires that the certificate and key be present in the same file, so there is an additional step.
$ cat mypubsub.crt mypubsub.key > mypubsub.pem
Create the Docker Bridge Network
Create the Docker bridge network that the PubSub+ broker and Keycloak instances will use to communicate. This can be done, using the command below:
$ docker network create solace-net
Install Solace PubSub+ broker
Before installing the PubSub+ Event Broker, create a directory for the brokers runtime configuration. This directory will be volume mounted in the PubSub+ container at /var/lib/solace. The directory must be writable by the PubSub+ container default user (uid:1000001).
$ sudo chown 1000001 mypubsub
$ sudo chgrp 0 mypubsub
$ sudo chmod g+wx mypubsub
The following docker command downloads and installs a Solace PubSub+ broker:
$ docker run -d --network solace-net -p 8080:8080 -p 1943:1943 \
-p 55443:55443 --shm-size=2g \
-v /mnt/c/Solace/docker/pubsubplus/mypubsub.pem:/var/run/secrets/mypubsub.pem \
-v /mnt/c/Solace/docker/mypubsub:/var/lib/solace \
--env tls_servercertificate_filepath=/var/run/secrets/mypubsub.pem \
--env username_admin_globalaccesslevel=admin \
--env username_admin_password=admin \
--name=mypubsub solace/solace-pubsub-standard:9.12.1.17
Note: Change the path of the volume mount for mypubsub to your local directory.
More details and installation options can be found here: https://docs.solace.com/Solace-SW-Broker-Set-Up/Docker-Containers/Set-Up-Docker-Container-Image.htm
Install Keycloak Authentication Server
Copy the certificate and key (tls.crt and tls.key) previously created for the Keycloak instance to a directory that can be mounted in the Keycloak container at /etc/x509/https. The runtime configuration of the Keycloak instance is also stored in a volume mount. Create a data directory to be mounted in the Keycloak container at /opt/jboss/keycloak/standalone/data.
Keycloak is deployed via docker with the following command:
$ docker run --network solace-net --name mykeycloak \
--env KEYCLOAK_USER=admin --env KEYCLOAK_PASSWORD=admin \
--env DB_VENDOR=H2 \
--volume /mnt/c/Solace/docker/keycloak/cert:/etc/x509/https \
--volume /mnt/c/Solace/docker/Keycloak/data:/opt/jboss/keycloak/standalone/data \
-p 7777:8080 -p 7778:8443 --detach jboss/keycloak:16.1.1
Note: Change the path of the volume mount for data and cert to your local directories.
Configure Keycloak Authentication Server
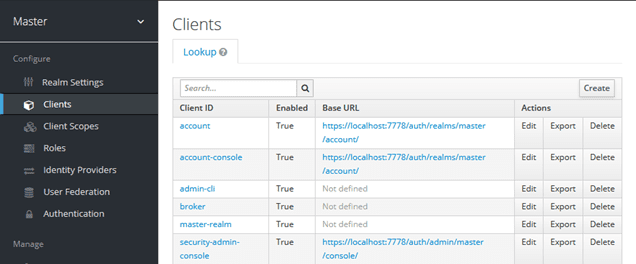
Once the Keycloak docker instance is up and running, it should be accessible via the following URL:
https://localhost:7778
Username: admin
Password: admin
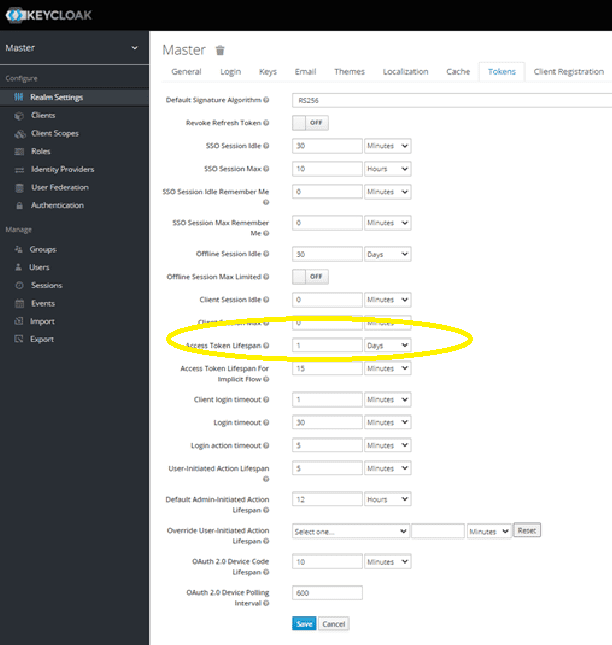
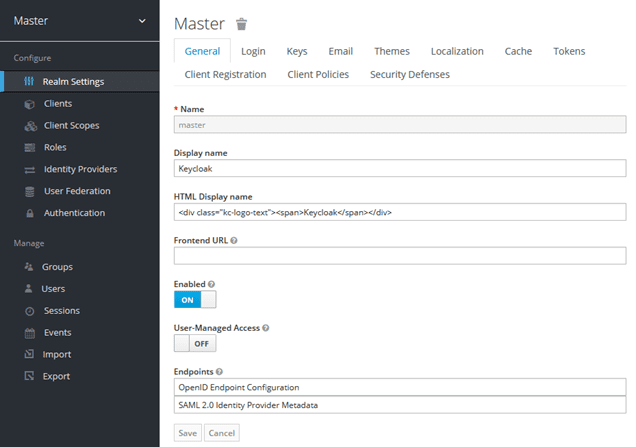
In the current demo, Keycloak’s Master Realm is used for the test client configuration. In the Master Realm settings, go to the “Tokens” tab and extend the lifespan of the token from 1 min to 1 or more days to make testing easier:
Follow the steps to create a new client on the authentication server:
Select “Create” and create a client named “solace”.
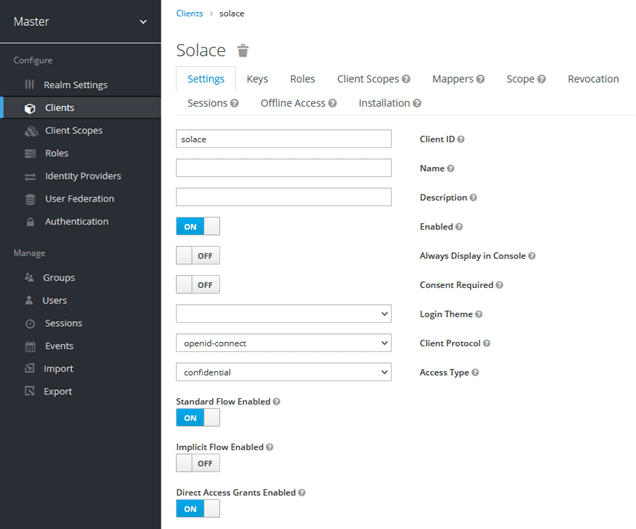
Select “Access Type” confidential and make sure that “Direct Access Grants Enabled” is set to “ON”.
![]()
Add * for Valid redirect URIs and save the client.
Go to Client Scopes and create a new client scope:

Select “Create”:
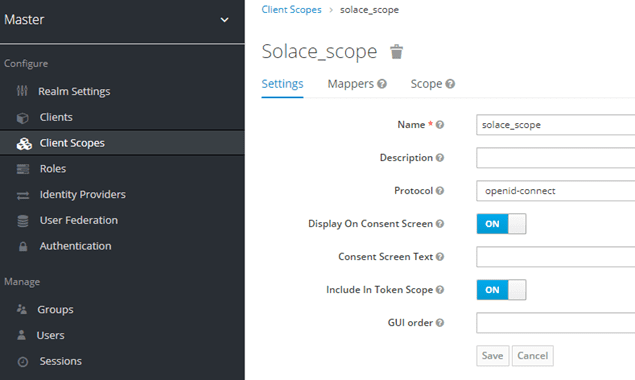
Name the new scope “solace_scope” and save the changes.
Add a new protocol mapper to the new client scope:
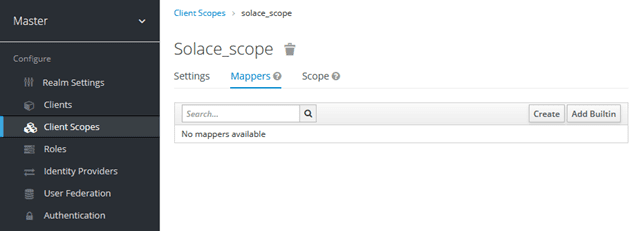
Select “Create”:
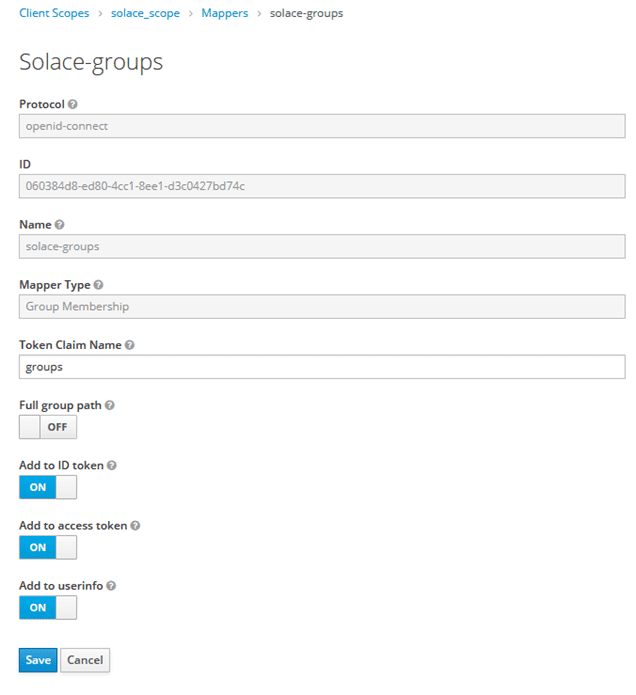
The mapper will be named “solace_groups”, the “Mapper Type” will be set to “Group Membership” and the “Token Claim Name” is set to “groups”. Also, set “Full group path” to “OFF”.
Add the new client scope:
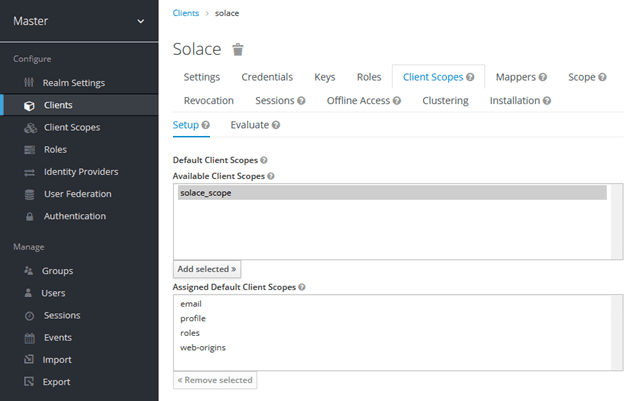
Select “solace_scope” and “Add selected>>”.
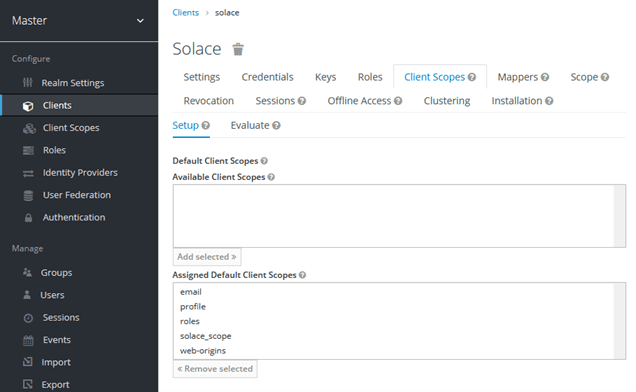
Now the “solace_scope” is added to the “Assigned Default Client Scopes”.
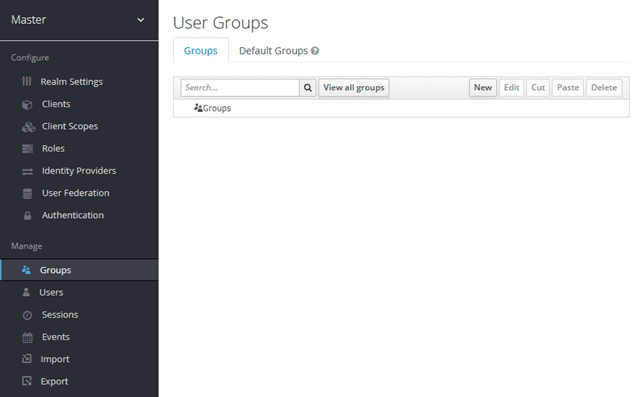
Create a new group:
Select “New”:
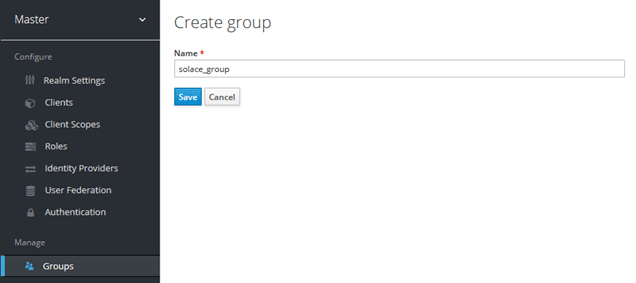
Save.
Add a new test user called User1:
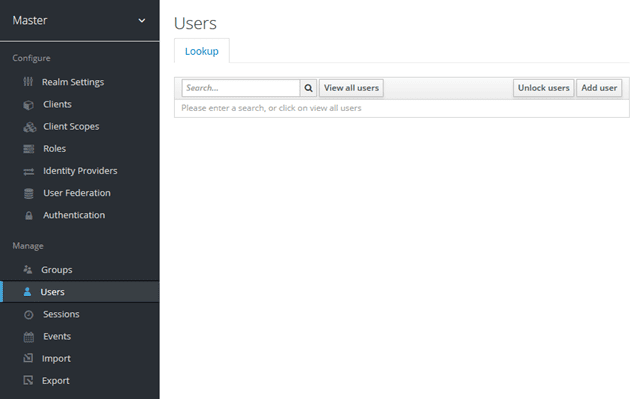
Select “Add User”:
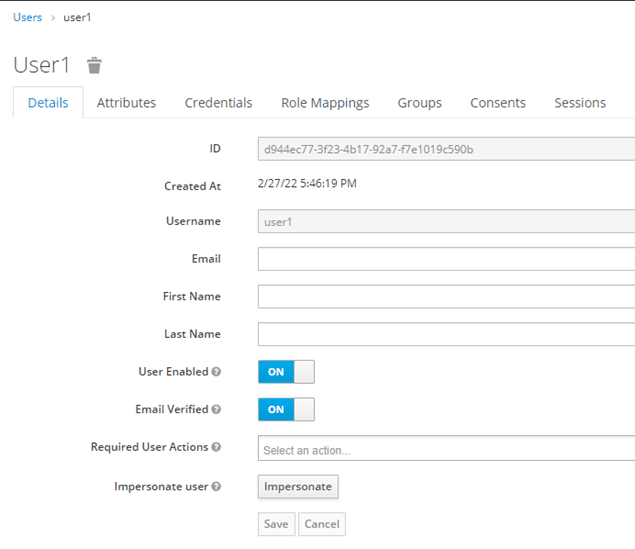
When adding the new user, remove the “Required User Actions” and uncheck “Temporary user”. Set the password under the “Credentials” tab.
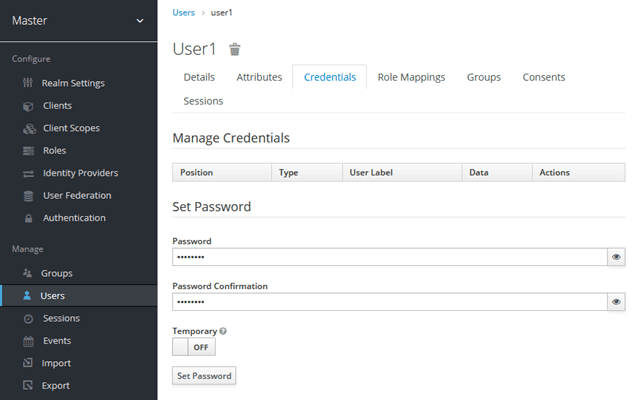
Set the “Password” to “password”, set “Temporary” to “OFF” and “Set Password”.
Then set the groups that user1 is a part of:
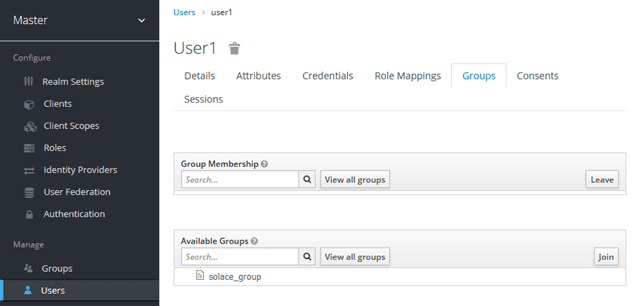
Select “solace_group” and “Join”.
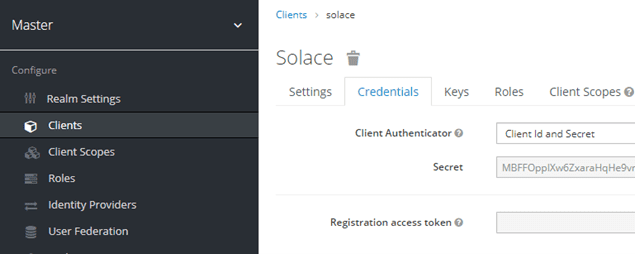
That completes the configuration of the Keycloak server, so the system is ready to grant a token. First, we need to remember the client secret from when the client was configured.
The client secret can be found in client’s credentials:
The client secret and the password for user1 can be used in a password type token grant using curl:
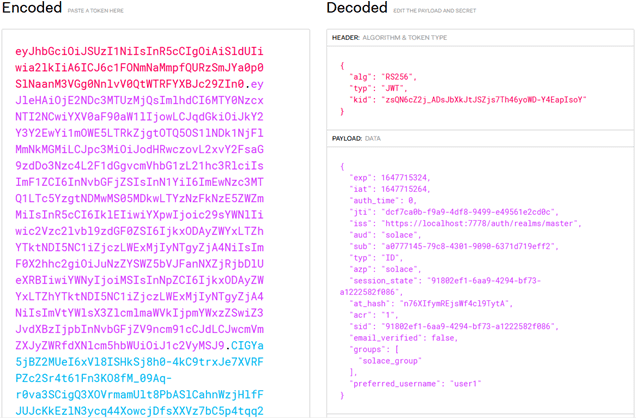
$ curl -v -L -X POST https://localhost:7778/auth/realms/master/protocol/openid-connect/token -H "Content-Type: application/x-www-form-urlencoded" \
--insecure --data-urlencode "client_id=solace" \
--data-urlencode "client_secret=6NGsYIBRRvS3s4yZAcxrRzR76fyhQvZy"
--data-urlencode "grant_type=password" --data-urlencode "scope=openid" \
--data-urlencode "username=user1" --data-urlencode "password=password" \
| jq
The “id_token” output from the above command can be decoded using https://jwt.io.
The next step is to configure the PubSub+ Broker.
Setup Solace PubSub+ Event Broker for OAuth
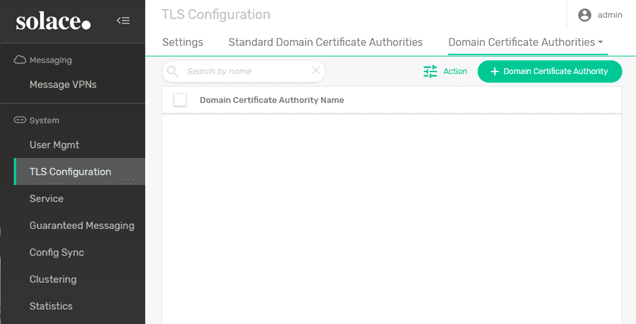
Install Domain Certificate Authority
The Solace broker validates the certificates of any OAuth server configured. This requires Keycloak server certificate to be added to the Domain certificate authorities, as shown below:
Select “+ Domain Certificate Authority”:
Create a new Domain Certificate Authority called “KeyCloak”.
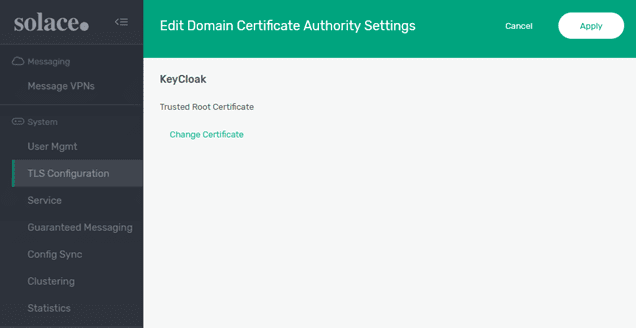
And click “Change Certificate”.
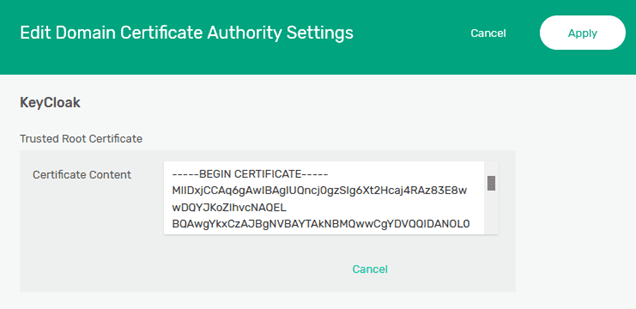
Paste the contents of the certificate that was created for the KeyCloak server (tls.crt) into the “Certificate Content” box and “Apply” the changes.
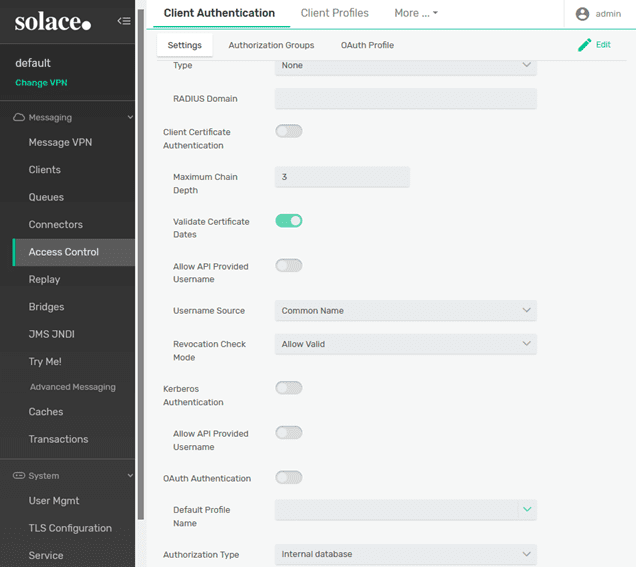
Enable OAuth Authentication
The OAuth authentication type needs to be enabled inside the Client authentication settings of the VPN.
Select “Edit” and enable OAuth Authentication:
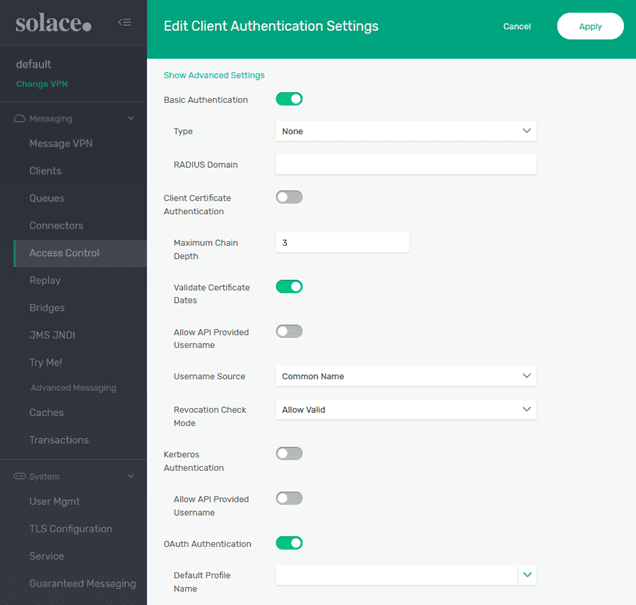
Select “Apply.”
Next step is to create an OAuth Profile.
Creating an OAuth Profile
A new OAuth profile needs to be created to connect to the Keycloak authentication server. The important parameters, which need to be configured are:
- OAuth Client ID: solace
- OAuth Role: Client: This means the OAuth authentication will be done by an OIDC-compliant ID token and access token is optional. When the Resource Server option is used, the access token is mandatory, and the Client ID token is optional.

Select “+ OAuth Profile” and create a profile called “KeyCloak”.

The “OAuth Client ID” needs to be set to the name of the client created at the KeyCloak server (“solace”). And the “Issuer Identifier” needs to be set; normally the issuer could be obtained from the discovery endpoint but, in this case, the tokens are granted from “localhost” (the messaging clients are connecting from the host system) and the broker will connect to the KeyCloak server via the docker bridge network (solace-net) using the mykeycloak hostname.
Go back to the KeyCloak management interface to get the URL of the discovery endpoint.
Select “OpenID Endpoint Configuration” to see the discovery endpoint.
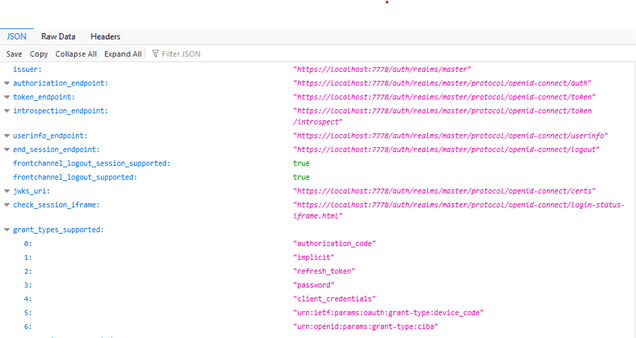
Copy the link to the “OpenID Endpoint Configuration” and paste it into the “Discovery Endpoint”.
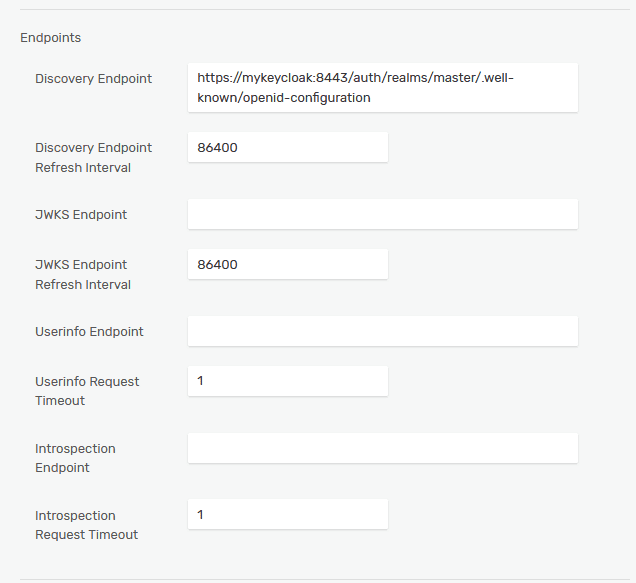
Change the host in the URL from localhost:7778 to mykeycloak:8443 (because the broker will be accessing the KeyCloak server via the solace-net bridge network, not from the host).
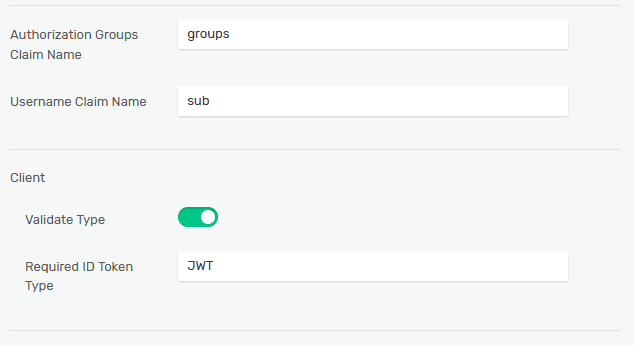
Authorization Groups Claim Name: aud
This is the token claim which needs to map to an OAuth Authorization Group. The authorization groups are explained in the next chapter.
Username Claim Name: sub
This is the token claim where the username can be obtained from. The OAuth client username does not have to be preconfigured on the broker. If there is already a username created on the broker and matching the token, it will be mapped to its assigned ACL and Client Profile of that user. If the username does not exist, it will be mapped to an ACL and a Client Profile specified by the OAuth Authorization Group, associated with the username by the Authorization Group Claim name.
Required Type: This parameter indicates the content type of the access token and is required only when OAuth role Resource Server is chosen. The Keycloak access type can be found in the access token header as “typ”:“JWT”. The required type should then be set as JWT.
Looking at the “Details” of the “Stats”:
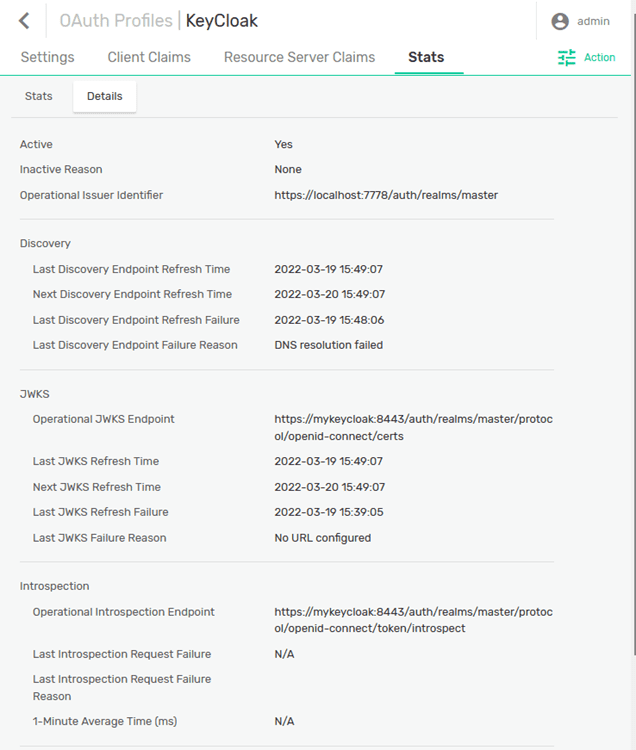
You can see that the PubSub+ Broker has contacted the discovery endpoint of the KeyCloak server and received the information for the JWKS endpoint. The JWKS endpoint is where the broker will get the keys needed to validate the ID Token that the messaging client will use to authenticate.
Before a client can login, an authorization group needs to be created for the “solace_group” that will be populated in the “groups” claim.
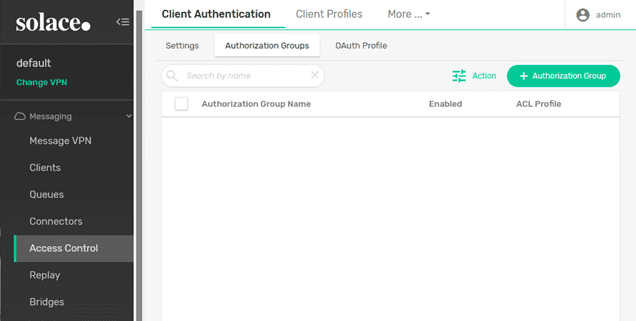
Select “+ Authorization Group” and create “solace_group”.
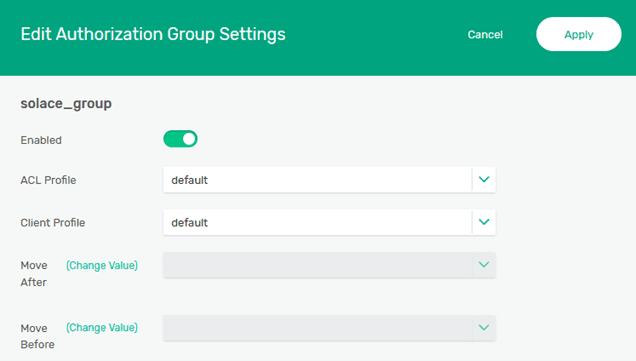
The “ACL Profile” and “Client Profile” can remain at the default setting for this example. “Enable” the group and click “Apply”.
Connecting a Client
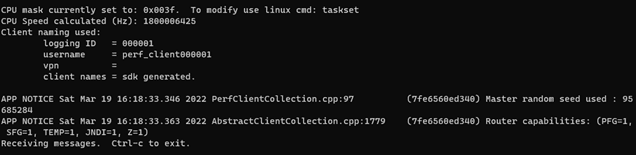
With the ID Token previously granted, a messaging client can be connected to the PubSub+ broker using the sdkperf test tool, which you can download at solace.com/downloads (it’s all the way at the bottom). In this case, the Linux x64 version of the tool will be used in WSL. Download the archive and expand it into a directory.
The following command line options will connect a client; the -oidt option is where the encoded ID Token is passed to the broker.
$ ./sdkperf_c -cip=tcps://localhost:55443 -stl=test -as=oauth2 -oidt="eyJhbGciOiJSUzI1N…”
Once the client has successfully connected to the PubSub+ Broker, it can be seen from the Broker Manager interface that the client is connected and has been authorized with the “solace_group” authorization group.
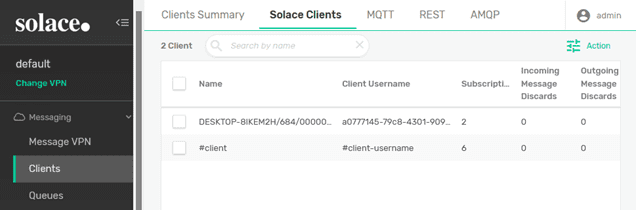
And looking at the properties for the client, it can be seen that the “Client Username” matches the aud from the token and that the “Authorization Group” is the “solace_group”.

Using Solace’s Java JCSMP API, a simple client can connect to the Solace broker via OAuth. The important parameters required to open a connection session are shown here:
// Create a JCSMP Session
final JCSMPProperties properties = new JCSMPProperties();
properties.setProperty(JCSMPProperties.HOST, host);
properties.setProperty(JCSMPProperties.VPN_NAME, vpn);

// For the purpose of the demo, the server's certificate will not be checked.
properties.setProperty(JCSMPProperties.SSL_VALIDATE_CERTIFICATE, false);

// Username is optional. When configured, the connection uses its ACL and Client Profile instead.
//properties.setProperty(JCSMPProperties.USERNAME, username);
properties.setProperty(JCSMPProperties.AUTHENTICATION_SCHEME, JCSMPProperties.AUTHENTICATION_SCHEME_OAUTH2);
// Required when OAuth role is Client. Optional when OAuth role is Resource server.
properties.setProperty(JCSMPProperties.OIDC_ID_TOKEN, clientIDToken);
// Required when OAuth role is Resource server. Optional when OAuth role is Client.
//properties.setProperty(JCSMPProperties.OAUTH2_ACCESS_TOKEN, accessToken);

final JCSMPSession session = JCSMPFactory.onlyInstance().createSession(properties);
session.connect();
After successfully connecting with the client application, the connection details can be checked on the broker’s UI:
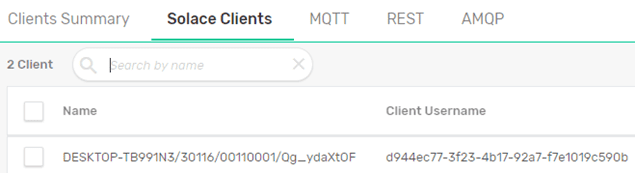
Under client properties, the mapping of the client’s authorization group used can be inspected, as shown here:

Conclusion
This example demonstrates just one of the cases where OAuth can be used for client authentication. Some OAuth flows might require the usage of Access Token and OAuth role Resource server instead.
More information on how to configure client authentication and authorization with OAuth and Solace PubSub+ can be found here:
https://docs.solace.com/Configuring-and-Managing/Configuring-OAuth-Authorization.htm
Explore other posts from categories: For Developers | Products & Technology


Subscribe to Our Blog
Get the latest trends, solutions, and insights into the event-driven future every week.