Most people starting with Solace will probably use our administration GUI, SolAdmin. SolAdmin is an excellent tool, but as with any GUI, once you get used to the concepts and procedures of using Solace message routers and gain experience, you may want to use a Command Line Interface (CLI) for some tasks.
Using the SolOS CLI has some advantages:
- Its structure closely matches that of the SEMP management interfaces and associated APIs, so those familiar with the CLI will find programmatic management easier;
- It is possible to create replay files with CLI, which can automate tasks – such as moving a Message VPN configuration from test through UAT to production environments;
- For some tasks, the CLI is faster.
I personally use a mixture of the CLI and SolAdmin. I find VPN bridges tricky in the CLI but a cinch with SolAdmin, while I’d rather use the CLI for redundancy configuration and initial setup. As with all of these things, it’s down to personal preference, but don’t let unfamiliarity put you off.
This post is a whistle-stop tour that should help you get started. Once you have that, use the CLI Reference Card to remind you of the commands you need.
Getting started with CLI
SolAdmin usually uses port 8080 on the VMR and port 80 on the appliance. This is actually the SEMP port: SolAdmin uses legacy SEMP (you can see this by enabling DEBUG level logging in SolAdmin’s log4j.properties – see the file for instructions)
To log on to the CLI you’ll need a secure terminal application: ssh is fine on Linux, for Windows I tend to use putty. Log on to the router using the default ssh port 22. If you haven’t changed the username or password, use admin/admin.
Linux:ssh admin@<ip address>
That’s all it takes: you’re in!
Exec levels
The CLI is hierarchical, with the number of levels varying depending on the command. Part of this hierarchy is the EXEC level.
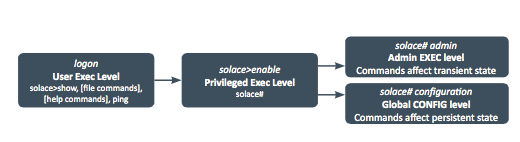
When you first log on, you’ll be at the Global EXEC level. Here you can access files such as logs, issue show commands to look at status and statistics, and other “read only” commands.
Time for a quick diversion: help is available by typing ?? or the tab key twice.
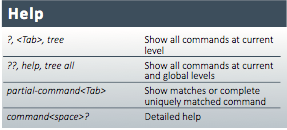
Once you’ve started typing a command, hit the tab key for command completion or command option prompts. For more details, see the CLI Reference Card or the CLI documentation.
To move on to the Privileged EXEC level, type enable. The command prompt will change:
solace> enable solace#
You can perform operations here like take a copy of the router configuration, reboot, upgrade, clear statistics and so on.
Lastly, there are the configuration (configure) and administration (admin) EXEC levels. Most of your work will probably be in the configure level – this makes persistent changes to the router configuration that survive reboots and upgrades. Examples might be creating message VPNs, queues and configuring network interfaces. The admin level is for non-persistent changes to router state – for instance clearing messages from a queue.
Show me the money…
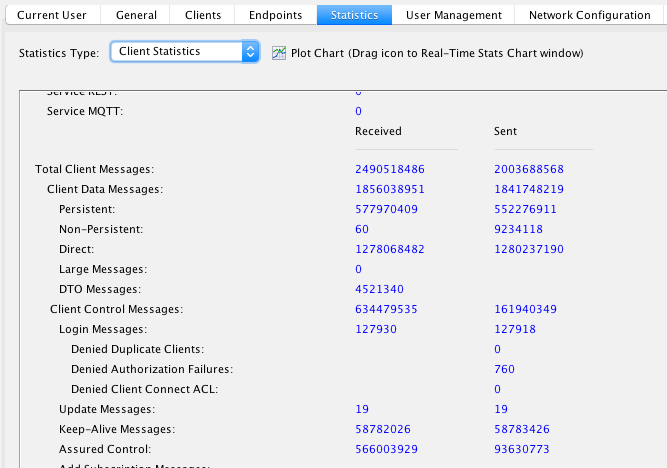
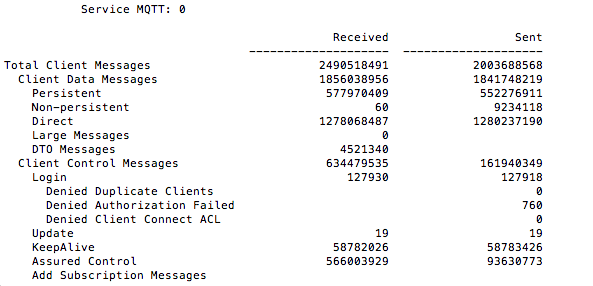
Something the CLI excels at is the show commands. These global commands are always available. Detailed show command output tends to be similar to the SolAdmin format, for instance here is the output from show stats client detail compared to the SolAdmin Statistics -> Client Statistics pane:
Sometimes it is very useful to be able to get all the information you need on a single page. Let’s say you are trying to determine if an application is slow or there is a network problem between the message router and the application. The CLI command
show client connections wide
gives a huge amount on information, including all theTCP statistics about a client.
Some other useful show commands:
show ip vrf [management|msg-backbone] Find the current IP address. Very handy when you start a VMR
show queue* Find all the queues
show redundancy Show redundancy status
show version What verson of SolOS are you using?
Show message-vpn… Message VPN status
Often, you can add the detail(s) option to give the full report rather than a summary. For instance show redundancy detail will give you insight into the status of the redundancy configuration, among many other details and statistics.
CLI Quick Reference Card
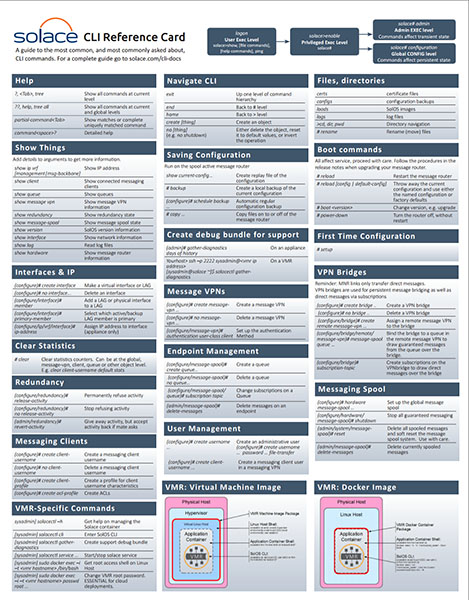 The above format, with the bare minimum of the command followed by a quick description, is what I’ve used for the CLI Quick Reference Card. The idea behind the card is to remind users of frequently used commands to give them enough to get to a point where they either remember what to do next or can access help immediately relevant to what they are doing – it is not a complete reference, which you can find here.
CLI Scope
We’ve already mentioned the hierarchical nature of CLI. For instance, to go from the Global to Privileged EXEC levels:
solace>enable

solace#
Accessing objects on the messaging router also follows this hierarchical pattern:
solace> show

solace(show)>
The (show) prompt indicates you are at the show level, where you can access show commands directly:
solace(show)> client Thomass-MBP-2.lan/1777/#000a0001
The same is true when administering objects:
Solace> enable

solace# configure

solace(configure)# message-spool message-vpn myVpn

solace(configure/message-spool)# queue TEST

solace(configure/message-spool/queue)#
Note the change in prompts, but more importantly, note that you are now in the queue TEST in the message spool of message VPN myVPN. CLI commands are scoped to the object you have accessed.
Stopping, deleting or creating things
While we’re at this queue, let’s see how we stop things. In CLI, the stop command is shutdown:
solace(configure/message-spool/queue)# shutdown
The negate command is no followed by the command, so to enable this queue, do:
solace(configure/message-spool/queue)# no shutdown
To delete the queue, “no” it:
solace(configure/message-spool)# no queue TEST
Creating things has its own prefix too:
solace(configure/message-spool)# create queue TEST
To delete messages on the queue, remember that this is a non-persistent change as far as the message router is concerned – the old messages stay deleted, but new messages aren’t – so this is an admin level command:
solace(configure/message-spool/queue)# end

solace# admin

solace(admin)# message-spool message-vpn myVPN

solace(admin/message-spool)# delete-messages queue TEST
CLI Navigation
The last command sequence showed one of the CLI navigation commands: end. This moves the user back to the privileged level (#).
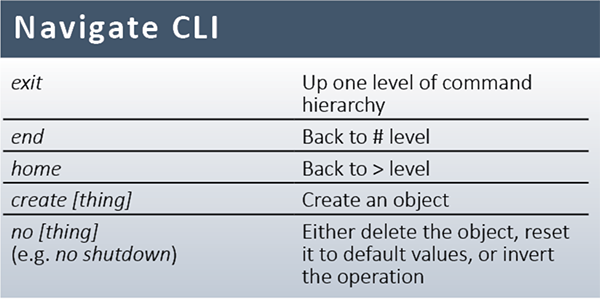
To move all the way back to the root global level (>), use home. To move one level up, use exit:
solace(configure/message-spool/queue)# shutdown

solace(configure/message-spool/queue)# exit

solace(configure/message-spool)# no queue TEST
CLI also has command history replay and editing using EMACs style keys:
up / ctrl-p Previous historical command
down / ctrl-n Next historical command
left / ctrl-t Move left
right / ctrl-f Move right
CLI replay
Usually, repetitive tasks should be automated with SEMP – especially now we have the funky ReSTful SEMP v2.
There are times when replaying a sequence of commands can be helpful, though – maybe you are storing a sequence of commands you are trying out interactively. To do this, save the commands in a file in the cliscripts directory:
Solace> dir

drwx--x--x     root     root     4096 Aug 10  2010 bin

drwxrwxr-x     root solgroup     4096 Feb 11  2016 certs

drwxrwxr-x     root solgroup     4096 Oct 06  2015 cliscripts

drwxrwxr-x     root solgroup     4096 Mar 20 01:00 configs

drwxrwxr-x     root solgroup     4096 Feb 22 12:06 cores
You will need to access the Linux shell using the SolOS shell command and save the commands using a text editor.
You can then replay the commands using the source script command:
Solace> source script cliscripts/
Source is a global command, but remember it is command replay and so hierarchy sensitive – it’s best to start your script with home and navigate in the script to the level you need.
The killer CLI replay app…
There is one instance where CLI replay really comes in to its own. Imagine you have developed an application using a development Message VPN. You now need to move this VPN from the development environment to UAT or even prod. You may need to change the VPN name, and you may need to change some threshold values.
Most importantly, you must make sure you don’t miss any of the configuration. This is where the show current-config command really helps:
solace> show current-config message-vpn myVPN > cliscripts/myVPN.cli
This command creates a replay script that will re-create the myVPN Message VPN. I’ve used the redirection operator (>) so that the commands are placed in the file myVPN.cli in the cliscripts directory. Once the file is created, you can change the VPN name, resource limits, alert thresholds and so on.
Replaying this file is as simple as:
solace> source script cliscripts/myVPN.cli
To create your VPN in your UAT or production environment, copy the file to the correct message router. You may need to create file transfer users on the local and remote message routers:
solace(configure)# create username password file-transfer
Solace(blog post/cli)# end
There is an awful lot more to the CLI than I’ve been able to cover is this article. To learn more check out the CLI Reference Card and of course our product documentation.
I find redundancy fail over testing (release-activity/revert-activity) much easier in the CLI. Anyone who has the job of operating production appliances should practise this procedure. The CLI will also help you understand the structure and methods available in the SEMP management API, so it is often well worth while getting to know it.
Explore other posts from category: Products & Technology


Subscribe to Our Blog
Get the latest trends, solutions, and insights into the event-driven future every week.