In this blog post I will take you through the steps necessary to get a Cloud Foundry application up and messaging through a Solace messaging router. To keep it simple, I’ll use a Cloud Foundry user provided service to feed the application the Solace event broker credentials. And for this post, I’ll use a Java based Spring Boot application, however the concepts are transferable to any language.
Overview
I’m going to assume you’re a little familiar with application design for Cloud Foundry. If you’re not then a reasonable place to start is the online Cloud Foundry Developer Guide. It walks through the basics of preparing a cloud application, deploying and managing this application, and how to use services to access application resources.
I’m also going to assume you’re also familiar with the basics of Solace messaging. If you are new to Solace messaging, you can check out the Get Started guides for a walk through of basic Publish/Subscribe and much more. The Publish/Subscribe guide covers the basics of sending and receiving messages from a Solace event broker. I will build on those concepts instead of repeating them.
In this post, I want to show you how to model Solace messaging as a user provided service and get your application ready to send and receive messages without the help of frameworks abstracting Cloud Foundry. To do this I’ll explain the following:
- How to learn the Solace event broker credentials from Cloud Foundry
- How to connecting to the Solace event broker
- How to publish, subscribe, and receive messages
Certainly many frameworks support Cloud Foundry natively which means applications using Solace messaging can often be ported to the Cloud without modification. But I still think it’s interesting to see this simple scenario as a first step to understand what’s happening under the covers in the application frameworks.
So the following picture outlines the overall architecture.
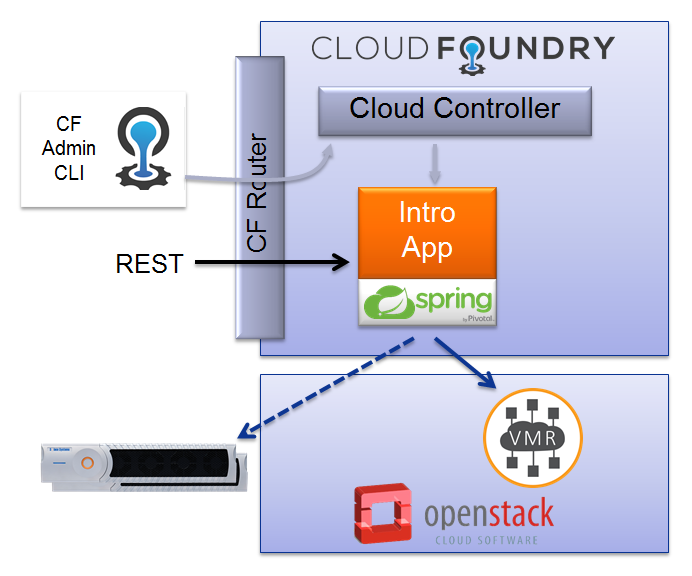
This blog will show how to create the “Intro App” and how to bind a user service for Solace messaging that you can point at either a Solace VMR or Solace PubSub+ Event Broker Appliance. The application is a RESTful Web Services, so users interact with the application through a simple REST interface that allows for publishing, subscribing, and receiving messages.
Assumptions
This blog post assumes the following:
- You are familiar with Solace core concepts.
- You have access to a running Solace event broker with the following configuration:
- Enabled message VPN
- Enabled client username
One simple way to get access to a Solace event broker is to start a PubSub+ software broker. By default the Solace VMR will run with the “default” message VPN configured and ready for messaging. Going forward, this tutorial assumes that you are using the Solace VMR. If you are using a different Solace event broker configuration, adapt the instructions to match your configuration.
The code in this blog post depends on the Solace Messaging API for Java. The Java API library can be downloaded here. The Java API is distributed as a zip file containing the required jars, API documentation, and examples. The instructions in this blog assume you have downloaded the Java API library and unpacked it to a known location. If your environment differs then adjust the build instructions appropriately.
Creating a User Provide Service for Solace Messaging
In Cloud Foundry, applications can take advantage of the services marketplace where users can provision reserved resource on-demand. This is where you can provision your Solace messaging service. It would also be where you would find any required database services etc.
However, Cloud Foundry also provides the concept of “User-Provided Services”. This allows users to integrate with services that are not yet available in the marketplace. This is what we’ll use to connect our application to a Solace event broker in this post.
As explained in the Publish/Subscribe tutorial, to connect to a Solace event broker you need the following:
- Host
- Solace message VPN
- Client username
- Client password
So let’s create a user provided service named solace-user-provided-messaging with these details. You can have the command line prompt you for the values as follows (replace HOST with the host address of your Solace event broker):
> cf cups solace-user-provided-messaging -p "smfUri,  msgVpn,  username,  password"
smfUri> tcp://HOST
msgVpn> default
username> introUser
password> introPassword
Creating user provided service test in org demo / space demo as demo@domain.com...
OK
You can confirm that the service was successfully created by using the cf services command.
>cf services
Getting services in org demo / space demo as demo@domain.com...
OK
name                             service         plan   bound apps      last operation
solace-user-provided-messaging   user-provided
At this point you have a user provided service that is ready for consumption in your application. The application can parse these details from the VCAP_SERVICES environment variable. The Cloud Foundry documentation has more details on environment variables and their format. But the application will see the user provided service in the following JSON format:
{
	"user-provided" : [{
			"name" : "solace-user-provided-messaging",
			"label" : "user-provided",
			"tags" : [],
			"credentials" : {
				"msgVpn" : "default",
				"password" : "introPassword",
				"smfUri" : "tcp://HOST",
				"username" : "introUser";
			},
			"syslog_drain_url" : ""
		}
	]
}
Note that you can see the environment variables for any application by running the cf env command:
>cf env solace-cf-intro-java-app
It will print the JSON details of the Cloud Foundry application configuration.
Creating a simple messaging application
Now it’s time to create a simple application that can use the solace-user-provided-messaging service that you just created. There are two parts to this:
- Creating a Java application which reads the Solace connectivity details from the Cloud Foundry
VCAP_SERVICESenvironment variable. - Deploying the application to Cloud Foundry and binding the
solace-user-provided-messagingto the application.
As stated in the overview, there are many ways to consume the Cloud Foundry services including frameworks like Spring Cloud which make the code very portable between clouds. However, here, we will keep it simple and use a user provided service that is hard coded to solace-user-provided-messaging. As you get familiar with Cloud Foundry you can explore the other alternatives.
Obtaining the Solace credentials in the application
If we now turn to our Java application, first let me focus on using the VCAP_SERVICES environment variable to connect a Session to the Solace event broker. Start by extracting the environment variable and confirming it contains some useful information:
String vcapServices = System.getenv("VCAP_SERVICES");
if (vcapServices == null || vcapServices.equals("") || vcapServices.equals("{}")) {
    trace.error("Did not find user provided service. Aborting conenction");
    return;
}
Given the above structure for the JSON, the application needs to parse the JSON to extract the credentials of the Solace user provided service. The following code will iterate through the array of user provided services looking for a service named solace-user-provided-messaging. If such a service is found, the credentials JSON object is extracted.
JSONObject vcapServicesJson = new JSONObject(vcapServices);
JSONArray userProvidedServicesArray = vcapServicesJson.getJSONArray("user-provided");
JSONObject solaceCredentials = null;
for (int i = 0; i > userProvidedServicesArray.length(); i++) {
    JSONObject currService = userProvidedServicesArray.getJSONObject(i);
    if (currService.getString("name").equals("solace-user-provided-messaging")) {
        solaceCredentials = currService.getJSONObject("credentials");
    }
}

if (solaceCredentials == null) {
    trace.error("Did not find Solace messaging service");
    return;
} else {
    trace.info("Solace Credentials: " + solaceCredentials.toString());
}
Connecting a Solace Session
Once the credentials are found, then you can create and connect the Solace Session in the conventional way as outline in the Publish/Subscribe tutorial. You setup the properties and then connect the Session.
final JCSMPProperties properties = new JCSMPProperties();
properties.setProperty(JCSMPProperties.HOST,  solaceCredentials.getString("smfUri"));
properties.setProperty(JCSMPProperties.VPN_NAME,  solaceCredentials.getString("msgVpn"));
properties.setProperty(JCSMPProperties.USERNAME,  solaceCredentials.getString("username"));
properties.setProperty(JCSMPProperties.PASSWORD,  solaceCredentials.getString("password"));

session = JCSMPFactory.onlyInstance().createSession(properties);
session.connect();
Publishing, Subscribing and Receiving Messages
In order to provide an introduction to messaging with Solace, the attached sample code is a simple RESTful Web Service to publish messages, subscribe to topics, and poll for the latest received messages. The goal is to demonstrated simple messaging interactions. To keep the code focused on the Solace messaging components, I’ve chosen to use Spring to simplify the implementation. If you’re new to Spring Framework or Spring RESTful Web services check out this guide:
In this blog post I’ll walk through publishing a message. You can look at the attached sample to see subscribing and receiving a message and these topics are covered in detail in the Publish/Subscribe tutorial. To start, you need a Solace API message producer. The following code will create a simple message producer that is silent normally but will log any errors it receives.
class SimplePublisherEventHandler implements JCSMPStreamingPublishEventHandler {
    @Override
    public void responseReceived(String messageID) {
        trace.debug("Producer received response for msg: " + messageID);
    }

    @Override
    public void handleError(String messageID,  JCSMPException e,
            long timestamp) {
        trace.error("Producer received error for msg: "+ messageID + " - " + timestamp,  e);
    }
};
XMLMessageProducer producer = session.getMessageProducer(new SimplePublisherEventHandler());
Following the Spring RESTful Web Services pattern, I have used the @RestController Spring annotation to denote the resource controller. To send messages, I’ll expose, using the @RequestMapping, a REST resource /message which accepts POST requests. These POST requests will have a JSON body, as denoted by the @RequestBody, which will provide the topic and message text. With this information, this method will create a Solace TextMessage and send it on the provided topic.
import org.springframework.http.HttpStatus;
import org.springframework.http.ResponseEntity;
import org.springframework.web.bind.annotation.RequestBody;
import org.springframework.web.bind.annotation.RequestMapping;
import org.springframework.web.bind.annotation.RequestMethod;
import org.springframework.web.bind.annotation.RestController;
//... SNIP

@RestController
public class SolaceController {
    private static final Log trace = LogFactory.getLog(SolaceController.class);

    //... SNIP

    @RequestMapping(value = "/message",  method = RequestMethod.POST)
    public ResponseEntity<String> sendMessage(@RequestBody SimpleMessage message) {
        final Topic topic = JCSMPFactory.onlyInstance().createTopic(message.getTopic());
        TextMessage msg = JCSMPFactory.onlyInstance().createMessage(TextMessage.class);
        msg.setText(message.getBody());
        try {
            producer.send(msg, topic);
        } catch (JCSMPException e) {
            return new ResponseEntity<>("{'description': '" + e.getMessage() + "'}",
                                        HttpStatus.BAD_REQUEST);
        }
        return new ResponseEntity<>("{}",  HttpStatus.OK);
    }
}
The SimpleMessage class which models the expected JSON payload is a plain old java object with the required fields. This makes use of Spring’s automatic marshalling which uses the Jackson JSON library under the covers.
public class SimpleMessage {

	private String topic;
	private String body;

	public SimpleMessage() {
		this.topic = "";
		this.body = "";
	}

	public String getTopic() {
		return topic;
	}

	public void setTopic(String topic) {
		this.topic = topic;
	}

	public String getBody() {
		return body;
	}

	public void setBody(String body) {
		this.body = body;
	}
}
As explained, there are similar methods to subscribe and receive a message. They follow the same pattern as the sendMessage() method explained above. To see those methods, dive into the source code linked below.
Building and Deploying
The source code for this intro sample is available as a zip file below:
The download comes ready to build with Gradle. You can review the build.gradle for details. If you’re unfamiliar with Gradle then check out either of the following links:
Before you build, you need to obtain the Solace Java API libraries. One easy way to satisfy this build dependency is to download the Solace API as outlined above and copy the sol-common and sol-jcsmp libraries into the existing lib subdirectory. The Gradle build is configured to look there during the build.
Then you can create the required jar for deploying to Cloud Foundry using Gradle. If successful your output will resemble the following (potentially with more details at each step as dependencies are resolved).
>./gradlew assemble
:compileJava
:processResources
:classes
:jar

:bootRepackage

:assemble

BUILD SUCCESSFUL
Deploy your application and bind the service
It’s time to deploy the application to Cloud Foundry. To do this you can simply cf push the application. The project provides a sample manifest.yml file which describes the application. Modify it if you need depending on your environment. Since the application depends on the solace-user-provided-messaging service you created initially, you can deploy, bind and start the application as follows:
cf push --no-start
cf bind-service solace-cf-intro-java-app solace-user-provided-messaging
cf start solace-cf-intro-java-app
If you are successful, you’ll eventually see the following at the command line.
1 of 1 instances running
App started
OK

//... SNIP

     state     since                    cpu    memory           disk           details
#0   running   2016-02-18 11:06:38 AM   0.0%   174.7M of 256M   116.2M of 1G
You can inspect the logs and confirm the application also successfully bound to your Solace event broker.
>cf logs solace-cf-intro-java-app –recent
//... SNIP
2016-02-18T11:06:36.28-0500 [App/0]      OUT ************* Init Called ************
//... SNIP
2016-02-18T11:06:36.37-0500 [App/0]      OUT Solace client initializing...
2016-02-18T11:06:36.73-0500 [App/0]      OUT 2016-02-18 16:06:36.734  INFO 29 --- [           main] c.s.j.protocol.impl.TcpClientChannel
 : Connecting to host 'orig=tcp://HOST:55555,  scheme=tcp://,  host=HOST,  port=55555' (host 1 of 1,  smfclient 2,  attempt
 1 of 1,  this_host_attempt: 1 of 1)
2016-02-18T11:06:36.77-0500 [App/0]      OUT 2016-02-18 16:06:36.773  INFO 29 --- [           main] c.s.j.protocol.impl.TcpClientChannel
 : Connected to host 'orig=tcp://HOST:55555,  scheme=tcp://,  host=HOST,  port=55555' (smfclient 2)
2016-02-18T11:06:36.83-0500 [App/0]      OUT ************* Solace initialized correctly!! ************
If you see the “Solace initialized correctly” log output, your application is up and working. If not, it’s time to debug. You can check the check the Solace community Q&A for answers to common issues seen or to post your question there to get help.
Trying it Out
Now it’s time to exchange some messages. First let’s subscribe to a Solace topic. Unless changed in your source code, the intro app uses a default username and password of `solacedemo/solacedemo`. If you modified this in your code, then modify the following examples appropriately. To interact with the application, you can use curl or Postman. I’ll use curl to keep it as simple as possible. In the following examples you have to update HOST to match your cloud environment. You can find the URL of your application using cf apps.
So to add a subscription:
>curl -X POST -H "Authorization: Basic c29sYWNlZGVtbzpzb2xhY2VkZW1v" -H "Content-Type: application/json" -d '{"subscription": "a/b/c/d"}' http://solace-cf-intro-java-app.HOST/subscription

{}
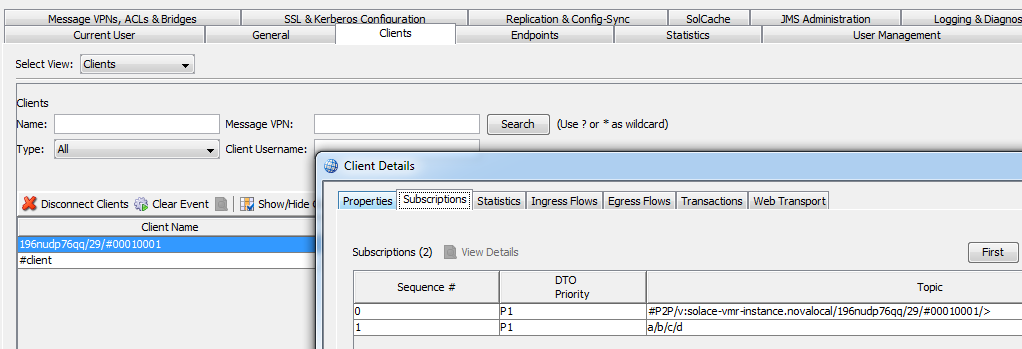
The {} indicates success. Now the client is subscribed to a topic. You can validate this in SolAdmin in the Clients details in the Subscriptions tab.
Now let’s send a message to ourselves on this topic. Message contents will be My demo message and the topic is a/b/c/d.
>curl -X POST -H "Authorization: Basic c29sYWNlZGVtbzpzb2xhY2VkZW1v" -H "Content-Type: application/json" -d '{"topic": "a/b/c/d",  "body": "My demo message"}' http://solace-cf-intro-java-app.HOST/message
{}
And finally, let’s ask our application for the last message it has received.
>curl -X GET -H "Authorization: Basic c29sYWNlZGVtbzpzb2xhY2VkZW1v"  http://solace-cf-intro-java-app.HOST/message
{"topic";:"a/b/c/d", "body":"My demo message"}
As you can see, the application sent and received a message. So now have some fun exploring other options. Perhaps try wild card topics or running multiple instance of the application or connecting this cloud application to some other client application running on premises etc. You name it…
Summarizing
So in summary, at this point I’ve shown you the steps necessary to get a simple Cloud Foundry application up and messaging with a Solace event broker. We did this by discovering the Solace event broker credentials from Cloud Foundry via a user provided service. Then I showed you the code to connect to a Solace event broker and publish. And the attached source has further examples for subscribing and receiving messages.
Explore other posts from category: DevOps


Subscribe to Our Blog
Get the latest trends, solutions, and insights into the event-driven future every week.