How To Connect to Solace PubSub+ SMF with OAuth OpenID Connect
OpenID Connect (OIDC) and OAuth are becoming increasingly popular standards for authentication and authorization because
This blog post explains how to set up Azure OAuth for Solace, and demonstrates how to connect SMF and REST clients to a PS+ broker via OAuth authentication protocol. The minimum version supporting Solace PubSub+ OAuth with Azure for SMF clients is SolOS 9.12.1.26+. PS+ supports OAuth authentication via REST clients since SolOS 9.13+.
Over the last few years OAuth has become a popular framework for providing authorization for clients and applications. Many organizations use Azure as a federated identity and access management (IAM) platform to provide single sign-on services for their users, applications and APIs. Azure Active Directory (AD) supports all OAuth 2.0 flows to enable client applications with secure delegated access.
Solace PubSub+ supports OAuth 2.0, giving clients the option to delegate their authentication to an IAM provider like Azure AD. This way, users and passwords management can be centralized, while an event broker like Solace PubSub+ can handle client applications without dealing with the clients’ identity.
OAuth supports several different flows, but for Machine-to-Machine (M2M) integration (applications, processes and other non-interactive systems) using Client Credentials Flow (OAuth 2.0 RFC 6749, section 4.4) is a good fit.
Solace supports various protocols and APIs for messaging and event-driven enterprise integration. Each of these can be used conjunction with OAuth. The example below deals with Solace’s native Solace messaging format (SMF) and REST for event publishing applications to PubSub+.
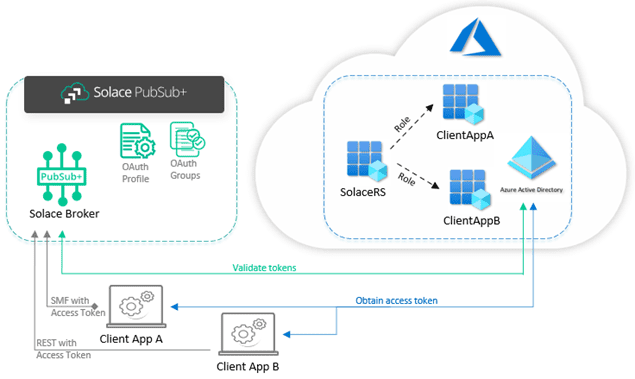
This guide uses Azure AD for an OAuth authentication provider. The current example creates three application registrations: a Solace resource server application (SolaceRS), and two client applications (ClientAppA and ClientAppB).
The Solace application registration will provide different roles to manage the access of clients. The client application registrations will be used to demonstrate how the access for each of them can be managed by the Solace broker:
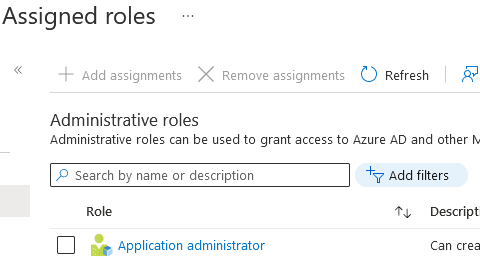
In order to bring about our example setup, you need your Azure AD account to have Application Administrator role. This can be checked and added under Azure AD Roles:
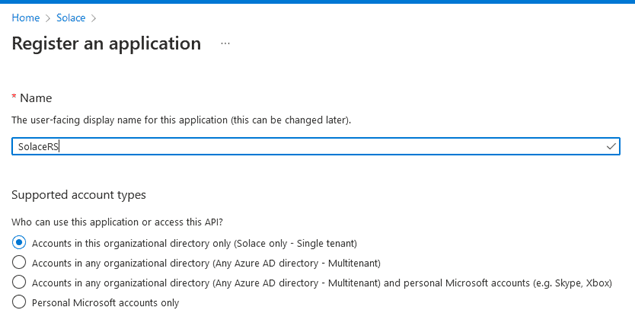
Assuming you have an Azure AD Application Administrator role for our account, you need to create the SolaceRS registration. Go to Azure Active Directory (AD) and create a new Application Registration:
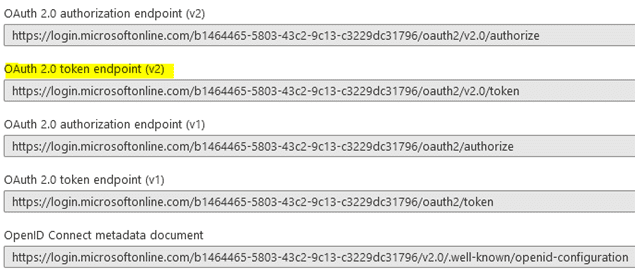
After creating the new app registration, you can find some important details on the Overview page, such as the tenant ID and the application (client) ID:

You can also find out what the various OAuth Endpoints are for your tenant ID. You will use two of these later: to obtain an Access Token (OAuth 2.0 token endpoint v2.0) and to configure the OAuth discovery endpoint on the Solace broker (OpenID Connect metadata document):
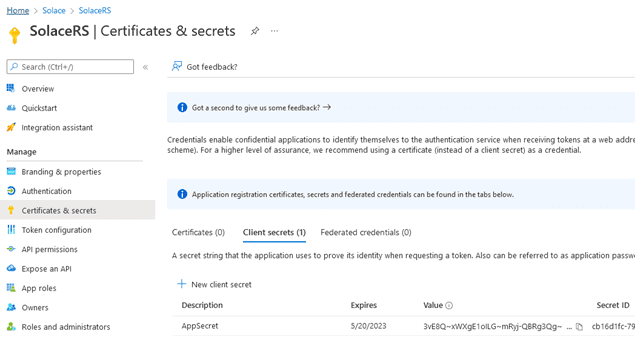
Azure provides service principal for the applications’ identity. The service principal uses client secrets as passwords. Therefore, you need to configure a client secret for the application registration. Go to Certificates and secrets and create a new client secret:

Make sure you copy and store the Value and the Secret ID, as they are provided only once. You will be using the value when you configure a Solace OAuth profile. The latter will be used to connect to Azure AD, in order to validate client applications access.
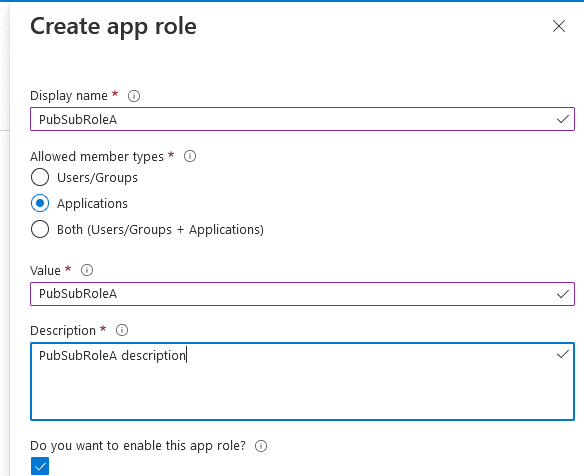
Next, you will define two application roles: PubSubRoleA and PubSubRoleB. Each of them will be granted to one of the client applications. Go to App Roles and create a new app role:
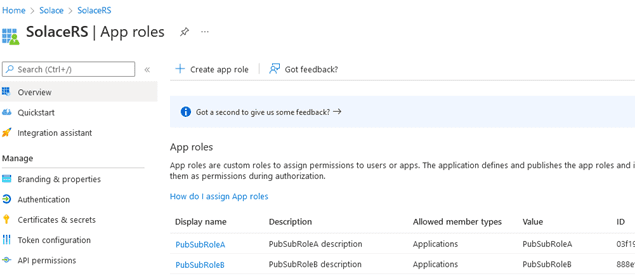
Repeat the same for the second role. After creating both roles, the Solace application should now have the two roles:
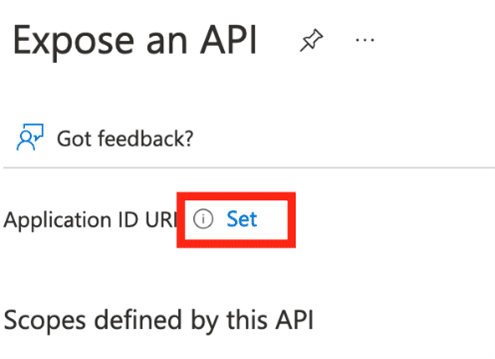
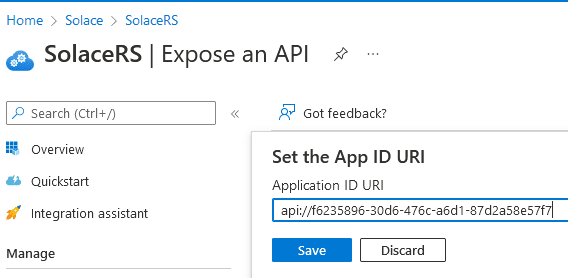
You will now have to expose the Solace application ID URI. The Solace API URI will be used for the client assigned roles, as well as access token validation. Go to Expose an API and set the app ID URI:
Since you will be providing only application roles to the clients, there is no need to add any specific claims.
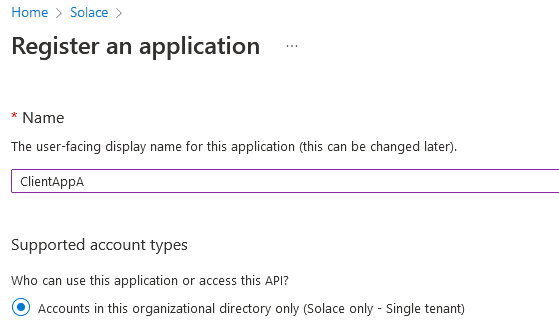
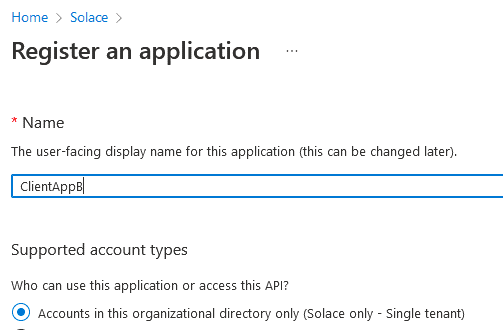
Next, you can add two new application registrations – one for each of our client applications. Go to app registration and add a new app called ClientAppA:
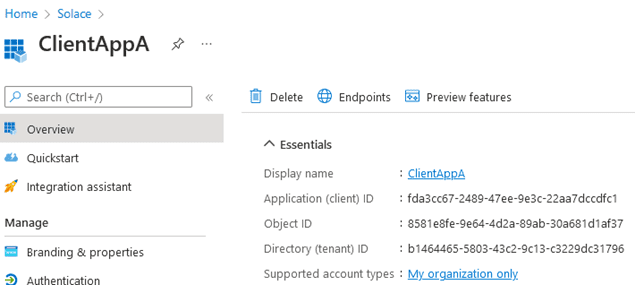
After creating the registration, you can find its Client ID in the Overview page:
You should also create a secret for the newly created application:
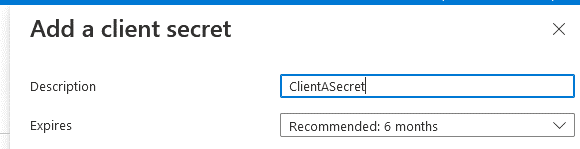
Store the secret’s value and repeat the same process for the second ClientAppB:
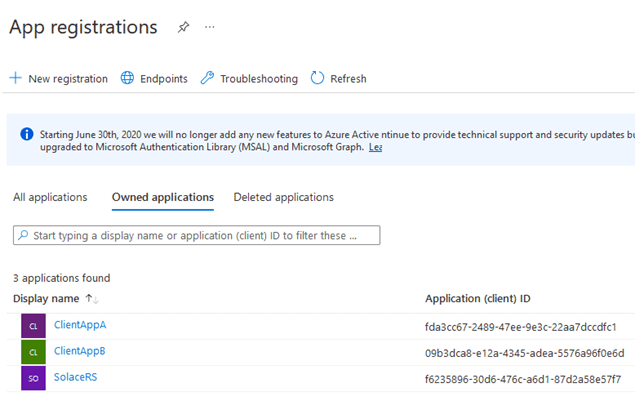
After registering the second app and creating a secret for it, you should now have all three applications, required for our example:
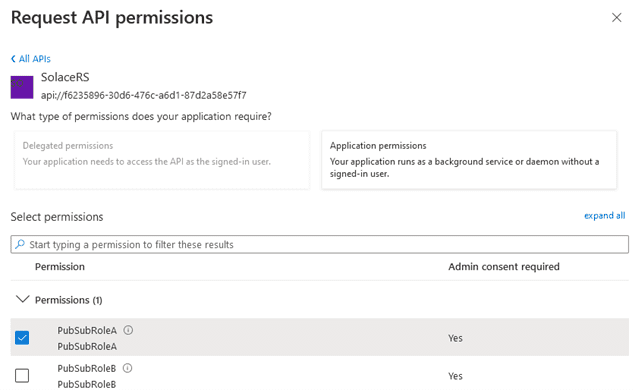
Now, you need to request permissions for each of the client apps. Open ClientAppA and go to API Permissions. Click on Add Permissions:
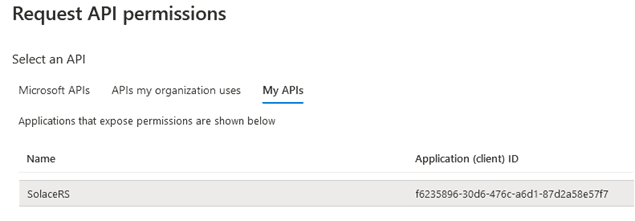
Select My APIs. The name of the Solace application should show up. After selecting it, you should be able to see the custom roles available. Choose Application permissions, since you are authorizing an application and select PubSubRoleA:
You need Application Administrator privileges in order to grant consent for the role (this button will be disabled if our account doesn’t have the required access):
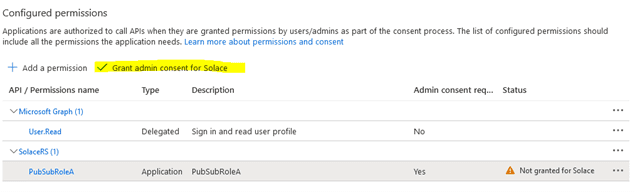
After granting the admin consent to the permission, the client should have the permissions to the requested role granted:

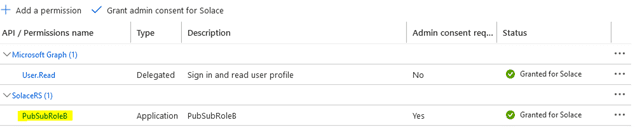
Repeat the same steps for ClientAppB, but this time select and assign PubSubRoleB to the second client and then grant a consent:
After all these steps are done, your Solace application should be ready to be used by the Solace broker and your two client applications should be able to obtain their access tokens.
After the Azure OAuth application registration is done, you should be able to obtain a valid Access Token for each client application. The token can then be used by the application to connect to the Solace PS+ broker. You can get the endpoint to obtain an access token from the endpoints page mentioned previously. The URL should look like this: https://login.microsoftonline.com/<tenant ID>/oauth2/v2.0/token
In order to execute a successful POST HTTP command to the endpoint URL, you need to provide several parameters in the request body:
| KEY | VALUE | DESCRIPTION |
| grant_type | client_credentials | The grant type |
| client_id | <client ID> | The client app ID |
| client_secret | <secret> | The client app secret |
| scope | api://<app ID>/.default | The SolaceRS app API URI |
Here is the CURL command (there might be a slight difference in the command syntax between Windows and Linux):
curl -X POST -d 'grant_type=client_credentials&client_id=<Client Application client ID>&client_secret=<Client Application Secret>&scope=api://<Solace resource server application Scope>/.default' https://login.microsoftonline.com/<Tenant ID>/oauth2/v2.0/token
Here is an example:
curl -X POST -d 'grant_type=client_credentials&client_id=834ad814-9bf1-4474-8a84-344614c3d41b -fa9d9e8a2367&client_secret=c9z8Q~U6omGB_rckf1mwOzgJX7Xo.hr5Ik6KMbU5&scope=api://f6235896-30d6-476c-a6d1-87d2a58e57f7/.default' https://login.microsoftonline.com/b1464465-5803-43c2-9c13-c3229dc31796/oauth2/v2.0/token
A successful result will return an Access Token like this:
{
    "token_type": "Bearer",
    "expires_in": 3599,
    "ext_expires_in": 3599,
    "access_token": "eyJ0eXAiOiJKV1QiLCJub25jZSI6IjF6dm5ERmhyMTRkVHBUTjA3N05LbEUwVEp2b3A4MVZzUzJPX3BRdFBObkEiLCJhbGciOiJSUzI1NiIsIng1dCI6ImpTMVhvMU9XRGpfNTJ2YndHTmd2UU8yVnpNYyIsImtpZCI6ImpTMVhvMU9XRGpfNTJ2YndHTmd2UU8yVnpNYyJ9. ck-gxLoVBJhdqSe8kM0LGS_BRnL_Yl5EAOiEwP0R00KF4fitAsNnOGNGhrBRM9joxXQhsa3Fi3zBm-RezW4ucZ6giN0oyXTIcP2duY7_Oy_GDsOqLsZo_N-JHrjC0DalpV2no2vMp0ZUacBsggwrqBcqSuA04r8otWdAntwE7JpdTeXyFZsTsDF4v_0GjbfrteB2udSgKoGL9c-ZsOSGN69CO-kbR7V7vPKWw"
}
You can obtain a token for each of the client applications by providing their corresponding client ID and secret.
After you’ve received a token from the endpoint, you can decode and analyze its content using a tool or a website like jwt.io. A token usually consists of three parts: header, payload and signature.
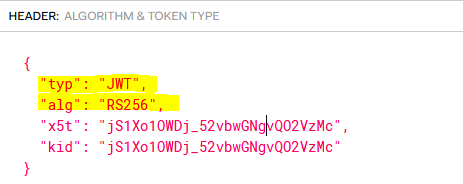
The important parameter in the header is the type of the token (typ). Azure always provides access tokens with type value of “JWT”. You will need this parameter later, when it’s time to set up the Azure OAuth Profile on the Solace broker. This sample header shows this parameter:
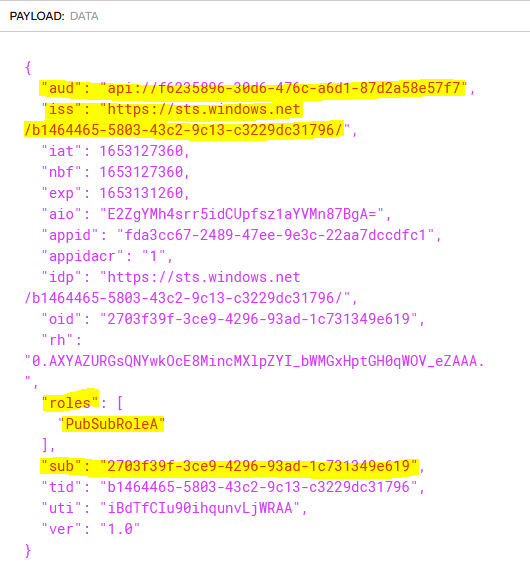
Below the header, you can find the payload of the token. It contains multiple properties called claims. Different OAuth providers might have a different list of claims, but the important ones from our Azure access token are:
You can learn more about Azure access tokens here.
Here is a sample payload:
The signature of the token is used to validate if the token is authentic and not tampered. It is not important for this example, but it is worth mentioning, the token is using RS256 (can be found in the header “alg” value), which is supported by the Solace broker:

The following example uses a Solace Cloud broker instance to demonstrate the OAuth setup. The steps to configure an appliance or a software broker are very similar. Next section explains how to install a server certificate and can be skipped for the cloud brokers, since they already have their server certificate enabled by default.
You can get a free Solace broker instance at https://solace.com/try-it-now/
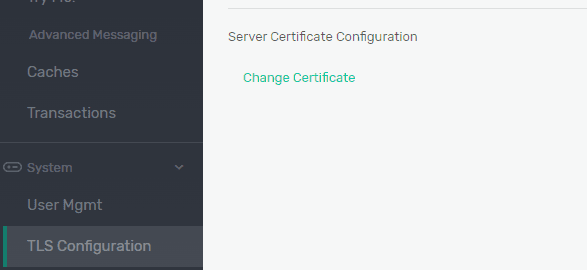
Solace brokers require a server certificate to be installed and enabled in order to use OAuth authentication. A certificate can be installed from the CLI or the broker GUI. With a certificate in hand, you need to concatenate its private key and the public certificate parts together and paste the content under System -> TLS Configuration -> Server Certificate Configuration -> Change Certificate:
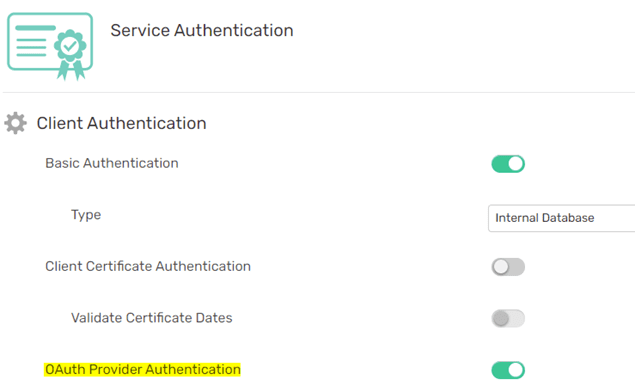
First, you need to enable the OAuth authentication for the broker VPN, which can be done on the Authentication tab for Cloud services:
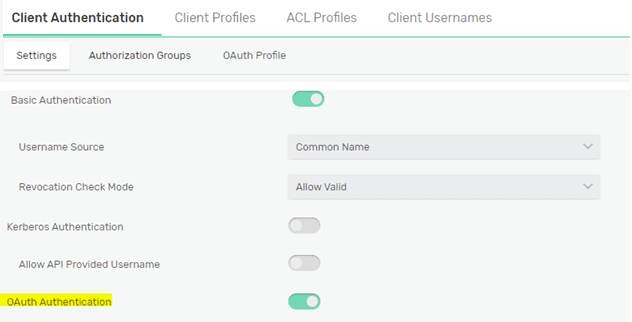
or under Client Authentication Settings for the stand-alone brokers:
Solace uses OAuth profiles to implement OAuth authentication to various IAM systems. We will create a new OAuth profile named AzureSolaceRSProfile, which will be used to connect to Azure and validate the tokens provided by the clients. The important parameters you need to configure are shown here:

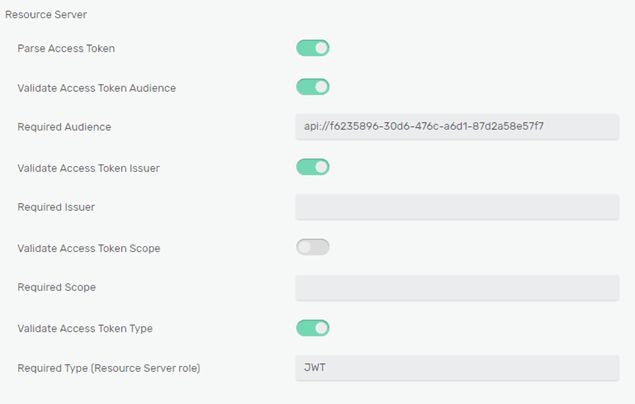
The OAuth Client ID is the Client ID of our SolaceRS application in Azure. When setting the client ID, you need to provide the application secret as well. Since the broker is the audience for the client access tokens, you can use OAuth Role of Resource Server type. Since the applications registrations are v.1 (registered on the Azure Portal), the value of the Issuer Identifier matches the one from the Discovery Endpoint URL (v1):

The Issuer Identifier value can be explicitly configured in the OAuth profile when the “iss” claim differs from the one returned by the discovery endpoint URL. This can happen when the version of the application registration differs from the endpoints used. This screenshot shows the Discovery Endpoint URL (v2.0) of the ISS token:

Another important parameter is the Discovery Endpoint URL. This can be obtained from the application Endpoints (OpenID Connect metadata document) in Azure, as previously mentioned:

Authorization Groups Claim Name is the token claim, which returns client permissions as configured by the Solace application. The roles permission value(s) will be mapped by an OAuth Authorization Group to a username, if the username doesn’t exist on the broker. I will explore the OAuth authorization groups further in the next section.
When a client connects to the broker, a username will be obtained from the token. In this example you will be using the provided by Azure “sub” claim value for a username:

Since you will be using Resource server role, you need to configure the Required Audience to match the Solace API URI. Since the access tokens do not contain scopes, you can disable Validate Access Token Scope. Finally, you need to specify the Required Type, as it is returned by the Azure access tokens in the header claim “typ” – JWT:
After all the changes have been made, enable and save the profile.
To map clients to specific OAuth permissions defined by Solace application roles, you don’t need to create users in the Solace broker in advance, but instead, can use OAuth authorization groups. Using these groups, you can authorize authenticated users by the permission(s) granted inside their roles claim.
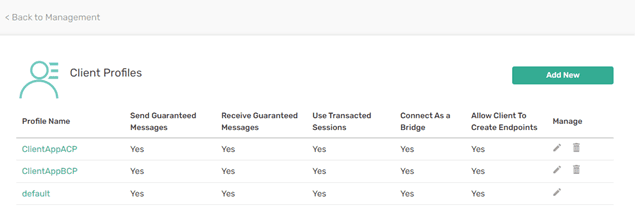
Create two new Client Profiles for each of the roles defined for the two client applications. This screenshot shows the new client profiles created:
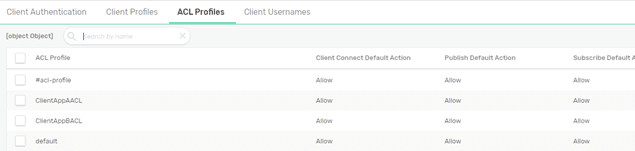
Create two new ACL profiles, one for each client application:
Finally, create two different Authorization Groups for each of the client permissions. The names of the authorization groups must match the permission values as returned by the roles claim. The groups should be then called PubSubRoleA and PubSubRoleB, as the values defined by the SolaceRS application in Azure. You can assign previously defined corresponding ACL and Client Profile.
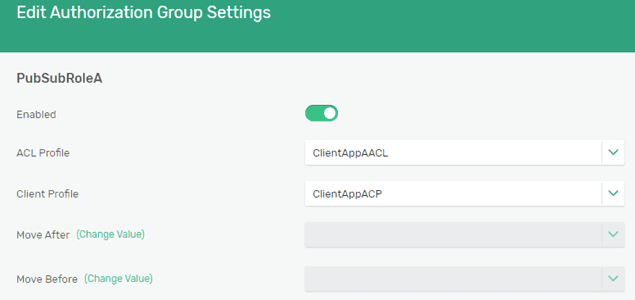
After you are done with the authorization group configuration, you should have two new groups:

You can use SDKPerf application to connect a test client to the Solace broker. In order to test an SMF client connection, you need to pass the following parameters, specific to OAuth:
When calling a specific VPN, different from “default”, you need to provide the name of the VPN without a specific username. We can use the following parameter for this:
-cu=ignore@The following command subscribes to a topic t/resttopic on a standalone broker using OAuth authentication.
sdkperf_java.bat -cip=tcps://<url> -cu=ignore@<vpn name> -stl=t/resttopic -as=oauth2 -oaat="ey...9gh"
When connecting a REST client, you need to call the broker REST service instead and provide the OAuth token as a header.
This screenshot shows a Postman request to publish a message “Hello OAuth!” to a topic t/resttopic, using an OAuth client access token:
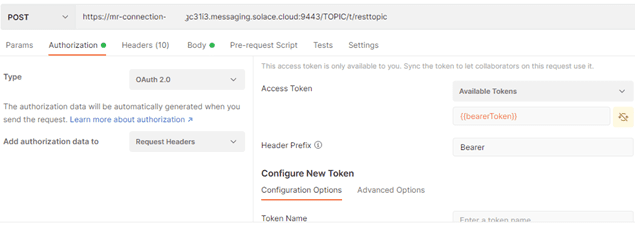
The equivalent result can be achieved by using the following CURL command:
curl -X POST -d "Hello OAuth!" https://<service URL>:9443/TOPIC/t/resttopic -H "Authorization: Bearer eyJ0...tdqw"
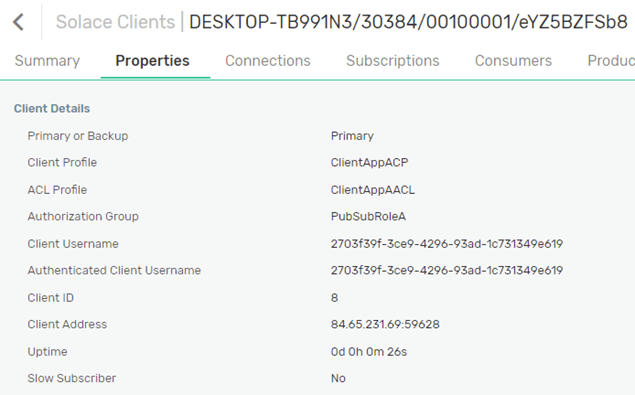
After successfully authenticated a client on the broker, the client connection can be verified in the broker’s Clients page. As you can see below, the authorization was done, based on the Authorization group PubSubRoleA. The client connection username was the value of the claim “sub” and the application role was mapped to the corresponding ACL and Client profile:
This example setup demonstrated how Solace can utilize OAuth in conjunction with Azure AD. There are many options and use cases related to OAuth which I haven’t explored here. You can learn more about OAuth setting with Solace PubSub+ broker at https://docs.solace.com/Security/Configuring-OAuth-Authorization.htm
Explore other posts from category: For Developers


Subscribe to Our Blog
Get the latest trends, solutions, and insights into the event-driven future every week.