Serverless architecture is all the rage these days and nothing screams serverless like AWS Lambda. AWS Lambda is a serverless compute service that runs your code in response to events and automatically manages the underlying compute resources for you. When Lambda was announced a few years ago by AWS, it caused quite a bit of confusion but slowly it has gained popularity and become analogous to serverless architecture.
Lambdas, which is what most people call the services you spin up with Lambda, are powerful because they can be easily triggered and scaled without having to worry about the underlying infrastructure.
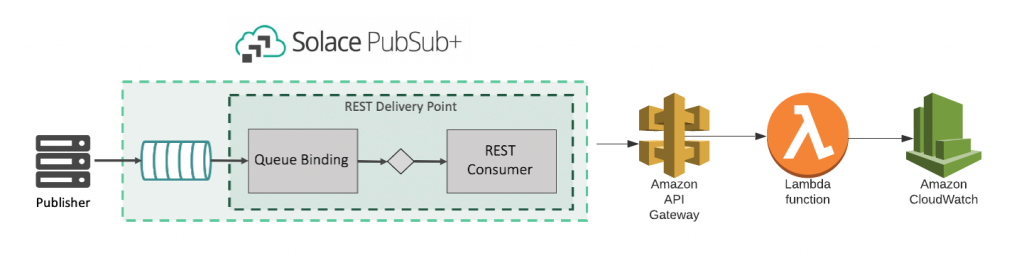
In this post, I would like to show you how you can send a message to a PubSub+ Event Broker running as a managed service on PubSub+ Event Broker: Cloud and use it to trigger a lambda through AWS’s API Gateway. And all of this without any code, except for the code you need for your Lambdas.
More specifically, I’ll walk you through the process of publishing a message to a topic that is being subscribed to by a queue. This is known as topic-to-queue mapping in the PubSub+ world. Once the message is received by the queue, it will be forwarded to API Gateway which will trigger the Lambda function.
We will be using REST Delivery Points (RDPs) to achieve this. An RDP is a provisioned object on a Message VPN that facilitates message delivery to REST consumers. For our use case, we will need an RDP to link our queue (which will receive the message) to the AWS API Gateway endpoint.
Here is what the architecture looks like:
Let’s begin!
Creating an AWS Lambda
Lambdas can be simple or complicated. For this blog post, I am going to create an extremely simple one that simply prints the event that triggered it.
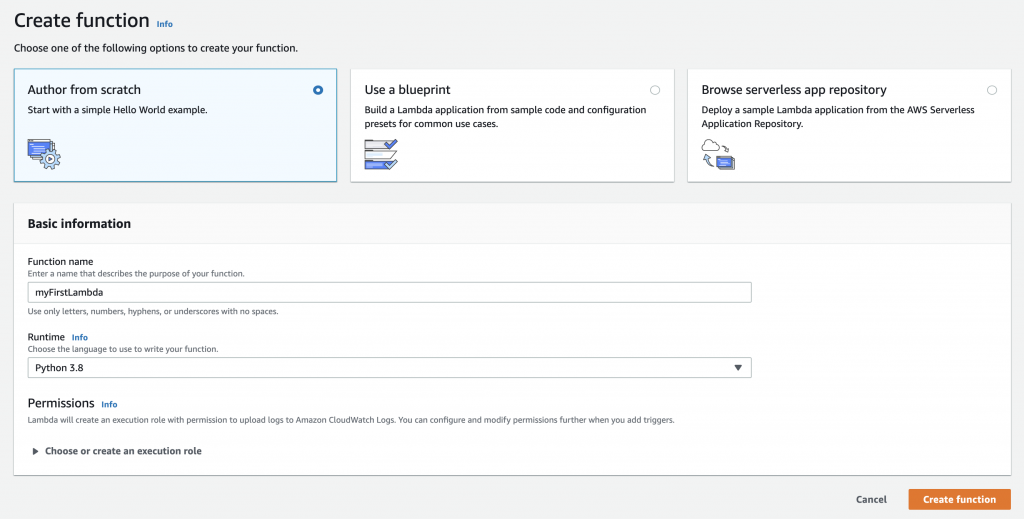
To create a Lambda function, go to your AWS Console and select Lambda from Services section. Then, click on Create Function button on the right side.
You will be provided with multiple options on how to create a Lambda. You can pick from existing Lambdas available in AWS Serverless Application Repository, build from templates or create a new one from scratch.
Pick the option Author from scratch, give your function a name, and pick a runtime environment for your function. I have picked my Runtime environment to be Python 3.8 and my function’s name is myFirstLambda. Click on Create Function.
Clicking on Create Function will create your Lambda function and take you to the next screen where you can design/code your function. In the Function code block, you can add your code, which in this case will simply print the event that triggered the Lambda. Here is the code to do that:
<br>import json<br><br> <br><br>def lambda_handler(event, context):<br><br># TODO implement<br><br>print(\'## EVENT\')<br><br>print(event)<br><br>return {<br><br>\'statusCode\': 200,<br><br>\'body\': event<br><br>}<br><br><strong> </strong><br>
Click Save button on top right to save your changes. You have now created a Lambda function!
Creating an API Gateway endpoint
Now that you have your Lambda, we need an endpoint to trigger it. Here’s how you can do that with an API Gateway:
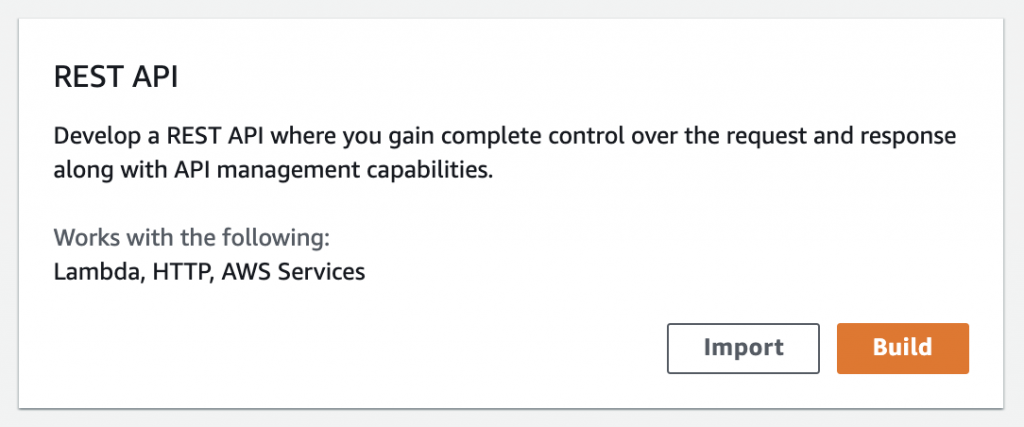
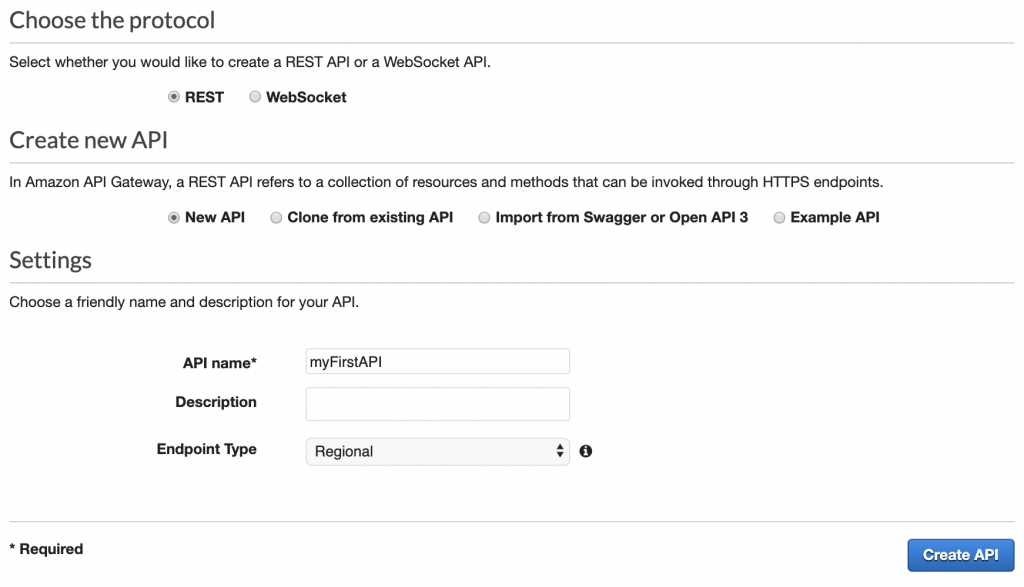
On the API Gateway page, click on the Create API button on top right. You will then be presented with different options on types of APIs you can create such as HTTP API, WebSocket API, and REST API (public or private). Pick REST API (public) and click on Build button.
On the next page, leave all of the settings as default and give your API a name (i.e. myFirstAPI) and click on Create API button.
Note: Currently, PubSub+ does not support SNI for REST consumers, so make sure your Endpoint Type is set to Regional, instead of Edge Optimized.
Now, you can create different endpoints under your root endpoint and specify which HTTP methods they support. For example, create one called purchase which supports POST method.
Click on Actions and then, Create Resource and fill in the details:
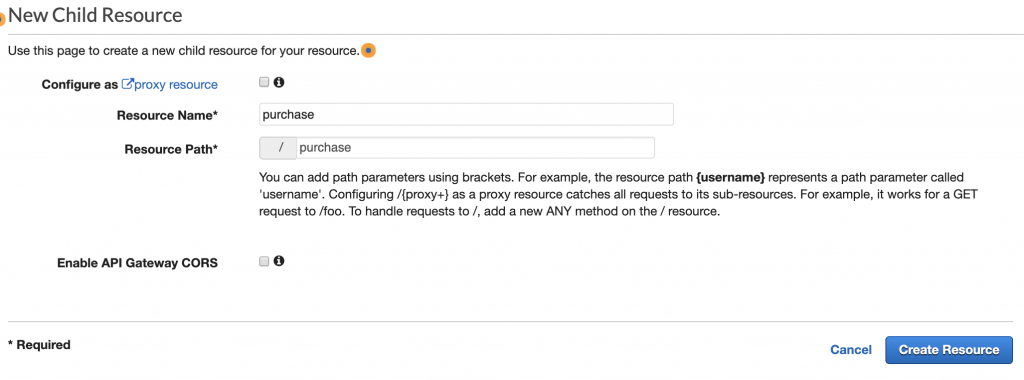
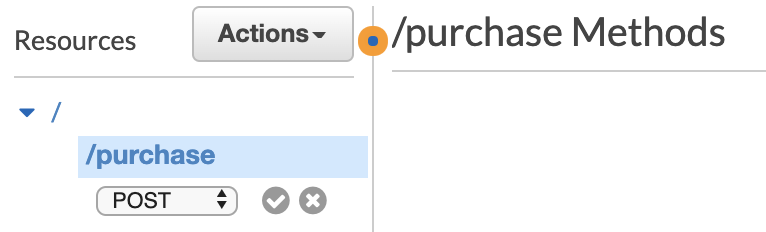
Click the Create Resource button when finished. Then, click on Create Method and select POST from the dropdown menu. Click the little circle with checkmark to finish.
You can now configure what happens when a POST request is issued against your endpoint. In this case, you’ll want it to trigger your Lambda function.
Again, keep all the settings as default and select your Lambda function from the dropdown menu:
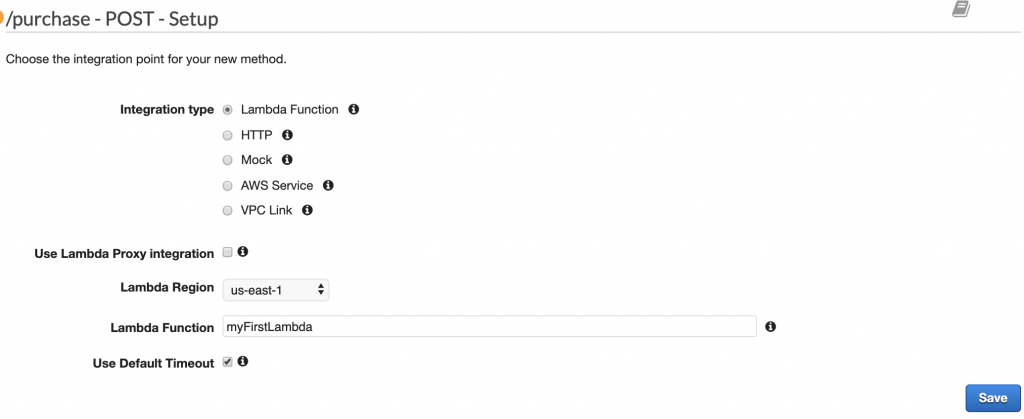
Click on Save to save your changes.
Now that you’ve designed your API, you need to deploy it to be able to use it. You can also create different Stages to manage lifecycle of our endpoint.
Click on Actions and then, Deploy API which will pop-up a mini window where you can specify the stage you want to deploy your API to and provide a description for your deployment. Because you don’t have an existing stage, you will see [New Stage] option when you click on the Deployment stage dropdown menu.
Select [New Stage] and enter information about your stage. I called mine PROD.
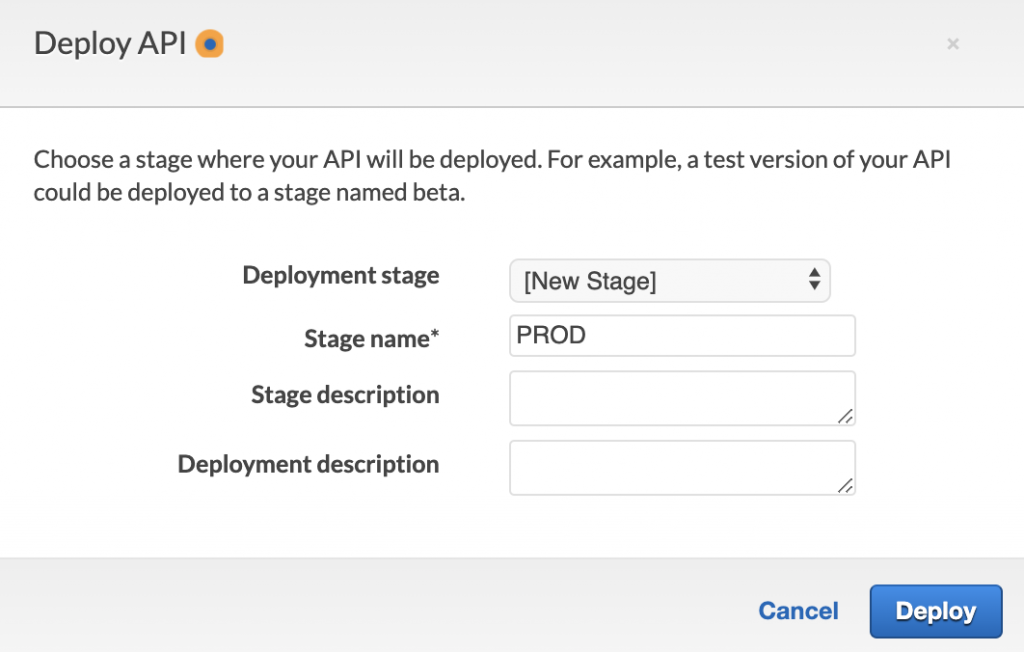
Click Deploy when finished.
You will now find details about your newly deployed endpoint, specifically, the invoke URL. Mine is https://1v3hgu8bia.execute-api.us-east-1.amazonaws.com/PROD
You’ve now successfully created an endpoint that will trigger your Lambda function when a POST request is issued against it. All that’s left to do now is to integrate your endpoint with PubSub+ Event Broker: Cloud!
PubSub+ Event Broker: Cloud
If you are unfamiliar with PubSub+ Event Broker: Cloud, it is Messaging-as-a-Service provided by Solace. PubSub+ Event Broker: Cloud allows you to easily spin up a PubSub+ Event Broker on any of the major cloud providers. It also has a free trial so you can easily spin up a service to follow along with this post without having to worry about any cost.
Follow instructions here on how to create a service on Solace PubSub+ Event Broker: Cloud.
Creating a Queue with topic subscription
Before you create your RDP, you need to create a queue with the appropriate topic subscription.
Go to your messaging service, click on the Manage tab, and then click on the Message VPN block under PubSub+ Broker Manager Quick Settings.
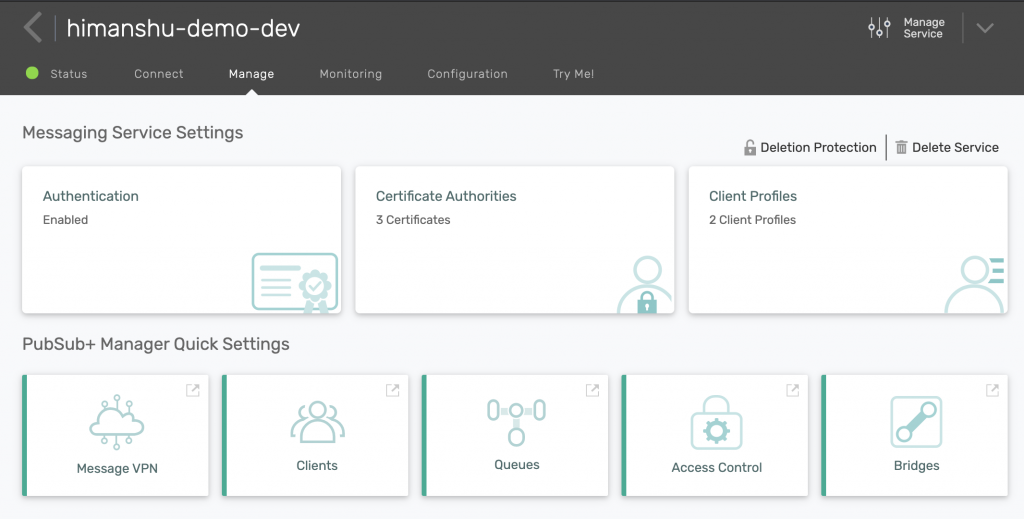
That will pop up a management UI for your service which you can use to create your queue. Click on Queues on the left navigation bar and then click on +Queue button. Give it a name of the form [rdpname].[consumername]. This syntax is not mandatory, but it will help you identify which queue is bound to which consumer and for which RDP. Because you haven’t yet created an RDP or a consumer, you can call it whatever you like. I called mine myFirstRDP.myRDPConsumer.
Click Create button and then leave the settings as default, click Apply. Your queue has now been created:

Now you need to add a topic subscription to it. To do that, click on the queue and navigate to Subscriptions. Click on + Subscription and enter POST/PROD/purchase and then, click on Create. Note that our topic must be of this syntax: <HTTP_METHOD>/<STAGE>/<endpoint>.
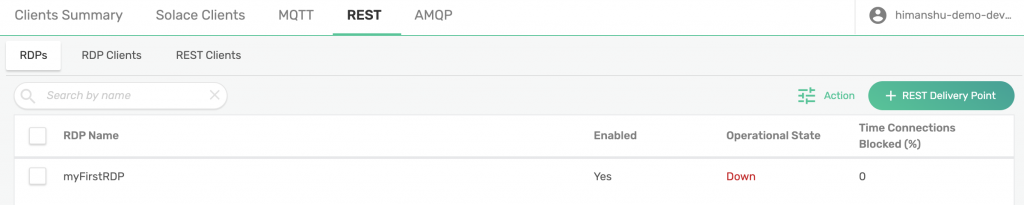
Creating a REST Delivery Point (RDP)
Now that you have your queue ready, you can go ahead and create your RDP. To do that, click on Client Connections on left navigation bar and then REST. Then, click on + REST Delivery Point button. As decided earlier, we will call our RDP myFirstRDP. Toggle the Enabled button to enable the RDP and click Apply. You will notice that the Operational State is currently Down and that’s because you haven’t added a REST consumer yet.
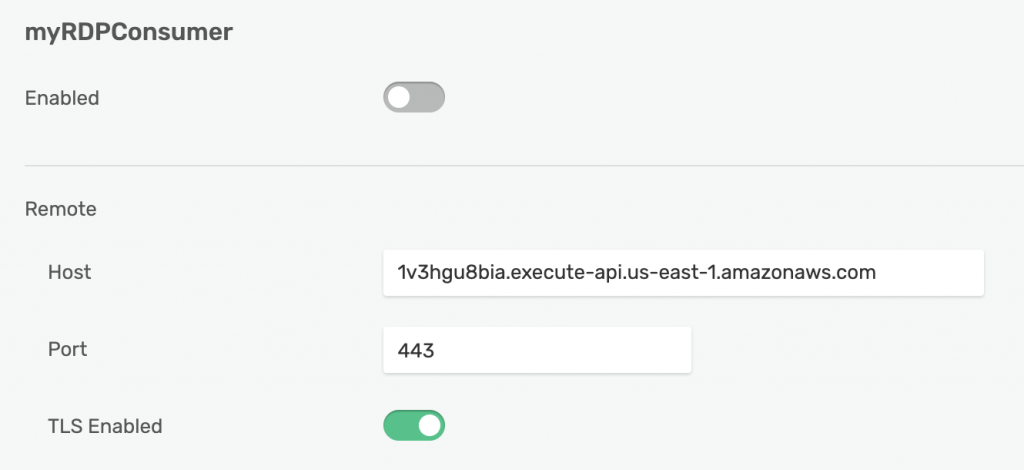
Click on your RDP and navigate to REST Consumers. Click on + REST Consumer and give it a name. We decided earlier (when creating our queue) that your REST consumer will be called myRDPConsumer. Click Create.
On the next screen, you will need to provide the host url for your AWS API Gateway endpoint. This URL is just the base URL and should not include /PROD/purchase. In my case, that URL is 1v3hgu8bia.execute-api.us-east-1.amazonaws.com.
The port number should be set to 443. Toggle the button next to TLS Enabled to enable TLS.
Click on Apply button to create your consumer.
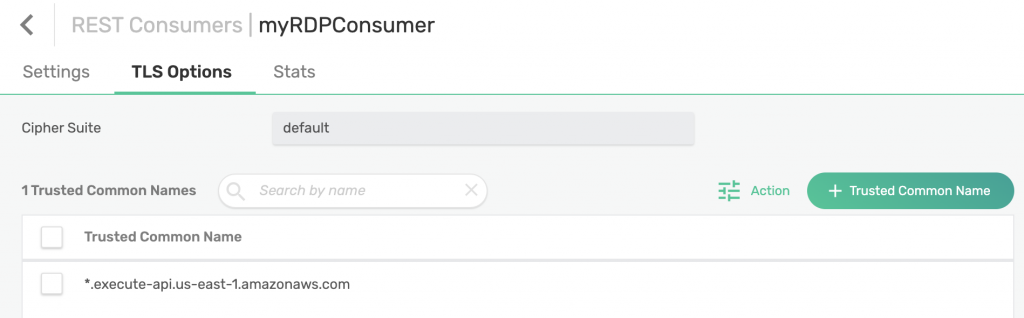
Click on your newly created RDP consumer and navigate to TLS Options on top. Click on + Trusted Common Name and enter *.execute-api.us-east-1.amazonaws.com.
Go back to your RDP and enable it by clicking on the toggle button next to Enabled. You will notice that the Operational State has now changed to Up.

You now need to add your queue binding to your RDP. Click on Queue Bindings and then on + Queue Bindings. Select the queue you created earlier, myFirstRDP.myRDPConsumer, from the dropdown menu. Click Create.
On the following page, enter a Post Request Target. In this case, that would be /PROD/purchase. Make sure you include the “/” in front.
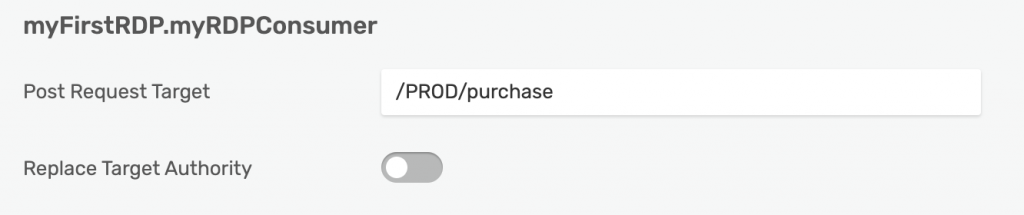
Click Apply. Operation State of your queue binding should be Up.

Adding Amazon’s CA Cert
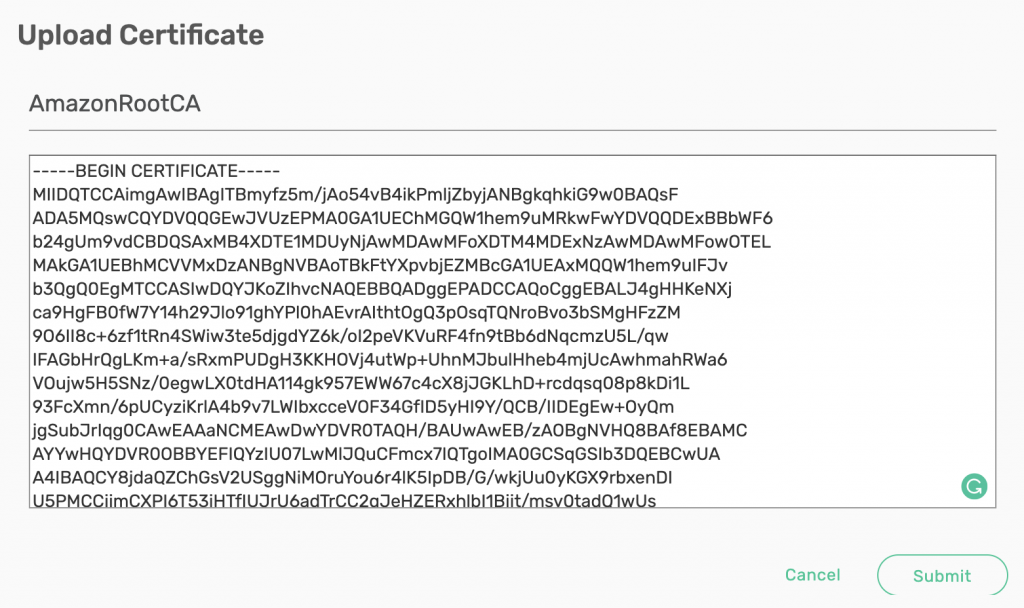
To make sure your TLS settings work, you need to upload Amazon’s CA Cert to your broker. The certificate can be downloaded from here.
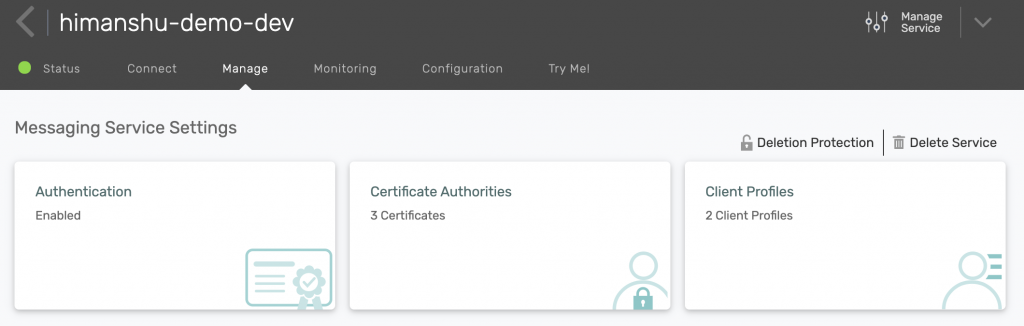
To upload the certificate, go back to your service on PubSub+ Event Broker: Cloud and click on the Certificate Authorities block.
Click on + Add New, give it a name, and paste the content in the popup box. Click on Submit.
That should be it! We can now test to see if our setup works.
Demo Time
A quick recap: With the goal of sending a message to PubSub+ Event Broker and have a Lambda triggered by it, you created an RDP which has a REST consumer that points to our AWS API Gateway endpoint and a queue binding which is subscribed to a topic. You AWS API Gateway endpoint is configured to trigger your Lambda function when a POST request is issued.
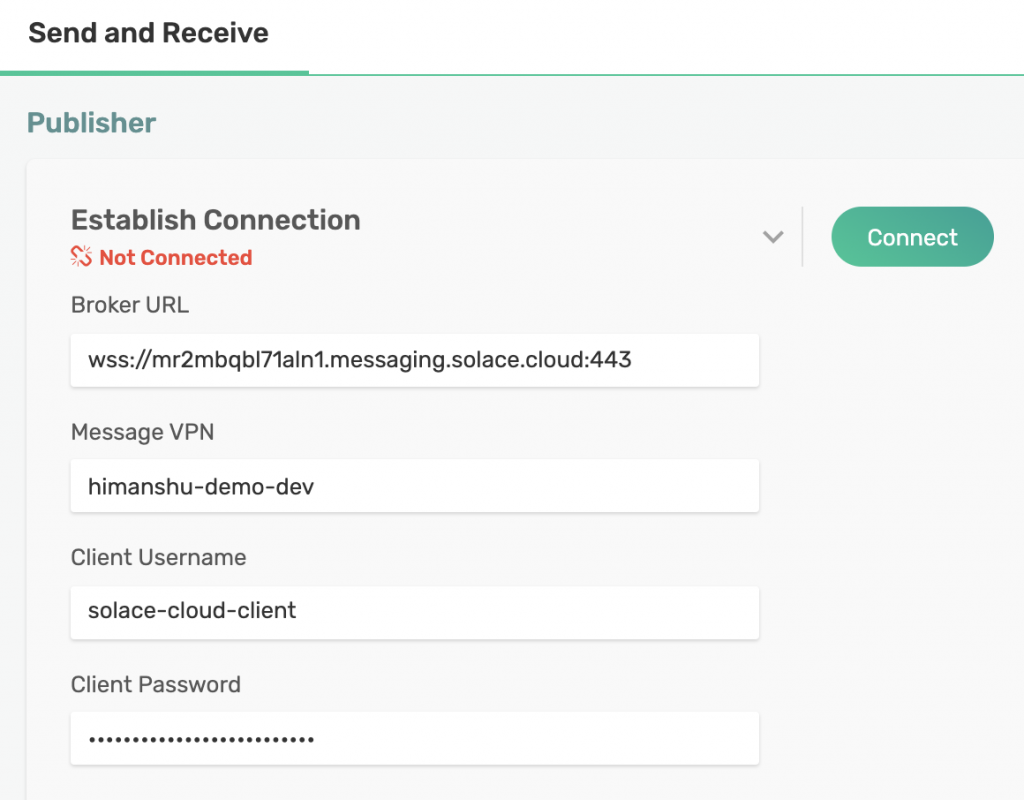
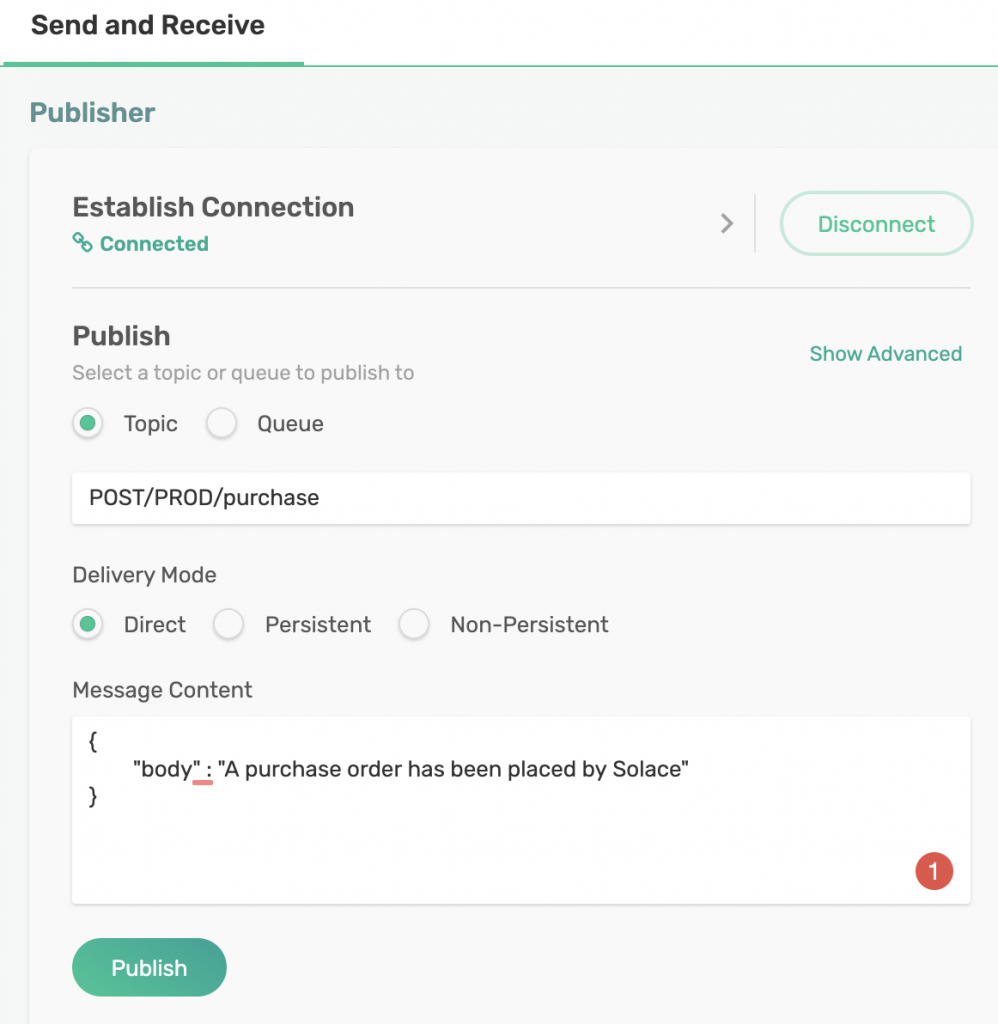
So, let’s send a message to our PubSub+ Event Broker and see what happens. You can easily do that by using the Try Me! app on PubSub+ Event Broker: Cloud. Click on Try Me! on the left navigation bar and enter your connection information on the Publisher app.
You can get your credentials by going back to your service and navigating to the Connect tab on the top and then selecting REST.

Click on Connect once you have entered your connection details in the Publisher app.
You can now set your Topic to POST/PROD/purchase and your Message Content to a JSON message:
<br><br>{<br>"body" : "A purchase order has been placed by Solace"<br>}<br><br>
Click on Publish to send the message and see if your Lambda was invoked. To do so, go to your Lambda and click on Monitoring on top and then, click on View logs in CloudWatch.

That will take you to CloudWatch console where you will see a Log Stream. Click on it to see the contents:
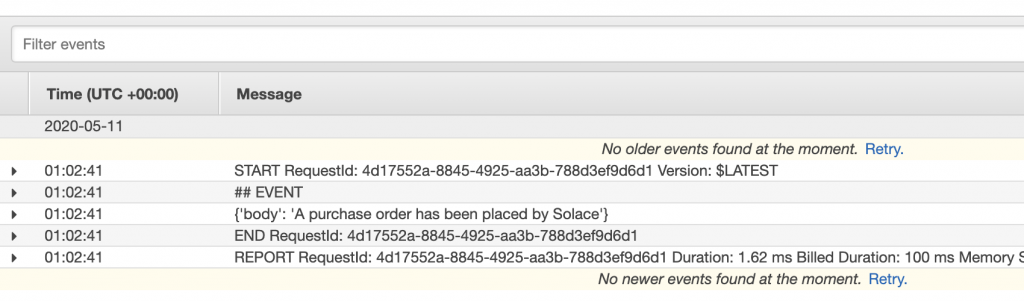
If you see something like this, that means your Lambda was successfully invoked, and it consumed the message sent from your Try Me! app. Pretty cool, right? And all with configuration, not coding!
Conclusion
Hope you enjoyed this post and learned something interesting!
Explore other posts from category: For Developers


Subscribe to Our Blog
Get the latest trends, solutions, and insights into the event-driven future every week.