In this post, I will demonstrate how you can easily and natively integrate logging into your event-driven system using an up-and-coming Elastic Search alternative called ZincSearch and Solace PubSub+ Event Broker. Before I begin, I’ll introduce the two pieces of that puzzle.
ZincSearch
ZincSearch is a search engine that can perform full text search on documents. It’s open source, written in Golang, and uses an open source indexing library for Go called Bluge. It’s viewed as a lightweight replacement for Elasticsearch which is the dominant player in the document search category. It also aims to be a drop-in replacement for Elasticsearch by having Elasticsearch-compatible APIs for applications that want to migrate from Elasticsearch to Zinc. You can find a good write up of a lot of the motivations for building out ZincSearch from the author’s blog.
ZincSearch is currently the fast growing project on GitHub – showing that there is a significant demand/appetite for asimple, lightweight and easy to use alternative to Elasticsearch.
Solace PubSub+ Event Broker
Solace PubSub+ Event Broker is an event broker that comes in a variety of form factors: hardware, software and SaaS. A core differentiating factor of PubSub+ Event Broker is multi-protocol support – including REST – as shown below.

This means you could do a RESTful operation directly into the event broker and consume the output as an event stream, or push an event into the event broker and have it do a webhook out to a RESTful endpoint.
Installing ZincSearch
The first step is to install ZincSearch. I’ll use Docker for this post but feel free to try any of the other installation methods (make sure to modify /full/path/of/data to match where you created the data directory).
mkdir data
docker run -v /full/path/of/data:/data -e ZINC_DATA_PATH="/data" -p 4080:4080 \ -e ZINC_FIRST_ADMIN_USER=admin -e ZINC_FIRST_ADMIN_PASSWORD=Complexpass#123 \ --name zinc public.ecr.aws/zinclabs/zinc:latest
Once you’ve installed ZincSearch, you should be able to access the web interface on http://localhost:4080. I’m also going to assume that you are going to be running this locally for the purpose of this exercise (if not replace localhost with whatever hostname you are running on).
Installing Solace PubSub+ Event Broker
There are multiple ways to install the Solace broker. You could sign up for a free trial of Solace PubSub+ Cloud which is a click button deployment in the cloud of your choosing. But for the sake of simplicity, I suggest you use the Docker Install option once again.
docker run -d -p 8080:8080 -p 55554:55555 -p 8008:8008 -p 1883:1883 -p 8000:8000 -p 5672:5672 -p 9000:9000 -p 2222:2222 --shm-size=2g --env username_admin_globalaccesslevel=admin --env username_admin_password=admin --name=solace solace/solace-pubsub-standard
(Note if you see any port conflicts with existing applications running, change the port mappings above.)
You should be able to access the web interface for the broker by hitting http://localhost:8080
Setting up an Event Driven Logging Architecture
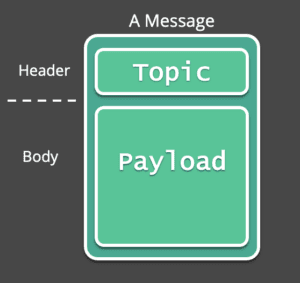
With PubSub+ Event Broker, you publish events using dynamic topics. Topics are simply metadata on an event and do not consume resources on a broker. A representation of a message in Solace is shown below:
Publishing and Subscribing to Messages with Solace
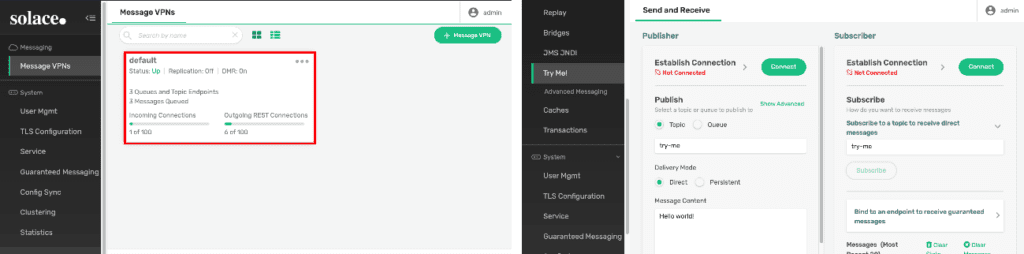
You can use a variety of APIs to interact with the Solace broker, but I suggest you use the nifty built-in ‘Try Me’ tab to publish and subscribe to Solace messages. To gain access to this try me tab, log in to the broker’s Web Interface using http://localhost:8080.
Assuming you used the default credentials, log in to the broker ui using admin/admin. Once inside, navigate to the default VPN and click on the ‘Try Me Tab’ as shown below.
Once you are in the ‘Try Me’ tab, click on Connect on the Publisher and Subscriber which will connect to the broker using a websocket connection for testing publishing and subscribing to messages.
Now it’s time to publish your first event onto Solace. A key aspect of Solace implementations is a topic taxonomy. Say you are building out microservices for a retail conglomerate called ACME Stores. Your first order of business is to build out a “new order” microservice. A suitable topic taxonomy might look something like this:
[region]/[corporation]/[status]/[ordernumber]
Solace can transmit any payload, so assume a payload with the following schema:
{

"region": string,
"orderNumber": string,
"status": string,
"item": string,
"quantity": number,

"price": number

}
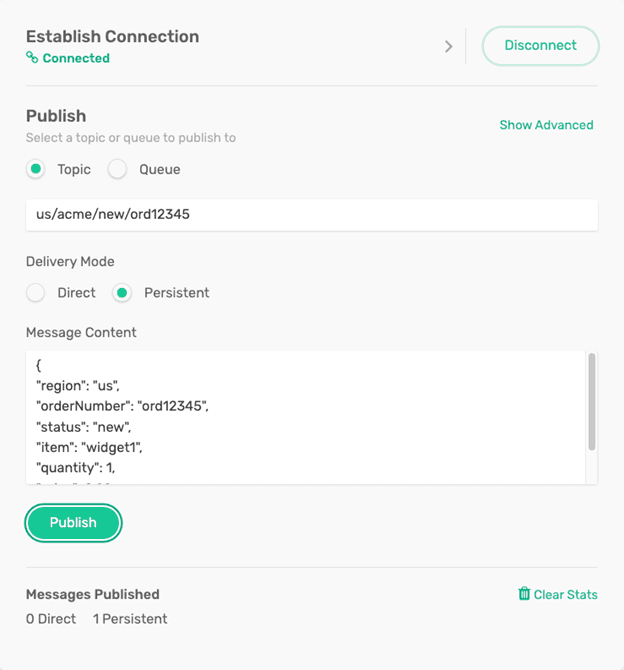
With the topic taxonomy and schema decided upon, you can publish an event or two using the “try me” tab with the following topic and payload:
Topic: us/acme/new/ord12345
Payload:
{
"region": "us",
"orderNumber": "ord12345",
"status": "new",
"item": "widget1",
"quantity": 1,
"price": 0.99
}
Your try me screen should be populated like the image below and then click ‘Publish’ and you should see the message publisher counter increment.
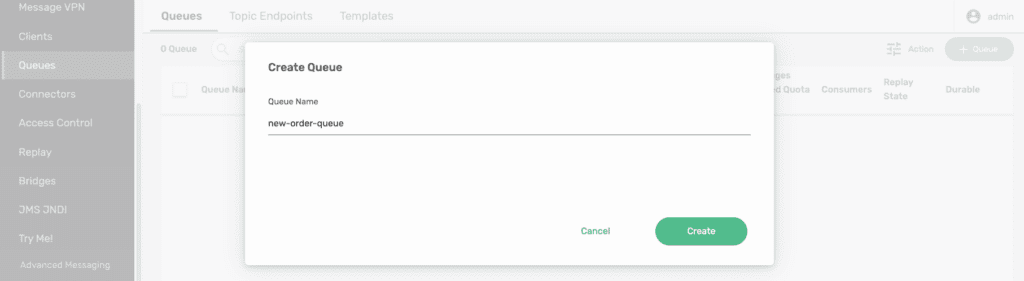
Now that you have published an event into PubSub+, you need to consume it. The typical pattern on how to consume events from Solace is via a construct called queues. So, let’s create a ‘new order queue’ and attach a new order topic subscription to it.
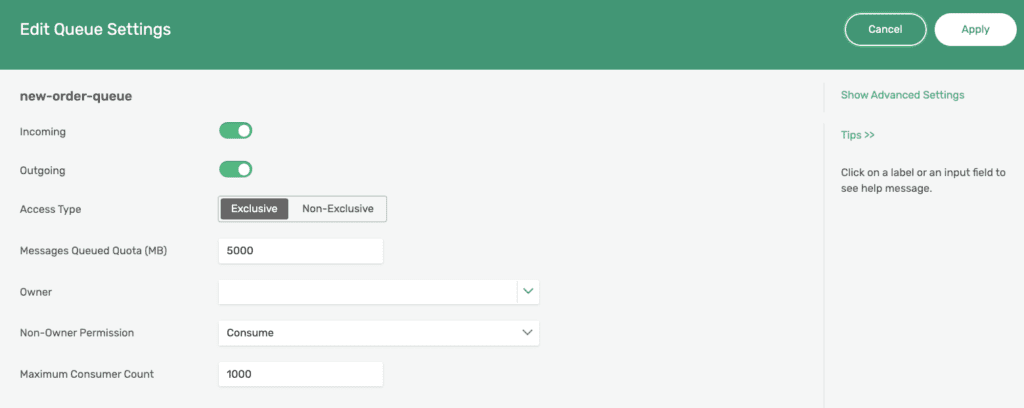
Navigate to the queues tab and click on the ‘+ Queue’ button and follow the sequence of steps as below and click apply:
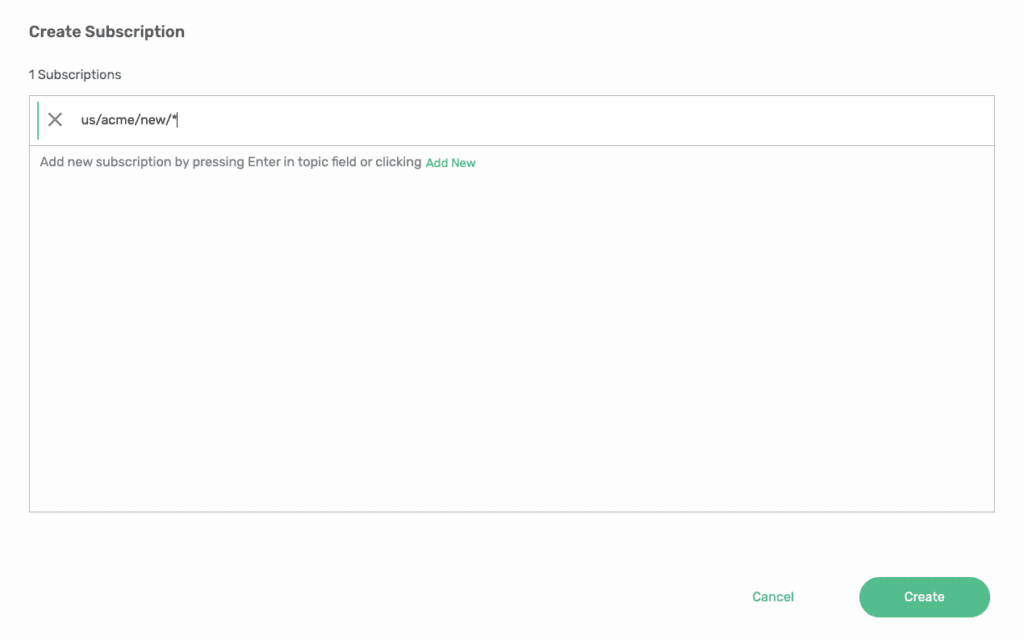
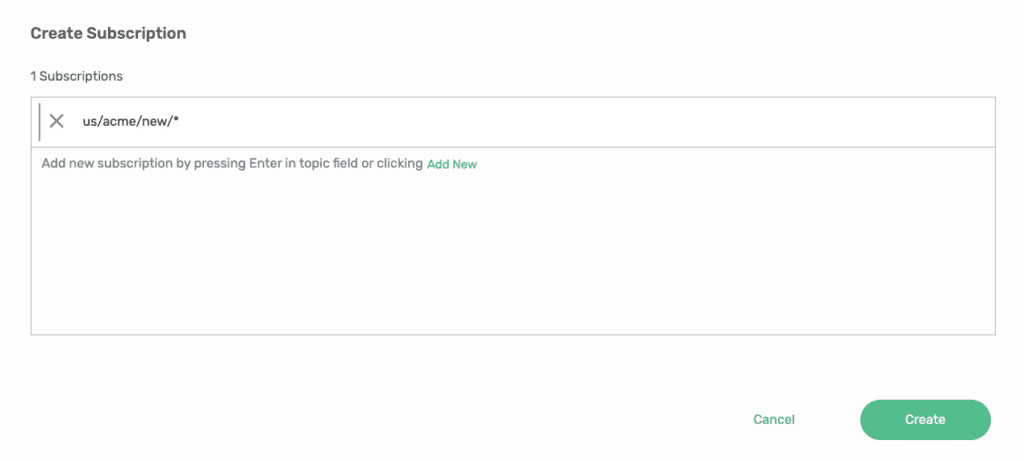
With a queue created, you need to attach a topic subscription to it in order to capture new orders. Since specifying the universe of order numbers is not feasible, we’ll use the concept of topic wildcards that will pattern match all events against a string to the queue. As such, the topic pattern that we want to use to match all orders will be: us/acme/new/order/*
To attach this subscription to the queue, go back to the queues tab, click on ‘New Order Queue’ and then the subscriptions tab, and click ‘+ Subscription’, enter the topic subscription, and press the create button:


You now have a queue that is subscribing to all of the US-based new order events that your New Order Microservice can connect to. Test the end-to-end flow by navigating back to the Try Me tab.
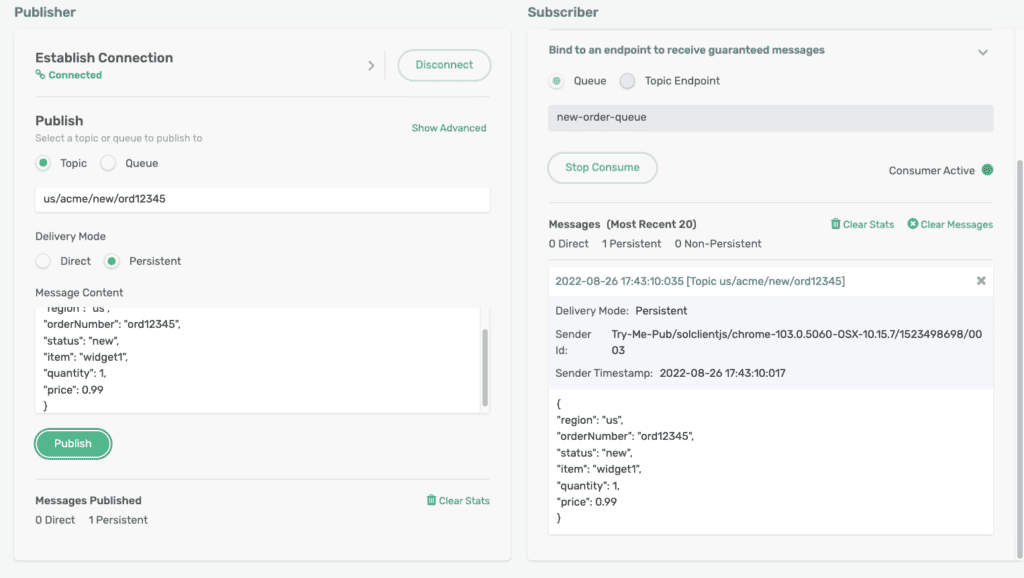
On the right hand side of the Try Me screen, click on ‘Bind to an endpoint to receive guaranteed messages’ and put in ‘new-order-queue’, and click on Start Consume. Once again publish the message on the us/acme/new/ord12345 topic and you will see the consumer consume a message on the right hand side of the screen:
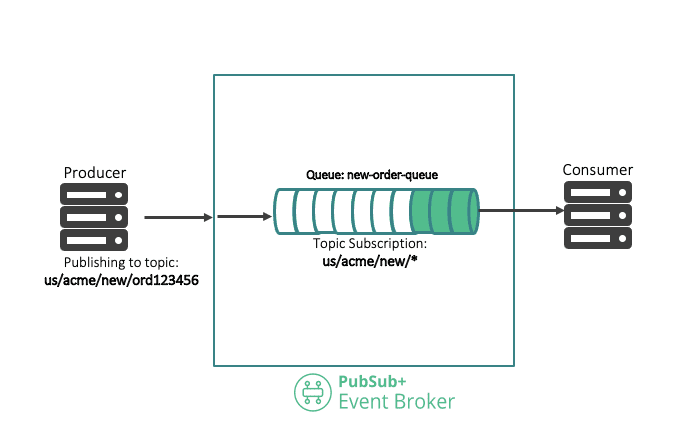
Congratulations, you’ve set up a basic event driven system which looks like this!
Logging New Orders to ZincSearch
Now that you have a basic publish/subscribe system in place, the next requirement is to send all new orders to ZincSearch for searching and indexing. There are many ways you could do this –perhaps have your consumer above also log the event to ZincSearch or you could write a separate microservice to do so.
However, one of the differentiating factors of PubSub+ compared to other event brokers in the market is first-class support for REST,which means you could trigger a webhook out from the Solace broker when an event hits a queue! This way you won’t have to change your publisher and/or subscriber that you implemented above to do anything different. ZincSearch just becomes another consumer transparent to the publisher and existing subscribers. The end-to-end architecture is illustrated below.
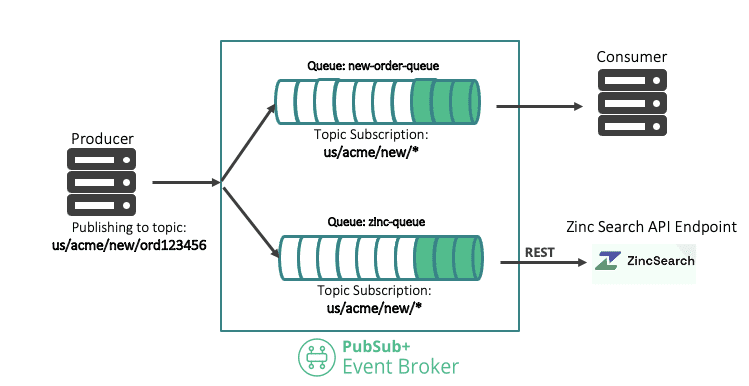
As shown here, the publisher publishes to a topic us/acme/new/ord123456 and it gets attracted to the new-order-queue and also the zinc-queue. The key thing here is that the publisher only publishes it once, the Solace broker distributes it to the two new queues. In addition, the broker will have the responsibility to push the event out into ZincSearch’s RESTful endpoint for indexing.
Connecting Solace PubSub+ and ZincSearch
Now that you understand the architecture, here’s how to configurethe connectivity to ZincSearch.
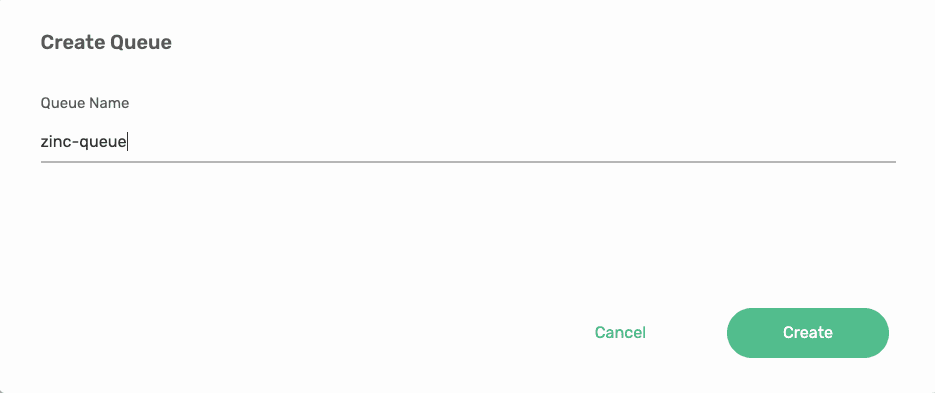
The first step is to create the zinc-queue by navigating to the Queues tab and, clicking the +Queue button with the following steps:

Now you’ve set up that queue, set up a connector to the ZincSearch endpoint. To do this navigate to the ‘Clients’ tab and then to the ‘REST’ tab as shown below:

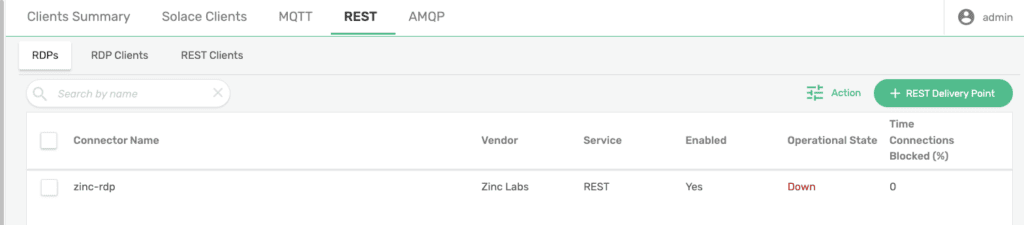
The next step is to create a REST Delivery Point by Clicking the ‘+Rest Delivery Point’ button and creating one called ‘zinc-rdp’ as shown below.

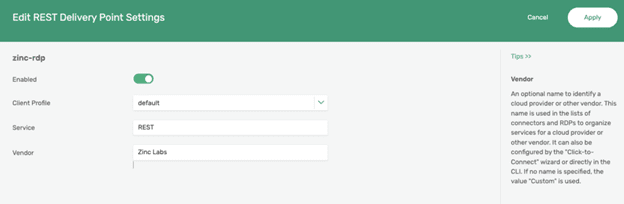
On the next screen, toggle the Enabled button and change the vendor to Zinc Labs as shown below and click Apply.
Once created, you will be taken back to the REST screen, and you will see zinc-rdp as an entry in the table. as shown below:
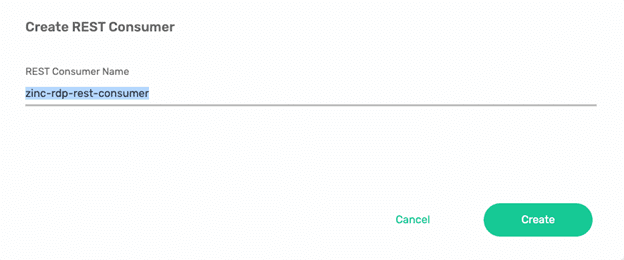
Click into the zinc-rdp entry and the REST Consumers and then click the +REST Consumer button naming your REST Consumer as ‘zinc-rdp-rest-consumer’ as shown below:

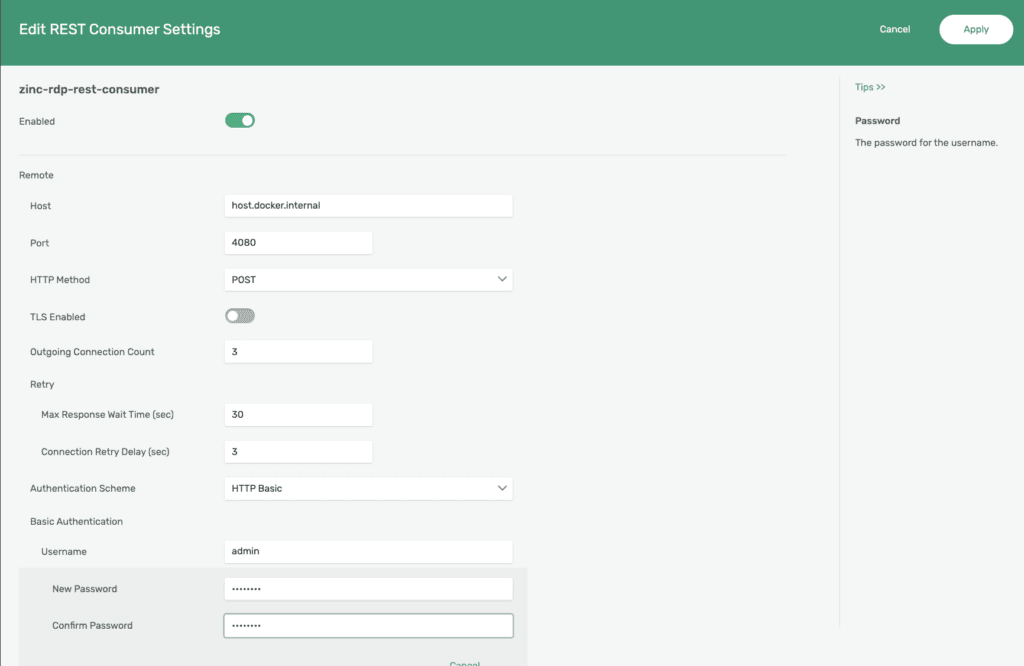
Once you click the create button, you will be greeted with a screen to configure the REST consumer. Assuming you deployed ZincSearch on the same host as the Solace broker, you will need to change the following settings (and click the Enabled toggle as well):
Host: host.docker.internal
Port:4080
Authentication Scheme: Basic Authentication
Username: admin
Password: Complexpass#123
Your screen should look something like this:
If you did everything correctly, you would have been greeted with a screen with the REST Consumer showing the status of Up as below:

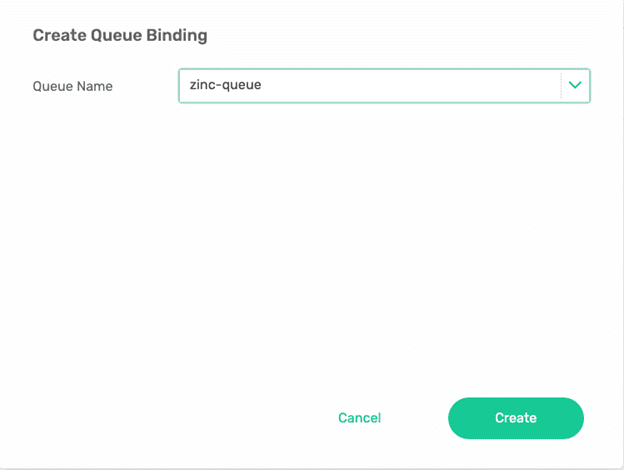
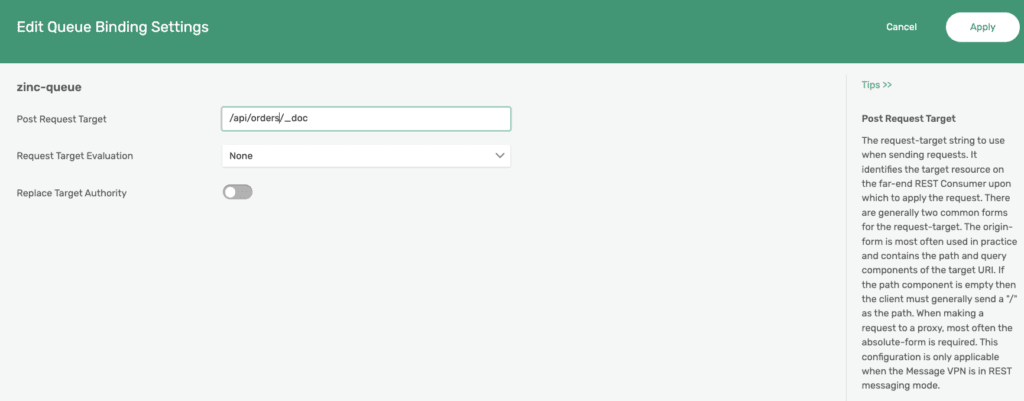
The very last thing to do is to configure a Queue Binding, navigate to the Queue Bindings tab and click ‘+Queue Binding’ to create a binding to the previously create ‘zinc-queue’ as shown below:

In the next screen, you will want to set the target to ZincSearch’s API to upload a doc to the orders index:
You do this by inputting /api/orders/_doc as the Post request Target as shown below:
Once again, if everything was done correctly you will be greeted with a queue binding screen and an operational status of ‘Up’ as shown below:

Testing it all out
If you’ve made it this far that means you’ve wired up everything successfully and the last thing to do is to test the end-to-end flow out. Go back to the try me tab and publish a new order once again with the following topic/payload:
Topic: us/acme/new/ord12345
Payload:
{
"region": "us",
"orde[rNumber": "ord12345",
"status": "new",
"item": "widget1",
"quantity": 1,
"price": 0.99
}

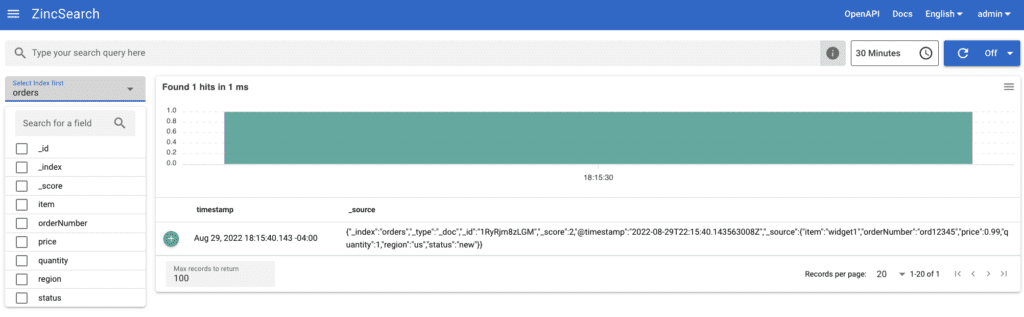
If everything worked, you should see an index “Order” created with the Order 12345 in your ZincSearch UI (which can be accessed by hitting http://localhost:4080)
Conclusion
In this post, I demonstrated how easy it was to extend your event driven architecture over Solace PubSub+ with ZincSearch. By implementing this natively within the event broker, you alleviate the need for your existing microservice or an entirely new microservice being deployed to handle logging to ZincSearch. You can further extend this pattern to do more sophisticated logging into ZincSearch by updating existing indexes or to log multiple stages of a workflow with no interruption to your existing microservices as all the steps I described above are in-service activities.
Explore other posts from category: For Developers


Subscribe to Our Blog
Get the latest trends, solutions, and insights into the event-driven future every week.