Donald Le is a quality engineer in software with 9 years of experience.
Developers and test engineers are familiar with API testing and e2e GUI testing. Although these types of testing simulate how users interact with the application, they introduce dependencies that can make the tests brittle and hard to maintain.
The wide adoption of microservices means developers need to work with many services to build an application, but how can they ensure the services work well together without writing a complete integration and e2e test? This is when contract testing comes into the picture.
With contract testing, you can ensure the integration of services works as expected, without real integration. The provider service and the consumer service can independently check the test, removing the need for ongoing meetings between teams, and allowing the test to run smoothly. In this article, I will show you how to implement contract testing between a blog management service and a notification service which use Solace messaging to allow event-driven development.
Contract Testing and Why it’s Important
In software development, when two services need to integrate to each other, the developers of these two services need to discuss together to design the APIs input and output, the API path, the API method or the data type of the fields in the json body. Designing the structure of the provider service and the consumer service allows these two teams to work independently and flexibly. After both of these services are completed, both teams will test the integration between these two services to ensure everything works as expected.
But as you may know, change is inevitable in software development. Sometimes the services need to modify the data type in the field in the request body of the API, or add a new field in the API response body due to the need of business logic. How can you ensure these changes won’t violate the agreement between the two services while you’re in that meeting if these changes aren’t mentioned in the meeting? Setting up sync-up meetings over and over again is not ideal and doesn’t make sure everything works as expected, which can lead to situations where you only discover an integration bug at the last minute.
Contract testing was born to address this issue. By setting up contract testing, the consumer service and the provider service can check the integration between them continuously for every time they update the code. This allows these two teams to work independently and avoid surprises on integration day.
In contract testing, the consumer service defines the contract and the provider service will follow it. In the contract, the consumer service shares the expected content type that it wants to get given the certain input. Then the consumer service team will store the contract in a file or publish it to a web URL. The provider service will then retrieve the contract that the consumer service has defined, and execute it on their side. If the contract is violated, the provider service will be alerted and make changes accordingly. If making the changes is difficult, the provider service can discuss with the consumer service about whether the contract can be updated to align with their current approach or not.
Introduction to Pact
Pact is an open-source code-first tool for testing HTTP and message integrations using contract tests, designed to help you implement contract testing for your services. Pact is one of the very first tools for contract testing, and it supports a number of programming languages like Javascript, Python, Java, and Go. You can learn more about how Pact works at docs.pact.io.
About the Sample Application
To help you understand how you can implement contract testing for your services, I’ll walk you through the development of a sample application and implement a contract test for it.
You will build an app that has two services: blogging service and notification service. These services will communicate to each other using Solace PubSub+ Event Broker. If a user creates a new blog, the blogging service will send a message to a Solace topic on the Solace broker. The notification service subscribes to the Solace topic, and if there’s a new message sending to the Solace topic, the notification service will send a message to a Slack channel to notify the customer service team that there’s a new blog created. You can also have other consumers to make use of the Solace message for a new blog in the future if needed. Below is the diagram showing the architecture of the sample app:
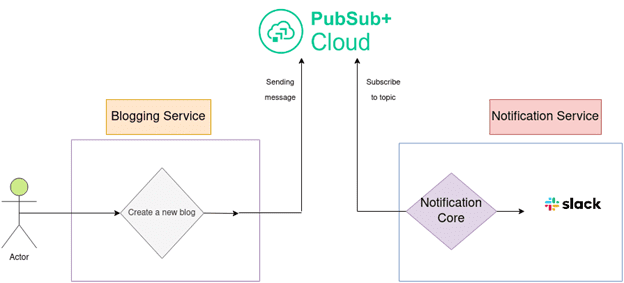
Figure 1: Architecture Diagram of the application
Build the Blogging Service
To build the blogging service, you need to :
- Install Git in your workstation
- Install Node.js version 16 or above in your workstation
- Set up a local MongoDB database in your workstation or using the cloud version Mongo Atlas
- Set up a Solace cluster using Solace PubSub+ Cloud
The full source code for the blogging service, please refer to this GitHub repository.
Clone the Source Code
First, you need to clone the source code to your workstation. Create a new directory to store the code.
mkdir ~/Projects
cd ~/Projects
Clone the code to Projects directory.
git clone https://github.com/cuongld2/solace-blog-service-contract.git
cd solace-blog-service-contract
Run the Blogging Service
To run the blogging service, you need to set an environment variable for MONGO_CONNECT_URL. In case you’re using Mongo Atlas, you can grab the MONGO_CONNECT_URL from Mongo Atlas as in the below image:
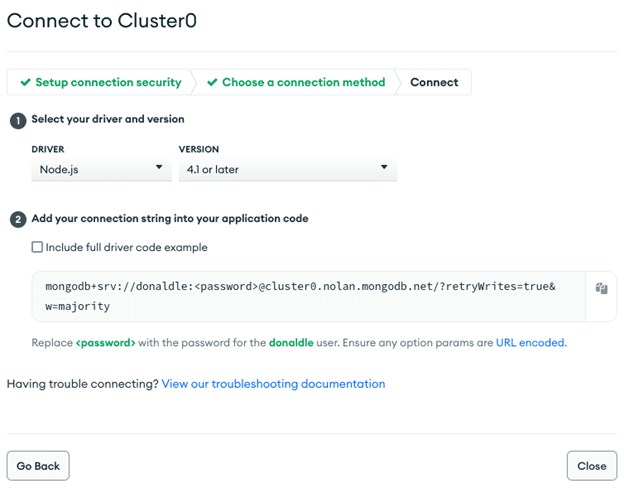
Figure 2: Mongo Atlas credentials
Export MONGO_CONNECT_URL using the command below:
export MONGO_CONNECT_URL="mongodb+srv://your_user_name:your_password@your_cluster/your_database?retryWrites=true&w=majority&useNewUrlParser=true&useUnifiedTopology=true"
You also need to set environment variables for Solace PubSub+ Cloud service. You can grab the connection details for SOLACE_URL, SOLACE_USERNAME, SOLACE_PASS, SOLACE_VPN by going to step 2 in the connection guideline page provided by Solace PubSub+ Cloud page as the one below:

Figure 3: Solace PubSub+ credentials
Export the Solace environment variables using the commands as below:
export SOLACE_URL=your_solace_url
export SOLACE_USERNAME=your_solace_username
export SOLACE_PASS=your_solace_password
export SOLACE_VPN=your_solace_vpn
Details of the code for connecting to Solace cloud and sending messages to a Solace topic you can find in app/utils/solace.js file.
Here you connect to Solace PubSub+ Cloud first, then use that session to publish a message to a Solace topic. The message will contain the title of the blog and the author name by combining the first name and last name of the author, firstName, lastName.
var messageText = `A new blog has been published with blog title is "${blog.title}" and author name is "${user.firstName} ${user.lastName}".`;
After that, you close the connection with the Solace broker.
You will send a new message to a Solace topic every time a new blog is created. To do that, you call the TopicPublisher function from app/handler/post.js as below:
// app/handler/post.js
.then((blog) => {
                blog.save();
                // notiNewBlog()
                UserModel.findById(blog.authorId, function (err, user) {
                    if (user === null) {
                    } else {
                        const publisher = TopicPublisher(solace,`service/blog/${blog.authorId}/${blog._id}/new`,blog,user)
                        publisher.run(process.argv);

                    }
                });
                return blog;
            })
Here you will send the message to the topic named service/blog/${blog.authorId}/${blog._id}/new. In the future, you can also get updates from a specific blog author or have other events from the blog service such as an update that would be published on service/blog/[authorid]/[blogid]/update or remove an outdated blog with an event on service/blog/[authorid]/[blogid]/delete or service/blog/[authorid]/[blogid]/archive.
To run the blogging service, you also need to install the dependencies of the project by executing the following command:
npm install
Then to bring up the service, run the below command:
node index.js
Now, your blogging service should be up and running.
Interact with the Blogging Service
You can create a new user for the blogging service using the following curl command. Replace the firstName, lastName, email, and password with your own value.
curl --location 'localhost:3000/v1/users' \
--header 'Authorization: supersecretbulletproofkey' \
--header 'Content-Type: application/json' \
--data-raw '    {
      "firstName": "thao",
      "lastName": "antonito",
      "email": "audr3eyhep4burn@gmail.com",
      "password":"audreyhepburn"
    }'
After running this command, a new user will be created with the API response looks like:
{
    "success": true,
    "message": "",
    "data": {
        "firstName": "thao",
        "lastName": "antonito",
        "isActive": true,
        "email": "audr3eyhep4burn@gmail.com",
        "_id": "63f03ed65cd50dd2c9a0677f",
        "dateCreated": "2023-02-18T02:58:30.032Z"
    },
    "links": []
}
Grab the _id value, as the user id and create a new blog for that user id by executing the below command:
curl --location 'localhost:3000/v1/posts' \
--header 'Content-Type: application/json' \
--data '{
    "title": "A great post",
    "content": "A great post man. Please read it carefully. A great post man. Please read it carefully. A great post man. Please read it carefully. ",
    "authorId": "63f03ed65cd50dd2c9a0677f"
}
After executing this command, a new blog post should be created. You can check that newly created blog post from MongoDb.

Figure 4: Mongo Atlas data
You have now successfully implemented the blogging service. Let’s move on to implement the notification service.
Build the Notification Service
To build the notification service, you need to create a Slack application and a bot token. By default, your bot has the permission scope to send messages to a public channel. Details of how to create a Slack app and a bot token, please refer to this guide.
After creating the Slack app and the bot token, you need to grab the bot token from the Bot User OAuth Token part in the OAuth & Permissions of your Slack app. You also need to get the channel ID of your public Slack channel.
Clone the Notification Service Code
The full code for the notification service you can find from this GitHub repository. Open a new terminal, go to the Projects directory then clone the code by running the following command:
cd ~/Projects
git clone https://github.com/cuongld2/solace-noti-consumer-contract.git
cd solace-noti-consumer-contract
Run the Notification Service
Install the needed dependencies for the notification service by running the following command:
npm install
Export the environment variables for SLACK_TOKEN, SLACK_CHANNEL_ID by running the below command:
export SLACK_TOKEN=your_slack_token
export SLACK_CHANNEL_ID=your_slack_channel_id
You also need to export the environment variables for your Solace PubSub+ Cloud credentials, similar to what you did with the blogging service.
export SOLACE_URL=your_solace_url
export SOLACE_USERNAME=your_solace_username
export SOLACE_VPN=your_solace_vpn
export SOLACE_PASS=your_solace_pass
Details of the implementation for connecting to the Solace PubSub+ cloud service, subscribing to a Solace topic and forwarding the received Solace message to a Slack channel can be found in index.js file.
Notice that since you want to be alerted for every new blog post by every author, the subscribed topic has format as service/blog/*/*/new.
var subscriber = new TopicSubscriber(solace, 'service/blog/*/*/new');
The code implementation for sending message to Slack channel is located in the subscribed listener code as below:
subscriber.session.on(solace.SessionEventCode.MESSAGE, async function (message) {
            subscriber.log('Received message: "' + message.getBinaryAttachment() + '", details:\n' +
                message.dump());
                const token = process.env.SLACK_TOKEN;
                const web = new WebClient(token);

                // This argument can be a channel ID, a DM ID, a MPDM ID, or a group ID
                const conversationId = process.env.SLACK_CHANNEL_ID;

                  // See: https://api.slack.com/methods/chat.postMessage
                  await web.chat.postMessage({ channel: conversationId, text: message.getBinaryAttachment() });
        });
To run the notification service, run the following command:
node index.js
Your notification service is now up and running.
Interact with the Notification Service
Let’s try to create a new blog post using the blogging service by running the following command. Replace the authorID with your own value:
curl --location 'localhost:3000/v1/posts' \
--header 'Content-Type: application/json' \
--data '{
    "title": "A great post",
    "content": "A great post man. Please read it carefully. A great post man. Please read it carefully. A great post man. Please read it carefully. ",
    "authorId": "63f03ed65cd50dd2c9a0677f"
}'
After a new blog is created, you should see a new message in your Slack channel, mentioning about a new blog that has been created with its name and the author id of that blog.

Figure 5: Message received in Slack
You have now successfully implemented the notification service. Let’s move on to the next part to implement the contract test for these two services.
Implement Contract Test
To implement the contract test for blogging service and notification service, you need to create a new account in Pactflow so that you can have your own Pact broker to store the contract. Pact offers a free user plan with up to five contracts which is more than enough for demonstration purposes.
After creating your account in Pactflow, grab the Pactflow url and your read/write token from the Pactflow settings page.
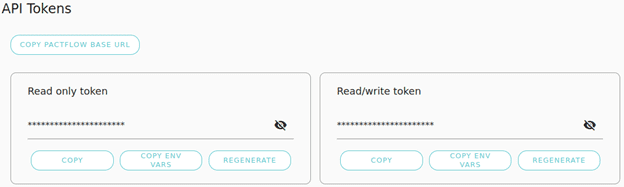
Figure 6: Pactflow settings page
Let’s move on to create the contract from the consumer side which is the notification service.
Create the Consumer Contract
Inside the notification service code, you have a [`noti.pact.spec.js` file](https://github.com/cuongld2/solace-noti-consumer-contract/blob/main/src/noti.pact.spec.js) which stores the code for creating the contract.
Here you define the expected message retrieving from the topic service/blog/authorId/blogId/new. The message should have the name and authorId fields.
messagePact
            .given("successfully integrate with Solace broker")
            .expectsToReceive("a noti for a new blog post is created")
            .withContent({
              name: like("How to implement a blog management service using Node.js"),
              firstName: like("Donald"),
              lastName: like("Le"),
            })
            .withMetadata({
              topic: "service/blog/authorId/blogId/new",
            })
For details of how to implement contract testing for Solace messaging with Pact, refer to this doc.
To generate the contract file locally, run the following command:
npm run test:pact
[code]

A new pact contract file should be created inside <code>pacts</code> directory with the content as below:
[code]
{
  "consumer": {
    "name": "NotificationService"
  },
…
    "pactSpecification": {
      "version": "3.0.0"
    }
  },
  "provider": {
    "name": "BlogService"
  }
}
To publish this contract to Pactflow, you run the following commands:
export PACT_URL=your_pact_url
export PACT_TOKEN=your_pact_read_write_token
npm run pact:publish
You should see the simliar output as below indicating that your contract file should now be published to the Pactflow.
> solace-contract-testing@1.0.0 pact:publish
> pact-broker publish ./pacts --consumer-app-version=0.0.1 --auto-detect-version-properties --broker-base-url=$PACT_URL --broker-token $PACT_TOKEN
Created NotificationService version 0.0.1 with branch main
Pact successfully published for NotificationService version 0.0.1 and provider BlogService.
  View the published pact at https://vindr.pactflow.io/pacts/provider/BlogService/consumer/NotificationService/version/0.0.1
  Events detected: contract_published, contract_content_changed (first time untagged pact published)
  Next steps:
    * Add Pact verification tests to the BlogService build. See https://docs.pact.io/go/provider_verification
    * Configure separate BlogService pact verification build and webhook to trigger it when the pact content changes. See https://docs.pact.io/go/webhook
Implement the Provider Test
Inside the blogging service code directory, you can check for the contract test from provider side in tests/provider.pact.spec.js file.
In this code, you retrieve the contract from Pactflow and apply that contract for the provider side. You verify whether the createBlog output satisfies the consumer contract.
  function createBlog() {
    return new Promise((resolve, reject) => {
      resolve({
        firstName: "Danilo",
        lastName:"Enketia",
        name: "A great blog",
      });
    });
  }
Here you mock the return response of the API for creating a blog to contain firstName, lastName, and name fields with some random example values.
To run the test from provider side, you run the following command:
export PACT_URL=your_pact_url
export PACT_TOKEn=your_pact_token
npm run test:pact
You should see the successful output like below:
Test Suites: 1 passed, 1 total
Tests:       1 passed, 1 total
Snapshots:   0 total
Time:        6.186 s
If you go to the Pactflow page, you should see the verification result indicating that the provider test is now successful and you can go ahead to deploy your blogging service code to integrate with your notification service.
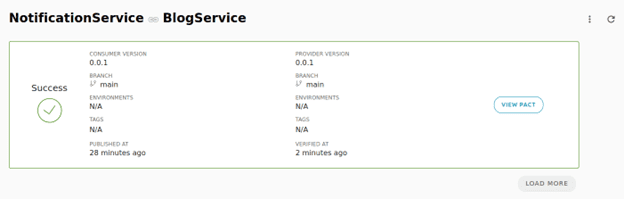
Figure 7: Successful verification for contract test
Conclusion
I hope I have helped you understand what contract testing is, and why you should employ it as part of developing event-driven applications. If you took the time to implement the sample contract test I walked you through, I hope you feel comfortable enough with Pact that you can implement your own contract test for your next software project
Happy developing!
About the Author

Explore other posts from categories: For Developers | Solace Scholars


Subscribe to Our Blog
Get the latest trends, solutions, and insights into the event-driven future every week.