Note: In September 2019, Pivotal changed the name of Pivotal Cloud Foundry (PCF) to Pivotal Platform.
The Solace Message Router Appliance is a high performance hardware-based message broker that supports higher throughput with lower, more predictable latency than any other messaging technology. For use cases where applications or microservices running in Pivotal Cloud Foundry (PCF) require exceptional performance and/or “five nines” reliability the appliance can be a perfect fit. With this post I’ll explain how the integration works, and provide step-by-step instructions to make it happen.
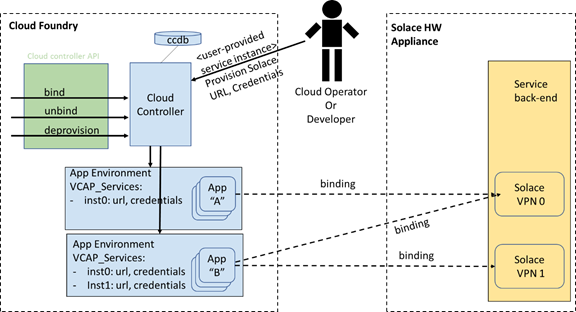
Architecture and Background:
Since the Solace appliances run outside of the PCF ecosystem they don’t appear as part of the PCF marketplace, but cloud operators or developers can create user-provided service instances that enable applications to use services not natively available in the marketplace.
The user-provided service instances will deliver service credentials to the applications at runtime, which mimics the functionality provided by our Solace Messaging for PCF Tile. The diagram below illustrates how this integration enables messaging between an application running in PCF and a hardware appliance located outside PCF.
Why combine Solace appliances with PCF?
- Leverage existing resources. If you already own Solace appliances, it’s a great way to extend that investment;
- Performance. If you need serious latency or throughput, you can take advantage of (and differentiate yourself with) the power only found in hardware appliances; and,
- High availability. If availability and stability is of the utmost concern and/or you require 99.999% uptime (exceeding nearly all IaaS providers) the Solace appliance is an excellent choice.
Any potential drawbacks?
- It’s not as automated. Changes to attributes related to Solace appliances (network, username, password, port, VPN Names, etc.) must be made manually to each user-provided service instance created. Such changes are automated by our Solace Messaging Service Broker which is available as a Tile on Pivnet, but it exclusively manages the software version of our product.
Instructions:
The basis of configuring user-provided service instances has been documented by Pivotal and can be found here.
From a Solace perspective, it is important that you set the list of environment variables specific to the Solace messaging service. This will enable components such as the Solace Spring Cloud Connector to properly look up environment values regardless of whether it was provided via a user provided service or the Solace Service Broker (Tile form).
This list has been provided here.
The last step is to set up the user-provided service in PCF. The below examples contain all of the protocol options Solace makes available:
Windows:
cf create-user-provided-service test -p “{ “amqpTlsUris”: [ “amqps://:” ], “amqpUris”: [ “amqp://:” ], “jmsJndiTlsUris”: [ “smfs://:” ], “jmsJndiUris”: [ “smf://:” ], “mqttTlsUris”: [ “ssl://:” ], “mqttUris”: [ “tcp://:” ], “mqttWsUris”: [ “ws://:” ], “mqttWssUris”: [ “wss://:” ], “restTlsUris”: [ “https://:” ], “restUris”: [ “http://:” ], “smfHosts”: [ “tcp://:>” ], “smfTlsHosts”: [ “tcps://:>” ], “smZipHosts”: [ “tcp://:>” ], “webMessagingTlsUris”: [ “https://:” ], “webMessagingUris”: [ “http://:” ], “managementHostnames”: [ “” ], “managementUsername”: “”, “managementPassword”: “”, “msgVpnName”: “”, “clientUsername”: “test-username”, “clientPassword”: “”, “activeManagementHostname”: “”}”
Linux:
cf create-user-provided-service test -p “{ “amqpTlsUris”: [ “amqps://:” ], “amqpUris”: [ “amqp://:” ], “jmsJndiTlsUris”: [ “smfs://:” ], “jmsJndiUris”: [ “smf://:” ], “mqttTlsUris”: [ “ssl://:” ], “mqttUris”: [ “tcp://:” ], “mqttWsUris”: [ “ws://:” ], “mqttWssUris”: [ “wss://:” ], “restTlsUris”: [ “https://:” ], “restUris”: [ “http://:” ], “smfHosts”: [ “tcp://:>” ], “smfTlsHosts”: [ “tcps://:>” ], “smZipHosts”: [ “tcp://:>” ], “webMessagingTlsUris”: [ “https://:” ], “webMessagingUris”: [ “http://:” ], “managementHostnames”: [ “” ], “managementUsername”: “”, “managementPassword”: “”, “msgVpnName”: “”, “clientUsername”: “test-username”, “clientPassword”: “”, “activeManagementHostname”: “”}”
Once you have completed this step, you’ll be able to bind the service to an application and experience the power of our hardware message router.
Explore other posts from categories: DevOps | For Architects


Subscribe to Our Blog
Get the latest trends, solutions, and insights into the event-driven future every week.